 This ring began out of frustration with a beaded flower bracelet I was trying to make. 'Trying' is the operative word because after several days of work on a piece I decided to give up. If you know me, you know I hate giving up on anything but I had only partial directions and not the right size beads.....sigh! This let down led to the creation of this funky ring. I really love the colors of the fluorite dagger beads and I thought they looked like the spines of a sea urchin. The ring base is sort of odd and I'm not sure where it was purchased. (I'll try to find the source.) It has a cap with holes that fit on as base which is attached to the ring shank. Anyway, since the ring was silver plated I decided to use the new silver filled wire (26 gauge) sold at Ben Franklin Crafts. It was easy-peasy to wire wrap the beads onto the ring cap and then snap it into the base. The success of this project helped to alleviate the pain of having to give up on the bracelet. "Don't focus on what could not be done, but celebrate what you have accomplished." Lynn

Monday, August 29, 2011
Sea Urchin Ring
This ring began out of frustration with a beaded flower bracelet I was trying to make. 'Trying' is the operative word because after several days of work on a piece I decided to give up. If you know me, you know I hate giving up on anything but I had only partial directions and not the right size beads.....sigh! This let down led to the creation of this funky ring. I really love the colors of the fluorite dagger beads and I thought they looked like the spines of a sea urchin. The ring base is sort of odd and I'm not sure where it was purchased. (I'll try to find the source.) It has a cap with holes that fit on as base which is attached to the ring shank. Anyway, since the ring was silver plated I decided to use the new silver filled wire (26 gauge) sold at Ben Franklin Crafts. It was easy-peasy to wire wrap the beads onto the ring cap and then snap it into the base. The success of this project helped to alleviate the pain of having to give up on the bracelet. "Don't focus on what could not be done, but celebrate what you have accomplished." Lynn
Friday, August 26, 2011
Two Wedding Cards
I needed to make two wedding cards so I decided to make them similar to save time and effort. One of the weddings already happened (I'm late again) so I wanted to keep them simple and I didn't want them to be exactly alike. As it happens sometimes, one inked image from an old Stampendous wedding cake stamp had a few imperfections because the stamp is so large. Hence, I opted to camouflage the 'mistake' with an off-centered ribbon and asymmetric card design rather than re-stamping. Actually, I ended up liking the 'flawed' card better. LOL! Which do you prefer?
 The background paper is softly iridescent (from Luxury paper stack pad by DCWV) so it is a bit hard to see in the photo. I really like this paper pad because it is elegant and perfect for wedding cards. To add more texture to the cards I added paper doilies (Little Yellow Bicycle pack), feathers (fluff pulled from the bottom of a large feather), sheer ribbon, and wedding bells buttons (Jesse James/Cousins) with the shanks snipped off. Oh, the stamped image was colored with Copic pens, cut out, and adhered with pop-up glue dots. Thank you for reading and looking at my blog. I hope you found it interesting enough to cause you to return often. Please leave a comment if you can. I read all of them and it delights me to hear from you.
 Remember: A hopeful life is a happy life.
Tuesday, August 23, 2011
Black and White Card
I've never made a black and white card before because I love color. Somehow though it seemed appropriate to keep this graduation card colorless because it is for a school of engineering male graduate. Gears, numbers, and other steam punk stamped images seemed just right too....serious and precise. I am still toying around with the pop-up gift card construction (from Joy of Crafting) and re-configured the size to suit my needs. Of course I'm not giving the graduate a Ben Franklin Crafts gift card but it's what I had available to use for the photo shoot. The blank black portion of the card will be used to write a message in silver or white ink. Anyway, I can finally send out this very belated card. Now I have only two more belated cards to make. LOL! Sometimes I get cards mailed out in a timely fashion......really! I'm glad you stopped by. Leave a comment if you have some time. I do enjoy hearing from you. Your cheery comments make my blogging day a happy one!

 I am still toying around with the pop-up gift card construction (from Joy of Crafting) and re-configured the size to suit my needs. Of course I'm not giving the graduate a Ben Franklin Crafts gift card but it's what I had available to use for the photo shoot. The blank black portion of the card will be used to write a message in silver or white ink. Anyway, I can finally send out this very belated card. Now I have only two more belated cards to make. LOL! Sometimes I get cards mailed out in a timely fashion......really! I'm glad you stopped by. Leave a comment if you have some time. I do enjoy hearing from you. Your cheery comments make my blogging day a happy one!

Saturday, August 20, 2011
Goodies for Halloween and a SMASHing (new?) product
 Greetings Ben Franklin Craft shoppers! This past Friday night (my shopping date night) I spied the Halloween items just coming into the Hilo store. I don't even have little ones at home and no one has ever come Trick o' Treating at our scary-looking house, but I still get excited when I see the spooky craft items on display. Maybe because as a kid I was big on Halloween and even designed my own costumes. I finally stopped going trick o' treating when at 12 years old I was mistaken for an adult taking my child door to door LOL! Some Halloween papers and embellishments from Jolee's, K and Co. and Martha Stewart are being put on display at BFC. You really need to go to the store and check them out. Sadly, some of them have already run out. Here is a sample of some products I chose to add to my Halloween stash. My favorite Halloween purchase is the Martha Stewart glow-in-the-dark glitter. I have some fun ideas of what to do with it.
  While going down the aisles of Ben Franklin Crafts some retro-looking paper crafts caught my eye. Ooooh! They look like office supplies in cool vintage colors and with humorous wording. Ooooh....and a matching album.....gotta get that! The SMASH line is produced by K and Co (who would've guessed?) and is a great departure from their usual bright colored girly products or soft pastel children's line. I think the SMASH products are designed to help crafters capture moments in their lives that are often fleeting thoughts if they aren't jotted down somewhere. I truly love this notebook for journaling/scrapbooking in the stream of conscientiousness style. The vintage, shabby chic-look tabs, tapes, date stamp with funny sayings, pockets, brads, themed paper pads, and stickies are all reasonably priced and totally appropriate for any generation of thought keepers. I plan to use my SMASH journal for collecting all those magazine pages, blogger ideas, etc. that I save and refer to for inspiration. If you are a family with young ones, these products are an excellent way to quickly save together those family recipes, funny kid sayings, photos of goofy relatives, and other memorabilia which otherwise have no place to be stored (and they are too precious to lose!). I'm not sure when these SMASH stuff arrived in Ben Franklin Crafts but there are only a few of each item left so you need to go to the store now and purchase what might be a valuable organizer for your thoughts. Thanks for visiting my blog page today. Sorry if it was a bit long, but I just had to tell you all about my exciting purchases. I hope you enjoyed reading my rambling writing and hope you'll be enticed to stop back again for another peek into my messy craft brain.
Wednesday, August 17, 2011
Healthy Treats
Doesn't this look like a calorie-laden dessert? Well it is just bananas, strawberries, and a Jello sugarless pudding cup. The presentation is what makes it look appetizing. Wouldn't your kids love this for an afternoon snack? Here's another 'dessert' idea. With blueberries in plentiful supply this summer, why not offer your children a pretty bowl filled with berries topped with scoops of Greek yogurt drizzled with agave syrup? It looks like a luscious treat and tastes like one too. Plain yogurt is way better than the kind with fruity stuff in the bottom. Agave syrup is as sweet as maple syrup but doesn't raise your blood sugar level like surgar.
 This final photo is of an island favorite...soybeans! Not only is it a healthy snack, it is easy to prepare. Rather than cooking the beans in salted water (this wastes salt), boil and drain the soybeans once the beans are tender. Sparingly sprinkle on salt (coarse Kosher is good). I think that part of the reason these healthy eats are tempting is because they are presented attractively. (The last two ceramic dishes were created by a company called Natural Element, a company in Boston.) If you take the time to create an eye-pleasing dish you can also offer a treat focused on good health. Be good to yourself.......eat healthy!

 Here's another 'dessert' idea. With blueberries in plentiful supply this summer, why not offer your children a pretty bowl filled with berries topped with scoops of Greek yogurt drizzled with agave syrup? It looks like a luscious treat and tastes like one too. Plain yogurt is way better than the kind with fruity stuff in the bottom. Agave syrup is as sweet as maple syrup but doesn't raise your blood sugar level like surgar.
 This final photo is of an island favorite...soybeans! Not only is it a healthy snack, it is easy to prepare. Rather than cooking the beans in salted water (this wastes salt), boil and drain the soybeans once the beans are tender. Sparingly sprinkle on salt (coarse Kosher is good). I think that part of the reason these healthy eats are tempting is because they are presented attractively. (The last two ceramic dishes were created by a company called Natural Element, a company in Boston.) If you take the time to create an eye-pleasing dish you can also offer a treat focused on good health. Be good to yourself.......eat healthy!
Sunday, August 14, 2011
Got Scraps?....Make chipboard embellies!
How many times have you purchased those packages of chipboard embellishments and wished that there were more in the pack and that they matched your project better? Do you have so many paper scraps that you don't know what to do but you can't bear to throw them out? Here's my solution: Use the new Sizzix jewelry dies to make chipboard embellishments. Start with plain chipboard (cut it to the size of the die) and glue (Aleene's Quick Dry Tacky) on decorative paper (light-weight card stock works best). I glue the paper to the grey side of the chipboard. Once the glue is dry you can begin die cutting the various shapes. Put the side of the chipboard with the decorative paper against the die. Glue some of the pieces together and add some bling. Voila! You have instant embellies made from scrap paper. Now if you need a bunch of them to make multiple favors you can do it at minimal cost.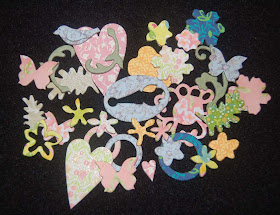 Here are some cards, tags and a topper that I whipped up after making the paper covered chipboard pieces. The tags on the cards are not filled in because I plan to later stamp on a sentiment and use them for a birthday, thank you or whatever card. It's good to make lots of these and keep them on hand for those times when you don't have time.
 I saw Joy (Joy of Crafting OC16 on Sundays at 6:30 PM) demonstrating a pop-up gift card that looked easy. (Instructions and measurements for the card are on her blog site http://joyofcrafting.blogspot.com/) It was easy; so I made a card and used a chipboard embellishment to decorate the belly band. I tacked the belly band together with small bits of Merikan double stick tape so that the recipient can turn it into a bookmark later. I'm not sure why the inside of my card had two borders on the sides. I don't think Joy's had borders. Ooops! Well, that's it for now......go use up those scraps!


Here are some cards, tags and a topper that I whipped up after making the paper covered chipboard pieces. The tags on the cards are not filled in because I plan to later stamp on a sentiment and use them for a birthday, thank you or whatever card. It's good to make lots of these and keep them on hand for those times when you don't have time.
I saw Joy (Joy of Crafting OC16 on Sundays at 6:30 PM) demonstrating a pop-up gift card that looked easy. (Instructions and measurements for the card are on her blog site http://joyofcrafting.blogspot.com/) It was easy; so I made a card and used a chipboard embellishment to decorate the belly band. I tacked the belly band together with small bits of Merikan double stick tape so that the recipient can turn it into a bookmark later. I'm not sure why the inside of my card had two borders on the sides. I don't think Joy's had borders. Ooops! Well, that's it for now......go use up those scraps!

Thursday, August 11, 2011
Happy Anniversary to Us!
 Tomorrow will be our _ _ ? Wedding Anniversary. Now you know that we've been married ten years or more and less than 100. LOL! Can you guess? Were we married BEFORE you were even born? I'll never tell unless you'll believe that I was married at age 5! LOL! Since we have been married for so long I don't even try to find the right anniversary gift. Some years I'm lucky and my hubby needs something that I can afford but this year I've made a card and hope to eventually finish some framed photos that coordinate with my card. The base for this card was cut by a Sizzix Bigz Pro die, 'album pages with circle tabs'. I turned it sideways and decorated the front of the card with K and Co. papers and embellishments. For the inside of the card I used a Sizzix die, 'scalloped circle with pop-up' that has two steps. On the first page I adhered a photo from our actual wedding (hippies in a park!) and the 'Once Upon a Time' words which were made by shrinking words found on some DCWV printed card stock. I sprayed both the photo and words with Tsukineko sparkle spray.
 The second photo shows the pop-up die cut before adding a photo and words. I need to hurry now and glue on a current photo of us and the words ' Happily Ever After'. The album pages die allows you to cut and fasten together many pages to make a fatter card or even a booklet. Should I just keep adding a page to this card every year? That would be a time saver but maybe a bit too easy...showing a lack of genuine affection. If there is anytime of the year that I need to express my feelings our anniversary is the day. To you, my dear husband, I will be eternally grateful that you put up with all my idiosyncrasies and craziness with rarely ever a complaint. Happy Anniversary!
Monday, August 8, 2011
Is it real?
 No, the fern is not a live plant but an artificial one that I purchased from Ben Franklin Crafts. At the store the ferns ( I'm going to get the maiden hair one next.) are somewhat stiff looking. All it took was some hand shaping to give the fern some realistic life. The planter pot is a real vintage one which I quickly scooped off a sale table at the Brimfield, MA antique fair. For well under $10 it was a steal for an Italian majolica piece. It is marked 'made in Italy' so I know that it is not an 'antique ' (something over 100 years old) but it is probably from the early 1900's...it will be an antique some day. Anyway, I am very happy with the greenery that now livens up my bathroom because I haven't been successful in keeping plants alive indoors.
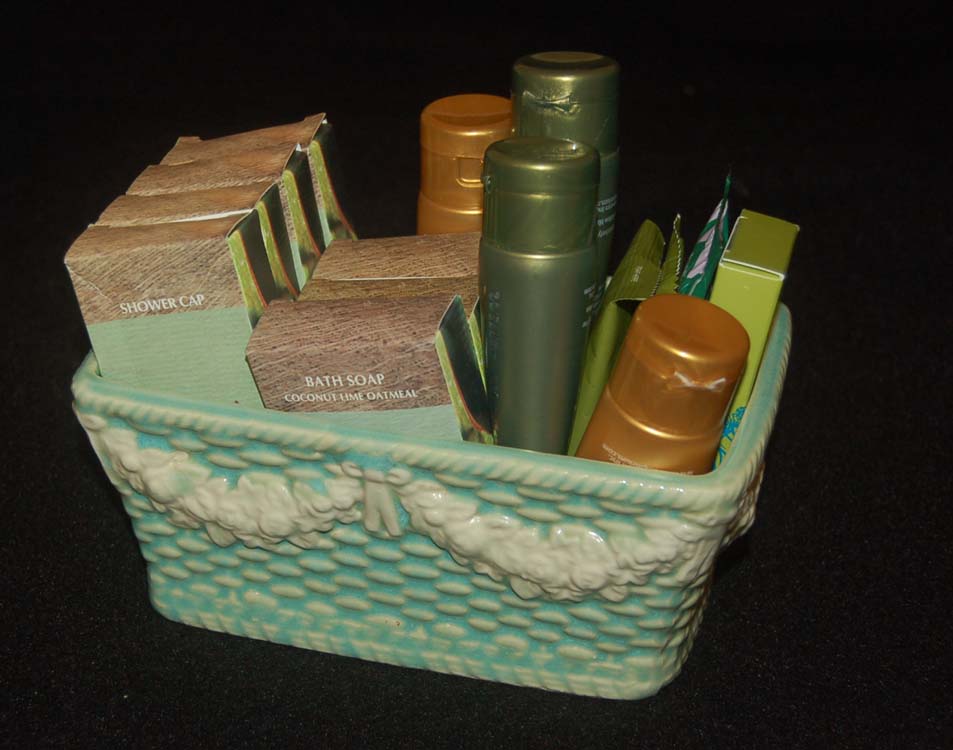 I can never resist taking home the extra sample size soaps, shampoos, etc. from hotels. Every once in awhile the generous hotels leave an ample supply of toiletries which are usually high quality items. My husband frowns on my 'extra luggage' but I think it is wasteful not to use them. Although I don't decant them into containers at home, I do like to have emergency products on hand. They are especially nice to offer to house guests. While scouring a vintage shop I came across this 'made in Japan' planter. I liked the color and the $5 price tag. I'm guessing that the planter was made around the 1930's because of the glaze, basket texture, and swag garlands. I think this piece makes a good storage place for those 'free' hotel goodies and will look attractive in the guest bathroom. Pieces like this would also be nice to fill with purchased small sized soaps, lotions, and shampoos and wrapped as a gift basket. It is so much fun to hunt for vintage finds and put them to good use. I like to think of it as recycling with a designer's flair. Happy Hunting!
Friday, August 5, 2011
Do your ears hang low?......
Do they wobble to and fro? Can you tie them in a knot? Can you tie them in a bow? Remember that silly song.....then you ARE old.....like me! I always think of that song when I make earrings that tug on my lobes everytime I turn my head. If you want to avoid low hanging lobes and big stretched out pierced holes, try making these feather-lite earrings. You can make really large, long earrings.....read on. ( Every once in awhile I take a good close-up of my jewelry. In this photo you can actually see the details without having to click on the image to enlarge it.) Can you guess what material I used to make these earrings? You're right if you guessed 'Shrinky Dink"! Remember the plastic sheets (Aleene's had some but I don't think it was called 'shrinky dink' plastic sheets.) that could be cut out and heated in a toaster oven or with a heat gun to shrink it down (and thicken it) to about 1/4 of the original size? Well, I still had lots of it in my collection of old craft stuff so I decided to experiment. First I lightly sanded the sheet and then scribbled over it with Copic pens (shades of blue and green) and added dabs of Staz-On silver metallic ink (from the refill bottle). After all the ink was dry, I used the Sizzix asymetrical circle jewelry die to cut out the pieces. Then holding each piece with a needle tool I blasted it with a heat gun. When the plastic curled and uncurled (but was stiill soft) I flattened it with an acrylic block (the type used for clear stamps). Next I linked up the pieces with 10mm silver colored jump rings, adding a large hole seed bead before closing the ring. I connected the pieces to earring hooks and I had instant lightweight jewelry that matched perfectly to my outfit because I made it myself! Sizzix has released a terrific line of dies that can cut small pieces (for jewelry and other embellishments) out of even thick chipboard. Go and check out this exciting product now available at Ben Franklin Crafts. The let your imagination run wild. Craft Happy...you'll live longer!
 ( Every once in awhile I take a good close-up of my jewelry. In this photo you can actually see the details without having to click on the image to enlarge it.) Can you guess what material I used to make these earrings? You're right if you guessed 'Shrinky Dink"! Remember the plastic sheets (Aleene's had some but I don't think it was called 'shrinky dink' plastic sheets.) that could be cut out and heated in a toaster oven or with a heat gun to shrink it down (and thicken it) to about 1/4 of the original size? Well, I still had lots of it in my collection of old craft stuff so I decided to experiment. First I lightly sanded the sheet and then scribbled over it with Copic pens (shades of blue and green) and added dabs of Staz-On silver metallic ink (from the refill bottle). After all the ink was dry, I used the Sizzix asymetrical circle jewelry die to cut out the pieces. Then holding each piece with a needle tool I blasted it with a heat gun. When the plastic curled and uncurled (but was stiill soft) I flattened it with an acrylic block (the type used for clear stamps). Next I linked up the pieces with 10mm silver colored jump rings, adding a large hole seed bead before closing the ring. I connected the pieces to earring hooks and I had instant lightweight jewelry that matched perfectly to my outfit because I made it myself! Sizzix has released a terrific line of dies that can cut small pieces (for jewelry and other embellishments) out of even thick chipboard. Go and check out this exciting product now available at Ben Franklin Crafts. The let your imagination run wild. Craft Happy...you'll live longer!
Tuesday, August 2, 2011
Friday Night Shopping at Ben Franklin Crafts
Most of the employees who work at the Hilo Ben Franklin Crafts store know that I often shop at the store on Friday nights because it's quiet. I enjoy getting ideas from the crafty ladies and seeing what's new on the shelves. Because I've been traveling so much in the last two months, I'm not sure if the products in these photos are new or just new to me. Anyway, I discovered some fabulous Confetti 12 x12 papers from American Crafts. They are birthday themed and have 'happy' colors which match with products from American Crafts and other companies. It seems that thank you and birthday cards are the ones that I most often craft. Also birthday celebrations are the ones that in the year are likely to get captured in scrapbook layouts, so these DP sheets are very useful. In the photo the Confetti zig zag sparkling ribbon and the striped rolls are also from Am. Crafts as are the Remarks dimensional number stickers and Flair adhesive birthday badges. The ribbon pack, jeweled flower brads, and adhesive candy dots are from Pebbles but I think they really go well with the Am. Crafts Confetti line.
 I know that the Prima line of flowers and embellishments are not new but I think these packages are different. Of course this company is constantly coming up with new flower assortments to tempt us, but now they've begun adding metal and bead assortment packages. I have a feeling that these new items will be great additions to jewelry crafts that you will no doubt want to try once you see the Sizzix dies designed for jewelry making. I've noticed on my Friday night runs to BFC that lots of families are making a trip to the store a weekend event. They tell me that they are staying home more, crafting for entertainment, and have plans this year to make the gifts they give. Perhaps the downturn of the economy will have a silver lining and make the next generation more interested in family values and less concerned with brand name clothing. Until next time, be good to yourself and think happy thoughts.

I know that the Prima line of flowers and embellishments are not new but I think these packages are different. Of course this company is constantly coming up with new flower assortments to tempt us, but now they've begun adding metal and bead assortment packages. I have a feeling that these new items will be great additions to jewelry crafts that you will no doubt want to try once you see the Sizzix dies designed for jewelry making. I've noticed on my Friday night runs to BFC that lots of families are making a trip to the store a weekend event. They tell me that they are staying home more, crafting for entertainment, and have plans this year to make the gifts they give. Perhaps the downturn of the economy will have a silver lining and make the next generation more interested in family values and less concerned with brand name clothing. Until next time, be good to yourself and think happy thoughts.