Monday, March 28, 2022

Shake and Decorate Gift Bag

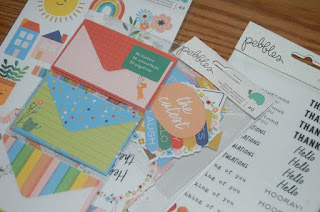
Yes, I found another way to use the Heiko self sealing cello bags (50 count found at HM Ben Franklin Crafts) This time I made a shaker bag using the Pebbles line of adorable die cut/sticker creatures and words.  A 6" square of the Pebbles printed card stock was inserted into the cello bag (a little strip was cut off the top so that the bag would seal) and sequins/paper flowers were added before the flap was pressed closed.  Die cuts were glued to the front of the shaker unit and the whole thing was adhered to the bag with double stick Heiko tape. A matching wire ribbon was tied into a bow closing the bag.

Here is a close up of the cute scene. I love shaking the bag!
For the back of the bag I reversed the Pebbles printed card stock to reveal the matching plaid print.  Extra strips of card stock were used to add more interest and color.  In the center of the bag back I adhered an envelope with card using double stick tape.  
The adorable Pebbles die cuts, word stickers and mini envelopes with matching cards are part of a reasonably priced set sold at HM Ben Franklin Crafts.  You have to check out this absolutely sweet product line at HM BFC before they run out. I'm going back to get more goodies that make crafting fast and fun. While Shake and Bake might make you something yummy, Shake and Decorate crafts have no calories!!!


Thursday, March 24, 2022

Mini Slimline Floral Shaker Card


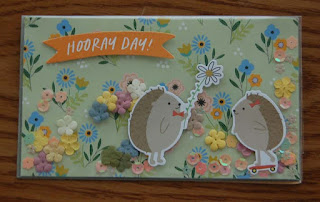
 These mini slimline shaker cards are so easy to make using the Heiko cello sealable bags (see previous post) and Pebbles die cuts/stickers.  The new Pebbles line of springtime items are perfect for decorating the cello pockets. The inner card is cut from a Pebbles 12x12 printed card stock that was cut to exactly fit the width of the cello bag.  The Prima paper flowers (very old product from my stash) and sequins were added before folding and sealing the bag. The whole confetti filled bag was adhered with double stick tape to a self-made slimline mini card (which fits a standard envelope).  Lastly, the Pebbles stickers or die cuts were adhered to the card fronts.  I really love the look of these cards and I'm so happy that I discovered using the Heiko cello bags (sold a HM Ben Franklin Crafts) to make the shaker pockets.  I hope that you will give it a try. I know you'll love it!


Monday, March 21, 2022

I just couldn't resist trying to remake the shaker card from the previous post.  I wanted to simplify the whole construction so I decided to go with a pocket shaker style like the cards I've seen on Annette Allen's (My Clever Creations) blog site.  Rather than purchase the clear pockets designed for shaker cards, I thought I could make a simple one from a Heiko cello bag sold in 50 count packages at HM Ben Franklin Crafts.  First, I cut a piece of the chocolate candy print card stock so that it exactly fit the cello bag.  Next, I filled in the shaker sprinkles and peeled off the protective strip so that the sticky surface of the flap was revealed.  When folded over and sealed, the shaker pouch exactly fits a 4-1/4 x 5-1/2 card (well, a hairline of the pouch extends over the edge of the card). I simply used double stick adhesive to attach the pouch to the card.  It was simple to die cut the words from foil and glitter card stock and use Fabri-Tac glue to attach it to the card front.  I put little round styrofoam balls in the pouch but they have so much static that they don't move around easily. Boo-hoo! (Please excuse the glare in the photos from my camera flash....Boo-hoo!... two times!)
I decided that I wanted a border around the card, so for the next card I cut a card stock just slightly larger than the pouch and used double stick tape to attach them together.  This solved the problem of the slightly too big pouch on the first card, but now this card won't fit the standard envelope....sigh!  Oh well, I think using the  clear cello bags are a really easy way to make colorful shaker cards.  You can be sure that you will see me using this technique in the future. Hugs and smiles!


Thursday, March 17, 2022

Chocolate Candy Sweet Thanks Slimline Shaker Card

At first glance this slimline card seems simple and boring but a closer look reveals how complicated it was to create.  Starting with a 12x12 Simple Stories card stock, a Whimsy die set was used to cut out the candy designed paper  and a turquoise card stock.  Initially, I was planning to let the turquoise squares show but then very little of the candy print was visible, so I opted to replace the cut out candy print squares.  Simple huh? NOT!  First, I had to glue down some clear acetate behind the windows.  Then sticky foam tape had to be applied around the back of the printed card stock to form a pocket for the sprinkles.  (In hindsight, I should have cut a foam sheet exactly like the printed candy paper and apply a sticky back. That would have been simpler.)  Placing the cut out squares directly below the windows was the problem and to add to the trauma, the little sprinkles had to be put in place without shaking any of them....a triple headache situation.  Once everything was in place and shaking properly, I could breathe again. Yay! The little 'windows' are well camouflaged by the chocolate candy print, but you can see them better in the close up picture below.
I used a Whimsy 'Sweet' die set to cut the turquoise foil outline and the pink glitter paper script. The small 'thanks'  was also cut from turquoise foil with a Taylored Expressions die.  My favorite part of this card is the shaking sprinkles (purchased from HM Ben Franklin Crafts). They add a surprise element to a rather simple looking slimline card.  Despite all the 'sticky' problems, I like the way this card turned out.  When I make it again, I'm sure that it will be much easier and faster. Like everything, practice makes perfect...well, at least better. LOL!


Monday, March 14, 2022

I was testing out a product that a wonderfully crafty friend sent to me, the Pink and Main embossing folder shown below. I tried it out on several types of papers and cardstocks. I discovered that I really liked the textured look when I used the embossing folder on a printed floral card stock.
If you look closely, you can see the cross-hatched texture that sort of looks like a trellis fence that rose bushes can grow on.  I buy a lot of boxed blank card sets from HM Ben Franklin Crafts because they are economical and make crafting cards super simple.  I love how the salmon colored card (with the tweed-look) matches so well with the embossed rose print cardstock. The 'awesome' and 'thanks' were simply die cut from scrap paper.  I think die cut glitter or foil card stock words make the card look richer and more professional. (The thanks die package has a glare so you can't really see that it is a Taylored Expressions product.) It's simple and fun to make quick thank you cards and you know you can never have too big a stash of them!  Be happy, keep crafting!


Thursday, March 10, 2022

Recycled Washi Paper Covered Bound Journal

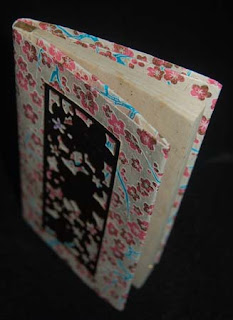
While looking for something in my messy of a craft room, I found a hand-bound Japanese blank book.  The cover was severely foxed but the inside of the book had lovely gold foil specks on each handmade page.  I couldn't bare to toss it out so I covered it with printed washi paper. At first I was just going to glue a piece of cherry blossom print paper to the front and back of the journal but then I remembered how we covered textbooks in grade school. (Remember when textbooks had to last for several years of students?) Anyway, it's a simple task to fold the top, bottom and sides of a rectangle paper to fit any size book and then slip it on like a book jacket.  Extra large sheets of origami paper can be purchased at Celebrations (next to BFC Mapunapuna).  
This top view shows how the paper forms a cover that makes the journal a bit sturdier.  Although the inside pages look foxed, they are really the flecks of gold foil in the paper.  I used a new Spellbinder cherry blossom die to cut a piece of bronze colored foil to use as a focal point on the front of the journal. (Sorry, I wasn't able to capture a good photo of the foil...it really isn't that dark.)  I am pleased that I was able to save this 're-discovered treasure' and turn it into a possible gift for someone who might use it as a memory saver.  I was glad to see that HM Ben Franklin Crafts is once again selling Spellbinder products (Remember their stencils?).  I used this die to make some Girl's Day items (see previous post) and I will certainly go back to HM BFC and get more of the beautifully designed Spellbinder dies.  See you there!


Sunday, March 6, 2022

Crafter's Luggage Tags


The Taylored Expressions sets 'Crafty Grumblings and Big Grumpy are so funny and relatable that I had to get them. I used them to make these luggage tags. For a little more color and interest, I added some pretty satin ribbons which were a gift from a sweet friend.
I used Doodlebug Design printed card stock for the backs of the tags. Actually, the aqua grid front and the smiling craft supplies back are from the same sheet of card stock. Isn't that convenient?  Now that we are all thinking about traveling again, I thought luggage tags were the perfect thing to create. Happy  Adventures to Everyone!


Thursday, March 3, 2022

Girl's Day Card and Bag Topper

Happy Girl's Day! (March 3rd) Because I don't have any daughters or granddaughters, I often forget to craft something for that special day. This year because I just purchased the Spellbinder sakura die from HM Ben Franklin Crafts, I was inspired to make this card. It was super easy to create this card because the die set also had the dies for the flowers and leaves. The girl in a kimino was stamped using a very old wooden handled stamp of unknown origin.
Because I had extra paper and my favorite sakura ume arare (from Wholesale Unlimited) I decided to create a bag topper too. The sakura cello bag is from HM Ben Franklin Crafts...lots of prints and sizes available.


From this close up you can see that I used two colors of pink vellum to make the blossoms. I like the delicate look and ability to bend up the vellum petals.
The girl image on the bag topper is an old Mari and Me stamp.  I paper pieced the kimonos on the girls by stamping on printed origami paper and then cutting out the kimonos before gluing them down.  I am pleased with how these Girl's Day projects turned out. I hope you all will have a great Girl's Day and give a hug to all your favorite girls.