Wednesday, April 28, 2010

Boy's Day Card

Boy's Day (a Japanese celebration) is quickly arriving (May 5th, the fifth day of the fifth month). I decided that I should at least design one card for the occasion since I have two boys. Maybe I'll do treat boxes later. Anyway I was inspired by the Dandelion Designs cute Boy's Day stamps. I was trying to find a way to make the fish flutter like the real cloth ones do when hung from a pole outside the house to indicate how many boys/men reside in the home. I finally gave up and just used mizuhiki cording and pop-dots to suggest movement. I'll keep thinking about another card design which will do what I imagine, maybe something will just come to me while I daydream.

Sunday, April 25, 2010

Rose Gold Necklace

I loved the rose gold findings so much that I just had to work on a piece using them. The photo shows what I designed, but the possibilities are endless. I used a flower necklace connector and heart charm as the focal point. The gems on the necklace are pink pearls and faceted tourmalines. I think aquamarines would also work well with the rose gold findings. Because the semi-precious stones are so tiny, the cost is minimal. Later I will write up this project for our website (www.bfcraftclub@aol.com). It took me less than an hour to finish the necklace. This project taught me that pretty doesn't have to be expensive and if you don't have jump rings just cut the closed rings. Give it a try......make yourself some sweet rose gold jewelry.

Friday, April 23, 2010

Pillow Boxes

No, these are not boxes for pillows but boxes shaped like pillows. They are die cut from 12x12 cardstock using the Sizzix XL pillow box die. On the orange one I used the Stampendous butterfly beauties clear stamp set and a glue ink pad. One color at a time, I sprinkled on Martha Stewart iridescent glitter (from the set), stamped again and added more glitter. Then I folded the box and taped it shut. After tying on the ribbon I put a spot of glue (Fabri-Tac) under the bow and glued on the K and Co. Berry Sweet grand adhesion butterfly sticker. The purple box was cut from a Bo Bunny Jazmyne Plush 12x12 cardstock. Because I felt that the cardstock was a little plain (even with the glittered flowers), I used an opaque white ink and stamped Stampendous clear stamp silhouette songbirds randomly on the die cut box before folding. The ribbon was embellished with a Poppy Seed K and Co. Grand Adhesion sticker. I like that these boxes can be used and reused because the ribbon doesn't need to be untied to open the box. A large sized chocolate bar fits perfectly in the box (with room to spare for other goodies) and so it would make a great party favor box. It would be a good idea to cut out lots of these boxes to have on hand for quickie gift wraps. In fact, that's what I plan to do tomorrow!

Tuesday, April 20, 2010

A Quick Stop at Mapunapuna BFC

On Friday I had the opportunity to do a little shopping at the Mapunapuna Ben Franklin Crafts. I headed straight to the bead department because I needed a metal hole making tool. Guess who I saw there? Joy, the host of 'Joy of Crafting, ' was in the bead department helping to make a decision on the flooring that will be in the renovated bead department. Through conversing with her I learned that there will be some major improvements made to the entire store. It sounds exciting and I can't wait to see the finished BFC. I'm amazed at all the different hats that Joy wears in this company......so much talent! The photo shows some of what I bought in the short time that I spent in the bead department. I was elated to see the rose gold findings from Cousins. Besides the ones pictured, there were many styles of chains, earrings, beads, charms, etc. all in the beautiful golden copper color called 'rose gold'. Also worth checking out are the luscious colors of C-lon cording. I haven't tried it yet, but I think that this product will work well in macrame or other woven projects which require a thin strong cord. Ben Franklin Crafts stores should be the first stop for crafters searching for beading and jewelry supplies because they are well stocked and reasonably priced. Thank you for stopping here to read my blog and I hope that you'll return soon and leave a comment if you have the time.

Saturday, April 17, 2010

A Sweet Thank You

I just returned from a trip to Boston and I'm catching up on reading blogs. While in Boston we had wonderful dinner with some great friends. I don't always have good manners and write a thank-you-for-the-meal note but I thought that this time I would surprise our friends. Pictured here is the quickie card I made using a Jolee's ice cream epoxy sticker, Best Creations Inc. glittered 12x12 two-sided cardstock, and clear design 'Friends' stamp from a Hero Arts set. After punching out the words that were stamped on white card stock, I rubbed pink ink on the edges so I wouldn't have to punch out another circle. To make the words more important, I raised the circle on pop-dots. Using an epoxy sticker makes the card easy-peasy. I love the Best Creations Inc. papers because they are sparkly and in one of my favorite color combinations.... pink, red, and green. I really should make a bunch of thank you cards so I won't always be rushing to mail them out, but I always want to personalize the card to fit the occasion. Dinner with these friends almost always ends in a shared decadent dessert.......I just took a bite.....really!

Thursday, April 15, 2010

Graduation Party Favor Bag


I need to make simple party favors about 100! Aaargh! Simple is the key word here. This bag is my first attempt. It was made using a Sizzix die and decorated with a lucky Japanese cat (Mari and Me) wearing a graduation cap (Dandelion Designs). The bag is dressed up with curly ribbons which are stapled on. Joy (Joy of Crafting) had the idea to use Flower Soft to make a flower texture for the lei and I think it's great....thanks, Joy. Although I don't know what will be in the bag, I don't think this is THE party favor. I'll keep searching for a better idea and test it out. I know that I want to keep the cost and construction time to a minimum. Maybe I'll surf the blogs and see something unique but easy. I'll look through magazines too for the perfect party favor solution. I have confidence that I will get it done....I WILL!

Monday, April 12, 2010

Happy Birthday Cupcake Box


I bought the cupcake box Sizzix die awhile ago, but only yesterday figured out how I wanted to decorate the box. The Hero Arts (girl with a gift) rubber stamp was discovered at Ben Franklin Crafts. I can see lots of uses for it because I'm always giving gifts. Since I needed this box for a birthday gift (not a cupcake) I decided to add on a Happy Birthday border which was punched from DCWV Glitter Border paper using a Martha Stewart punch. Pop-dots under the cut out girl image help her to stand out. I didn't stick down her head so the box lid could come off. Of course this box can be decorated to become excellent party favors for Mother's Day, Graduation, etc. That reminds me, I need to get started on my son's graduations leis and party decorations. Remember, graduations are earlier this year! Start crafting!

Friday, April 9, 2010

New! from K&Company and Bo Bunny

The two new line of K and Co. products, Suzy Ultman (Lion Sleeps) and Spaghetti are adorable. If you are preparing a baby album or making baby shower invitations, cards, favors, etc. the Lion Sleeps collections will enchant you into crafting sweet things. The Spaghetti designed paper and embellishments are well suited for children, especially boys. The bright colors of this line will make your projects stand out.

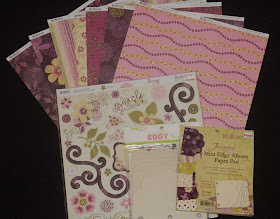
Oh boy, the new 'Jazmine' Bo Bunny papers and accessories are irresistibly gorgeous. Most of the papers have glittery accents and match the sweet embellishments. Shown in the photo are the Mini Edgy album and the paper pad that goes with it. The papers have shaped edges to match the ones in the album.....neat huh? The papers have the same designs as the 12x12 sheets. Also in the photo are punch out chipboard pieces which coordinate with the papers. So many pretty papers and things.....so little time....gotta get working! Thanks for stopping by today.


Tuesday, April 6, 2010

From My Bookshelf

These first five jewelry making books are my latest favorites. Jewelry with chains is very popular now, especially several strands of mixed metals. I really get inspired by looking at and reading these cleverly artistic books. While some of them have actual project instructions many of them serve to get my creative juices flowing. The most unique book in this bunch is Enchanted Adornments, a whimsical book with attractive jewelry designs and stories to go with them.


I read dozens of magazines at a time, some useful and some just full of advertisements. These two will appeal to card crafters and scrapbookers. Card Maker is not new but it never fails to provide new, clever card creations. You can learn a lot by just looking at the photos, but the magazine contains good information and tips as well. The other magazine is new to me and has a fascinating concept of providing sketches of card layouts along with sample projects. Once you start with a good sketch it is easy to coordinate colors, patterns and embellishments. The last four books I want to show you are rather eclectic. If you are a recycler, the bottom two books should appeal to you. The one about plastic is very clever and will amuse both children and adults. The other recycling book has projects of a more useful nature, like tote bags made from potato chip bags or old sweaters. I love to receive pretty mail and the Good Mail book is a teaching tool which helps me create pretty mail to send to others. Finally, Collage Journals is an artistic book designed for those who want to put their journaling in a museum quality setting. For the moment this book is giving me good ideas but I haven't become a journal artist yet. Anyway, I hope this deviation from my usual posts will get you to check out the craft magazine and book racks.


Sunday, April 4, 2010

Easter Blog Candy Winner!

Drumroll Please.........The winner of our Easter blog candy giveaway is.........Jan! Congratulations! Please e-mail (contact@bfcraftclub.com) your mailing address to us so that we can send you your prizes. Thank you to everyone for all the wonderful suggestions and comments. I will send the list of the ideas to our buyers and managers. Happy Easter!

The photo shows my last Easter project for this year. It's a simple treat box made from the Sizzix die cut carry all box. A Spellbinder nestie egg shape was stamped with a Stampendous stamp and colored in. A Martha Stewart border punch used and the grass was colored in and the rabbits flocked before taping the punched strip to the box. Maybe this box can serve as a start for next year's Easter craft projects. I think I will put a list of projects that I didn't get to this Easter in the carry all box and I'll look in the box out right after Valentine's Day. Maybe next Easter I WILL finish all the projects I plan. LOL I said, "maybe".

Saturday, April 3, 2010

Easter Tag/Card for Cookies

BLOG CANDY ALERT! Check out the March 31st post to see how you can win a $50 gift card. Besides trying to finish more Easter projects, I've been testing recipes again. This healthy (lots of good fiber and low in sugar) version of sesame cookies turned out to be very tasty so I wanted to let my neighbors sample it. Rather than make a regular card I decided to make a mini-card tag using the Sizzix scallop tag die. First I cut two tags and cut a portion off one of them. I formed a pocket by taping three sides of the cut tag and adhering it to the full tag. Next I punched out a white cardstock 3" circle and a 3-1/2" lavender scalloped circle. After stamping and coloring the TAJ stamp, I taped the circles together. I wrote my message on the back of the circle card and slipped it into the pocket. To add more interest to the tag, I added a die cut Spellbinder label onto which I stamped the word 'Enjoy'. I finished off the tag by gluing a Prima flower onto the ribbon that I used to tie the tag to the bag. Without much effort I made this tag/card, which decorated the cookie bag as well contained a hidden message to the recipients. Don't forget.....tomorrow I will announce the winner of my blog contest. Let's hope it's YOU!

Friday, April 2, 2010

Paper Shaker-style Easter Basket

Scroll down to the previous post if you want to enter my contest for the blog candy shown on March 31, 2010.
The first time I saw this style of paper basket on Camille's blog, ( http://captureaheart-cami.blogspot.com/). I thought that it looked like a Shaker basket (the Amish type not one that has something shaking in it). It sort of looks like a variation of the one Joy (Joy of Crafting) had on her blog site. Anyway, Camille had a link on her site that let me connect to Dawn's blog,(http://whimsiedoodles.blogspot.com/2010/03/tuesday-tutorial.html ) which gave me the how-to measurements and directions for the basket. I loved Camille's baskets but I decided to try the original two-handled style. Instead of covering the center joint with a paper circle, I used a punched paper flower (another one covers the back) on one basket and put a sparkly foam bunny (Nicole Crafts stickers from Ben Franklin Crafts) on the other. (I sprinkled some glitter on the back of the bunny's head so it wouldn't be sticky.) The brads on both baskets allow for the handles to move as they would on a real split wood Shaker egg basket. If you need a quick goodie Easter basket, this is the project for you. You can make two baskets from one 12x12 double sided cardstock or four if you cut the handles from some other paper. I used American Crafts (Letterbox) for both baskets and embossed the cardstock with a flower design before folding the pink basket. (Click on the photo for a close-up.) With the Martha Stewart scoring board and Tim Holtz ruler, this project was a snap to make. Give it a try. You can easily make enough baskets for a whole group in just a few hours. Hurry you only have until April 3rd to enter the contest!