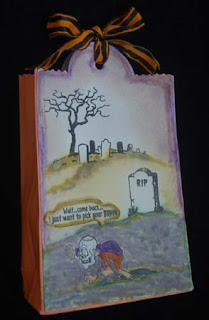
Next I cut a piece of printed cardstock 12 x 8-1/2" (the orange bag). Overlap the short edges of the rectangle by 1/4" and glue down the overlap. Center the overlap and flatten the piece before folding the two side edges in by 3/4". Unfold and pleat the sides of the bag. Fold up the bottom of the bag by 1-1/4" before tucking in to form the bag bottom. Use glue or double stick tape to seal the bottom flap. Trim the side edges of the large tags to fit the bag. Measure the height of the bag so that the tag will sit even with the top straight edge of the tag. Cut the excess of the bag top edge with a zigzag scissors.
Using the Whimsy stamps and black Versa Mark ink, I stamped the scene on the watercolor paper tag. Ranger Distress Ink pens and watercolor pencils were used on the images. Water was sprayed on to blend the colors and give a grungy look. After the watercolor paper was dried, I glued on the tags to the front and back of the bag. A ribbon was tied into the tag holes to complete the look. I love the way this new project turned out and I'm sure that I will make more tag bags in the future. It is easy to do, makes a perfect-sized bag for treats, and uses up more scrap Halloween printed cardstock. Yay!


spooky cute..
ReplyDeleteReally cute! LOVE the idea of a tag bag! :)
ReplyDelete