Tuesday, December 29, 2020

Vintage Girl Thank You Card

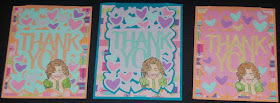
Now that Christmas is over, it's time to write thank you notes.  Those special gifts deserve a special handmade card don't you think?  When I spied the Sizzix thank you card die at HM Ben Franklin Crafts I really liked the look but when I opened the package I was a little confused at first.  After inspecting and thinking awhile, I figured out how to assemble a card from the the four part die set.  It turned out just as I desired except that it took me a lo-o-o-o-ng time to fit in the hearts as they all look the same...except they're not. LOL!
This photo shows how attractively the card front folds over....so it was worth all that thinking of how to assemble the card initially.  The THANK YOU's were die cut from pearlescent card stock (available at HM BFC).  I think this adds just the right amount of shine without being too bling-bling.
Here are three more color versions I designed so that I would have a variety of different colored hearts to use.  I color coordinated the cards to match with the printed 'gift' cardstock in the background of all four cards.  I added the vintage girl (Whimsy stamp and die sets) just because I wanted to use the image again and she looks so happy and satisfied. That's how I feel now that the rush-rush of the season is over and I have a brand new year to look forward to....YAY! for 2021!!!!!


 

Friday, December 25, 2020

Thank You Cards Made Easy With Dies

First of all, I want to thank all of you who have supported my blog and the House Mart stores: Ben Franklin Crafts, Celebrations, Daiso and Ace Hardware (neighbor island stores).  Your local patronizing has really enabled us to stay in business this year.  Thank You! Thanks You!  Thank You!
These two cards are quick  and easy cards made with dies that are intricate but super easy to use. The background on the top card was cut from a gorgeous Whimsy 6x6 paper pad.  The background on the bottom card was made by me using some Distress Oxide Inks (Tim Holtz, Ranger) that were purchased from HM Ben Franklin Crafts. Lawn Fawn dies were used for the 'thanks' that were cut from silver and glitter card stock. These cards took just minutes to create so many can be produced quickly to thank everyone who generously took time to choose and send you a wonderful gift.  Mahalo to all!


Wednesday, December 23, 2020

Christmas Ornament Ball Card and Tag

These Ornament Ball card and tag are super simple to construct.  Just one printed card stock circle (use Sizzix die) is needed for each ornament ball card or tag.  The backs are plain white card stock circles.  The circles are joined with a rectangle folded and trimmed to look like an ornament top.  The animals were colored with Copic pens and die cut with matching dies.  They were mounted on foam square dots and the sentiments were added with Heiko tape.  Tree-like pipe cleaners and red pips were glued to the top.  Oh yes, the twine was strung through two holes poked in the fold of the ornament cap.
I know this tag looks to be the same size as the card but it is really much smaller.  I got too close with my camera and didn't realize the visual size until I posted. LOL!  Anyway, I hope you'll try making some of these ornament ball tags or cards because they're easy.  Make them to use up scraps and have a bunch ready for next year. It's just around the corner...hahaha!


Monday, December 21, 2020

Christmas Friends Warm Wishes Card

I loved this sweet Whimsy image so much that I knew it deserved to be on a holiday card.  It was simple to stamp and heat emboss the image before coloring it in with Copic pens and fussy cutting it out. The pinkish grey background is marker paper with Tim Holtz Distress Oxide inks applied.  HM Ben Franklin Crafts has a bundle of new Distress Oxide ink pads...great colors!  I flicked some silver Liquitex ink onto the background.
The Lawn Fawn tree scene was stamped and colored before die cutting.  Be sure not to distort the stamp as you stamp or the die will not line up. (how do I know this???)   The snow was sparkled up with glitter and 'warm wishes' was stamped (Studio G, only $1.50 at HM BFC) and applied.  Oh yes, the green dotted paper was from the new Lawn Fawn 6x6 pad....so many useful sheets!  Okay, that's it for today....I have a couple more days of crafting before the Big day and then it will be time to start on thank you notes.  Happy Holiday Crafting!


Saturday, December 19, 2020

Christmas Goodie Tag Bag

The inspiration for this tag bag was the cute Whimsy image that I stamped, colored with Copic pens, and then fussy cut.  It was adhered to a dotted green card stock from the American Crafts 6x6 pad available at HM Ben Franklin Crafts for a bargain price.  I used a whole 12x12 printed card stock sheet to form the tall tag bag base.  The large Little B tag die was used to cut out the top portion so that a peppermint ribbon with jingle bells could be tied on as a closure.
This side view shows that the bag doesn't have a lot of depth but it will easily hold some delicious biscotti or perhaps some long pretzels decorated with sprinkles.  A bag made with card stock is sturdy like a super strong paper bag.  Hope you are almost done with your Christmas crafting and in the process of wrapping everything up.  If not....hurry up!!!!!!


Thursday, December 17, 2020

Magical Dragon Mini Calendars and Xmas Tags

This year Lawn Fawn came up with the cutest flying dragon which was the perfect size for Xmas tags.  The set also had some coordinating words and swirls.  To make it even more irresistible, there was a matching die set.  At first I was just planning to make just Xmas tags but then I spied my small stack of mini calendars and knew I had to make dragon calendars too.  

The calendar base is three inches wide and starts as a simple strip that is pleated at the bottom.  The dragon image was stamped with green ink and heat embossed to make it easier to color with Copic pens.  Because I didn't want to print a holiday message on the calendars, I just printed the word 'magical' and added some sparkly star stickers.  The calendars were purchased from Vippies.
Here is the original idea I had for the magical dragon image.  After finding just the right printed double sided card stock, I folded a 2" wide strip  to form the tag.  Three-fourths inch of the lower half of the front of the tags were removed and the words were stamped.  This leaves enough room inside the tags for the recipient and giver names.  Don't you love the sparkly yarn that I used for the tie?  It's a yarn that I purchased at HM Ben Franklin Crafts....there were so many luscious colors!
I am very happy with both the calendars and tags because I think that they showcase the LF dragon extremely well.  It was an inexpensive stamp set but I know I will get lots of use out of it during the coming year.  I'm already thinking of Valentine dragon cards!


Tuesday, December 15, 2020

Prize-winning Ribbon Xmas Tags

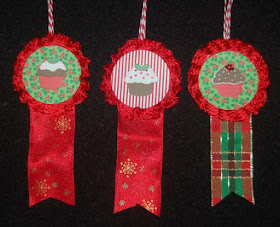
As a joke of sorts I decided to make these tags to hang on my Xmas baked goods given to friends and family.  I like baking but I'm not delusional enough to think I could win a baking prize ribbon.  These ribbon tags were easy to construct.  First I die cut two circles for each tag, one from printed card stock and another from plain white card stock.  Next the red lace was glued to the back rim of the front circle and the trimmed ribbon was glued on the bottom back.  Finally, candy cane twine was added in before the back circle was glued on and the Martha Stewart Xmas cupcake or gingerbread stickers were applied.
The plain white back of these tags allows for a message/recipient's name and/or the name of the baked gift item.  I hope that you will have fun making prize-winning tags like these.  They will make your baked goods even yummier!  Enjoy Xmas crafting and baking!


Sunday, December 13, 2020

Tags, Tags, Tags....You're It for Xmas

These truck tags are for the little boys on our Xmas gift list.  They were super easy to make with the My Favorite Things stamp set.  I colored the images with Copic pens after applying clear embossing powder to the stamped ink and heat embossing. This embossing step makes coloring within the lines a little easier.  I didn't have the matching dies so I fussy cut the loaded trucks.  Hint: Choose double-sided printed card stock that when cut and  folded over allows a place for the stamped words to show.  A tiny hole punch was used in the corner for the candy cane twine.  Well, that's it.....stay tuned for more tag madness!


Friday, December 11, 2020

Christmas Snarky Cats Gift Card Holders and Tags


I was excited to purchase the Tim Holtz Snarky Cats Christmas Stamps and couldn't wait to ink them up.  I wanted the images and words to stand out so I chose not to color them....also I am too lazy to put  much effort into tags or gift card holders.  For these tags and card holders, I raided my scrap pile that was ready to topple over.  
The inside of this large scrap had a pretty tree so I applied a coordinating gift card corner holder and a quote cut out from the top of a 12x12 card stock sheet...waste not!  I like how this just fell into place!
The plaid card holder front was too strongly colored so I added  sparkling Scribbles to the light bulbs and white gel pen ink to the eyes.
Here are the coordinating card holder corners. It's fun to find just the right scrap piece to cut.

These are some snarky quick tags I made for the family members with a sense of humor.  Also shown below with the Christmas stamps is a set of Tim Holtz Halloween snarky cat stamps, which I got too late to use this year. Lawn Fawn makes the useful corner gift card holder die. The pretty gold edged plaid ribbon was purchased at Daiso....only $1.50! and the roll is generous!  In the previous post the little Santa figurine is from Daiso too....lots of Xmas wrapping items....check them out! Okay, keep it simple but get those gifts wrapped and mailed out...now!!!!


Wednesday, December 9, 2020

Personalizing a Christmas Stocking

I purchased a cute stocking at Daiso and thought it would be fun to fill for my new grandson.  I wanted to personalize it but didn't trust my handwriting skills with a marker.  I considered sequins, die cut felt or plastic letters but eventually settled on gluing fluffy yarn onto the stocking.  I think it turned out quite well for a 15 minute project using a bargain priced Diaso item. Be Creative!


Monday, December 7, 2020

Christmas Family Newsletter Card

Every year I write a family newsletter and send it out to friends and family who we rarely see.  That may be almost everyone this year.  To keep me sane, I try to make the cards simple and concentrate my time on the newsletter.  The theme of this year's letter is the joy of having three beautiful grandsons...symbolized on the card by the three stars.  Inside the newsletter there will be three star-shaped photos of the boys.  Unfortunately, the subtle colors of the cards were difficult to photograph.  Each tree is embossed with the Cuttlebug embossing folder but in the photo the pearlescent one shows up better.  I prefer the embossed green vellum tree.  Because the background of the top card has a musical sheet I think it goes well with the inside sentiment.
Here are some card variations I created.  The stars were punched out with a Fiskar punch and the words, "Holiday Cheer" were made with a Paper Smooches die.  To accurately stamp the Hero Arts words, I used the MISTI tool.....invaluable for aligning words on multiples.  As a final touch I glued on a tiny sparkly acrylic dot to the top of the 'i' in holiday.  I encourage you to send out family newsletters with photos to all the special people who you will not get to see this holiday season.  They will certainly be thrilled to receive them and maybe they'll write back to you. Wouldn't that be wonderful? Happy Holidays!


Thursday, December 3, 2020

Vintage Gossip Girls Xmas Gift Boxes and Tags

I've been having fun with the Whimsy Gossip Holiday Girls stamp and die sets.  The images are so cute and the sayings are amusing.  I combined the images with Hero Arts stamp sets to create a variety of boxes, tag bags and large tags.  The tag bag took only one 12x12 vintage -looking card stock and there was leftover paper for small tags.

I colored the images with Copic pens and added some furry yarn (from HM BFC).
Here are two boxes which I hope will amuse and delight the recipients of my homemade fudge.
I added some glitter and fuzzy yarn to this box top.
Be sure to use double sided 12x12 printed card stock so that your boxes will be festive inside and out.
Another version of the box with added snowflake buttons (shanks removed) and glitter.
I like the very retro look of this one and the hopeful look of the girl's face.
Large tags were cut from the leftover paper used to make the boxes.  I used a much loved tag die from a Little B set.  Each box took less than one 12x12 piece of card stock.
These are the holly version of the tags.  I can't wait to tie them onto my holiday gifts. Christmas is such a fun season even during a pandemic. Stay jolly!