Tuesday, April 27, 2021

Mahalo Leaf Cards

I've had these  Rubber Stamp Plantation leaf stamps for a very long time.  They are good go-to graphic designs useful in a variety of crafts.  I needed some less feminine thank you cards so I thought I would create some 'Zig Zane aloha shirt' cards.  I was partially inspired by an episode of Joy of Crafting that showed how bold graphic RSP stamps can be used.

By using a Versa Craft ink pad with several shades of green ink, I was able to quickly stamp the leaves to achieve a screen print look. The Mahalo TAJ stamp was used with gold ink and heat embossed gold powder.


To make this version of the Mahalo card a little different I used a different die to cut the stamped paper.  This Spellbinders die has rounded corners so I used a corner clipping tool to round the card corners to match (available at HM Ben Franklin Crafts).  On the backs of the cards I added 'Handstamped with Aloha' (Dandelion Designs) to give the cards special handcrafted touch.  I whipped up these cards and others in a very short time and now have new 'manly' additions to my thank you card stash. Now is the time (before Easter) to increase your emergency card supply....don't forget sympathy and get well cards....unfortunately there is a never-ending need for them, too.


Friday, April 23, 2021

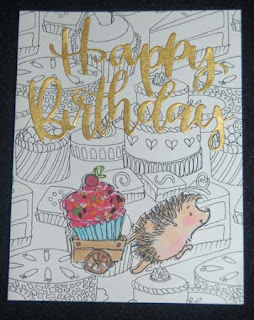
Decorating Uncolored Boxed Cards

Do you remember those uncolored coloring book style cards, posters, etc. that were all the rage a few years ago?  Well, I didn't color very many before I got bored and put the uncolored items away.  While moving stuff around, I discovered them again and decided to do something with them.  Using Penny Black (hedgehog) and Stampendous (House Mouse) stamps, I colored the images with Copic pens and fussy cut them.  Nuvo dimensional paint was added for frosting and fake plastic sprinkles were adhered.  The words were die cut from shiny foil and glitter paper.


The insides of the cards were stamped and embossed. Another House Mouse character was stamped and colored right on the card.

I think the single colored character and script words really upcycle this card to something worthy of giving.

It was fun making a sprinkled mess with the Queen and Co. tiny, shiny balls. The House Mouse stamped designed was fussy cut, colored and popped up on foam adhesive dots.  It didn't take much time to turn these plain, uncolored cards into ones that are fun and eye-catching.  Here's to more exciting finds within my own stash of 'hidden treasures'!


Monday, April 19, 2021

Sweet Cupcake Cards

While looking for a particular craft supply, I discovered a whole box of cupcake cards which I purchased before I was crafting my own cards.  They were okay but rather plain, so I decided to jazz them up with die cut colored images and words.
For the first one I added a Mama Elephant bear on a cupcake image and a Whimsy 'sweet' die cut word.
I put a lion cupcake on the second card.  The cupcake base was cut from printed card stock and little Whimsy fake candy balls were added for interest.
On the bunny cupcake card, Scribbles and crystal glitter were added to make the cupcake look more delicious.
All the words inside the cards are different and die cut or stamped to match the fronts of the cards.


There were five different photo cards in the boxed set (of  20?)cupcake cards (purchased from Borders?).  As you can see, two images of the cards were attractive but three styles were rather plain. I think my added die cut pieces really moved the cards into the useable level.  I hope you agree and will look into  upcycling items you've overlooked for years.  It's fun and great for lessening your stockpile of  STUFF. 


Thursday, April 15, 2021

S'more Banana Pumpkin Muffins....please!


 What do you make when you have only two overripe bananas, some leftover canned pumpkin, mini marshmallows in the freezer, a chocolate bar, and a box of graham crackers? Of course, I concocted a new recipe, ' S'more Banana Pumpkin Muffins.  Basically, I started with my Mom's much-loved banana bread recipe and dumped in the other ingredients.  It turned out fantastic!  Give it a try....enjoy!


                                                        S'more Banana Pumpkin Muffins


1 cup sugar

1/2 butter

2 eggs

2 over ripe bananas

1/2 cup canned pumpkin puree

2 cups white whole wheat flour

1 tsp. baking soda

1/2 tsp. salt

1 cup crushed graham crackers

1 cup chopped chocolate bar

1 cup mini marshmallows


Mix together sugar and butter. Add in the two eggs and mashed fruit.  Stir in the flour and then the baking soda, and salt.  Finally add 3/4 cup of the crackers, 3/4 cup of the chocolate, and 3/4 cup of the marshmallows.  Spoon the mixed batter into paper lined muffin cups. This recipe will make about 16 muffins.  Press the leftover crackers, marshmallows, and chocolate pieces onto the top of the muffins and bake at 350 degrees (no need to preheat oven) for about 25 minutes (until a butter knife inserted into a baked muffin comes out clean).  Enjoy!


Sunday, April 11, 2021

Arigato (Thank You) Kokeshi Doll Card

Because the slimline card format is very popular now, I decided to retrieve some blank business-letter shaped cards from my bottomless craft storage bin.  Here is the thank you card I created to say, "arigato" for some wonderful birthday gifts that were wrapped in the Japanese 'furushiki' style.
I believe that Whimsy Stamps started the trend to decorate the slimline cards with creative die cuts.  I used the die to cut some of the wrapping paper (I think I wrapped the giver's gift in this paper for HER birthday...hahaha!) to make a frame for the kokeshi dolls. I cut solid papers with this die too, to make the inside pieces. By simply changing out the inside colors you can see that  there is a subtle difference between the cards.  The original card blank had a cut out square and a pink panel of paper for writing a message so I recut the square opening and stamped the inside design.  The dolls were stamped on origami paper, fussy cut, and glued onto the original stamped image so that their kimonos would look colored but didn't require much labor.  The larger word stamp was by Mari and Me and the smaller one is from Dandelion Designs; I think. Hero Arts made the set of three kokeshi doll stamps.  If you don't have any slimline card blanks, you can easily cut some yourself to fit a business envelope and punch out a window too.  Be creative and have fun!


Wednesday, April 7, 2021

Happy Birthday Mice Gift Bags

The plain Daiso dotted bags were the inspiration for these gift bags.  Can you believe that the bags came in a pack of three for only $1.50!!!  I knew that the colors and simplicity of the dots would be great background to add on embellishments.
I have two Sizzix dies (from HMBFC) which I seldom use because of their large size, but they were perfect for these bags.  The Birthday Wishes words were cut from pearlescent light blue card stock and the Hooray was cut from a foil blue card stock. (Fancy card stock is available in packs from HMBFC.)
Both die cuts have small holes on the sides through which I strung the Lawn Fawn rainbow twine and tied it into bows.  Fabri-Tac glue was used to adhere the words and stamped circles.
House Mouse stamps were used to apply brown permanent ink to Sizzix die cut circles before they were colored in with Copic pens.  The edges of the stamped card stock circles were rubbed with Distress Ink and a little crystal glitter was added to the pink cupcake frosting.
The small circle tags were serendipitous additions because I found some House Mouse clear stamps at HouseMart Ben Franklin Crafts that coordinated perfectly with the larger House Mouse stamps. (The small stamps were only $3.49....what a deal!) Fancy decorated gift bags are so expensive these days that it's economical and fun to make your own from 50 cent Daiso paper bags.  Yes, YOU can craft!  


Saturday, April 3, 2021


I love this Art Impressions twin bunny egg hunters image and bought the rubber stamp years before my twin grandsons were born.  I'm psychic!  Anyway, I thought that it would make a great card front for the surprise inside the card.  Since I didn't feel like fussy cutting the image, I stamped the image on a 5-1/4" square of watercolor paper ad rounded the corners with a corner clipping tool. (I didn't clip the top corners of the purple card because it would show on the inside of the card along the fold.) Next, I colored in the image with Copic pens.  After stamping the image on a Masking Magic paper (from HM BFC), cutting it out and applying it over the watercolor paper Copic colored image, I started dabbing on two colors of blue and two of green Hero Arts reactive inks (from HM BFC) to form a sky and grassy area.  Leaving on the mask, I sprayed the scene with water and blotted.  Once I was satisfied, I removed the mask and  drew in the grass sprouts with a green color pencil.  I filled in any white spaces around the image by applying the reactive inks with a tiny brush.  The Impression Obsession words were die cut from pearlized pink paper and adhered after running through a Xyron sticker maker. A little bit of Scribbles crystal paint was applied to the eggs.
I actually created the inside of this card before the outside.  I watched the Lawn Fawn video of a card made with the amazing Create a Basket die set.  I knew that I HAD to try it.  I simplified the  basket contents and added a die cut Lawn Fawn chocolate bunny with a bitten ear.  To make the bunny look more like chocolate I coated it with Glossy Accents.  
The words were stamped on a Lawn Fawn die cut banner.  From this photo you can see how the card pops up and folds down.  I didn't have the SMILE die that was shown on the video, but I had a similar one that said Big Hugs and it worked well for this project.  I am pleased with this card because it represents the joy of the Easter egg hunt which speaks to the kid in me.  I'm excited to watch the excitement of the search that will surely shine in my grandsons' eyes this Easter.  I hope that all of you will never lose that thrill of the hunt....I'm still keeping my eyes open for that elusive antique, bejeweled Faberge egg!  Happy Easter to All!!!!