Saturday, November 30, 2013

Inside Out


Today I'm showing you the inside of my card first because that's how I started this card.  Well, actually this card started with a new die (label, Funky 3D pop-up) I purchased at Ben Franklin Crafts.  It is one of those dies that fit into the basic card shape die allowing you to cut many different pop-up cards simply by switching out the center pop-up part.  After cutting the reindeer pattern paper (Authentique) upside-down ...TWICE, I decided to listen to the crafting gods and go with the flow.  I reversed the card to show the dot pattern, cut up one of the 'mistake' cards and tape down the reindeer paper sections.
I think the result was a 'happy' mistake. The only problem was that the Sister Stamp image that I colored did not stand out against the reddish reindeer paper.  Since there was lots of room on the platform made by the pop-up label, I decided to make another pop-up part and adhere the SS image to it.  To further enhance the image I add a glittered scalloped circle in the background.  The glitter paper is from an American Crafts 6x6 paper pad (from BFC) and easily cuts with a paper punch. The SS image was colored with Copic pens and the kimonos were paper piece from the cutest pack of origami paper I found at BFC.  The Studio G reindeer stamp with sentiment was punched out and colored with ink and chalk.  The Santa with sleigh is a sticker from an Authentique 12x12 sheet and was added to give a surface for writing a message.
 After finishing the inside of the card, I decided to keep the front simple so I added  Doodlebug Xmas washi tape (lots of styles at BFC) and a panel of Authentique card stock.  Authentique stickers from a 12x12 sheet were easy and fun add-ons.
This close-up shows the AC ribbon and the bell charm zipper pull that I added for a little whimsy and to hint at the Japanese girl images inside the card.  Also adding a zipper pull is a nice 'little' gift to someone with whom you don't exchange Xmas gifts.
The side view shows the width of the pop-up platform and the small pop-up stand that I made and adhered to the back of the reindeer image.
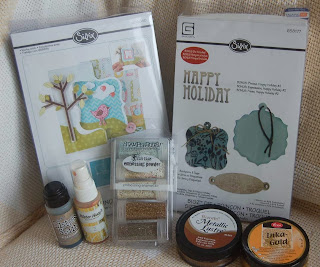
Here are the terrific supplies I used to make my first Christmas card of the season.  (I forgot to include the Studio G stamp reindeer with the sentiment.) All of them were purchased at Ben Franklin Crafts and make me excited, speeding up my crafting.  So many projects in my head and so little time to get them done.  I think I was in the same predicament last year and I vowed to start seasonal crafting earlier....sigh.  Hope your 2013 crafting has a light at the end of the tunnel!  Thanks for making a stop here today.  If you have time, I'd love a comment......every one is a precious energy boost.

Wednesday, November 27, 2013

Autumn Splendor Stand Up Card

 I wanted to do another quick autumn card because...well, Thanksgiving is almost here and I still haven't mailed out my family newsletter that I am intent on sending BEFORE turkey day.  Also I wanted to showcase the new Sizzix stand up card die that I purchased at Ben Franklin Crafts.  It's a great die and features a beautiful curvy pop out top.
To accent the top portion I found two labels on a page in the DCWV Autumn paper pad.  I cut these out and sprayed them with Mister Huey's gold color mist before attaching them to the card. The front label was adhered with pop-dots and the inner one was taped on with Merikan double stick tape.


The impressed  Martha Stewart die cut leaves were rubbed with Metallic Lustre before they were added.

The feathers from BFC were glued down and for a touch of humor I lightly stamped the words, "Gobble, Gobble, Gobble".
Here is a close up of the gold brad that I attached to the gold trimmed woven ribbon (from BFC). To tone down the shine of the brad I rubbed it with the Metallic Lustre...yes, it works on metal too!  Fianlly, I rubbed the inside edges of the card with brownish ink for a vintage look and used the Mister Huey's gold mist here and there for a bit of sparkle.
Since I showed products used on this card in previous blog posts, I just photographed the  Sizzix die, Mister Huey's color mist, and DCWV paper pack.  I hope this post has enticed you to take a look at the amazing new dies now being sold at Ben Franklin Crafts.  They are so simple to use and make card designing a creative pleasure.  Thank you for your interest in my blog. I hope you will be a frequent visitor. Happy Holidays!

Saturday, November 23, 2013

Pilgrim Thanksgiving Card Plus Centerpiece Idea

Here is another card made with a postcard panel from a 12x12 Tim Holtz all occasion pad, using the Sizzix Flip-It Scallop Square die (purchased from Ben Franklin Crafts).  This is what the die cut card looks like flat for mailing.
This photo shows a close-up of the crackled scallop edge that I made using Tim Holtz Distress crackle paint (antique linen).  After the paint dried,I rubbed on some TH distress ink (dauber) and Metallic Lustre. to emphasize the crackle. For the bright gold edge of the postcard I simply applied (with my finger....real hi-tech) some Inca Gold paste paint.
The Flip-It feature of the die allows the card to stand up for display.  Adding some faux turkey feathers made the card more interesting without extra weight.
I found an old Hero Arts stamp which had an appropriate sentiment. To age the panel I sanded the edges and rubbed on more Metallic Lustre and sprayed some gold Mister Huey.
This card had to be backed because I got it so wet with spraying and painting that the card warped and split apart at the folds.  To fix this problem I taped the card together before adhering the die cut backing with Merikan double stick tape.
These are some of the supplies I used to make this card.  Most if not all the products used were from House Mart Ben Franklin Crafts.

 The two faux  postcard Flip-It cards (see previous post) can be paired together with artificial garlands (from BFC) to make a centerpiece for your Thanksgiving table.  If you have a really big table you can make several cards and angle the images/sentiments so every guests has something pretty/inspirational to look at during dinner. If appropriate, some of the panels could include photos of the guests during previous Thanksgiving celebrations.

Thank you so much for taking the time to visit my blog site during this busy time of the year.  I hope I have given you ideas to help make your holiday season a beautifully crafted one. Happy Thanksgiving!

Tuesday, November 19, 2013

Faux Vintage Postcard Thanksgiving Greeting Card


I really like vintage postcards and dies that turn paper into interactive cards so of course when I saw this new Sizzix die at Ben Franklin Crafts, I knew I wanted to pair it with the vintage Thanksgiving paper from a pad of Tim Holtz all occasion sheets.  The trouble with the paper was that it lined up the postcards in a row. This seemed too boring so I cut three of the postcards out and angled and glued them on a piece of scrap paper before cutting them with the inner part of the die. With a little hand trimming I glued the patchwork postcards to the die cut card.

Next I smudged the edges of the center piece with Inca Gold cream paste and used stick glue to adhere Stampendous gold Fran-tage embossing powder before melting with a heat gun. I lightly sprayed over the melted embossing powder with Mister Huey's gold. The final step for the front was to glue (3 in 1 Beacon)
on a sprig of an artificial garland that was rubbed first with a little Inca gold paste.
on a sprig  of an artificial .

After gluing on the artificial sprig, the card became top heavy so I die cut another card from a printed Kraft paper (Graphic 45) and taped (Merikan double stick) it to the back of the card, trimming out the inner part first.
The sentiment was stamped on an altered tag that was die cut from a piece of textured yellow card stock.  After stamping, the edges were rubbed with Distress ink ( Tim Holtz dauber) and embossed with gold Fran-tage.


All of these supplies used on this card  were purchased from (House Mart) Ben Franklin Crafts.  At first I intended to just use this card for a greeting but after making another similar one, I realized that they would make great table centerpieces.  Please return to this blog site to see what I mean.  I think you'll like this idea to spruce up your Thanksgiving table.  See you soon!

Saturday, November 16, 2013

I Made This Just For You!

I wanted to make a gift for someone who loves the Japanese story, Totoro.  While in Japan I found some Totoro origami paper in a pack of 6x6 sheets.  I thought that the pack had just the one design but there were only four sheets of this design in the pack. Wanting to conserve my supply, I decided to use just one sheet on both the pencil case and journal. I found a beautiful scrap of real marbled paper (hoarded so long that the bugs had made holes on parts of the handmade sheet...sigh) which I felt would look well with the origami paper and give the gift a rich look.
I used Merikan double stick tape (from Ben Franklin Crafts) because it doesn't warp the paper. The ribbon was adhered with 3 in 1 Beacon glue.  The opening for the snap in the Totoro paper was made by aligning the paper and pressing to mark the position of the snap.  Then it was a simple matter to punch a hole with a regular paper hole punch. There was even enough of the marbled paper to cover the pen which was included with the Sierra Pacific unlined journal.
Here is what the journals and colored pencil sets look like before being decorated.  Notice that the pencil set even has a sharpener in the cap.....so neat and reasonably priced.  You can make a bunch of these gifts for party favors, office grab bags, teacher gifts, etc. and not go broke.
Oh, I wanted you to see just some of fantastic ribbons I found at Ben Franklin Crafts. These rustic ribbons will give your crafts a shabby chic look. My Totoro set has an autumn feel, but with a change up of paper you can make Christmas journals or sketch books to use all year long.  Happy gift crafting!

Wednesday, November 13, 2013

Another Autumn Ombre Card

Here is a brighter ombre card that I made using the Neon orange and yellow ink pads (purchased at Ben Franklin Crafts).  As on the last ombre card, I swiped the white card stock with the pads and then rubbed with a paper towel to blend.
For the leaves, punches (Tim Holtz and EK Success) were used to cut the shapes from dark green cardstock.  Next leaf stamps with patterns were used to stamp some copper ink onto the punched out leaves. Gold embossing powder was sprinkled on and embossed with a heat gun.  The areas that were not embossed were rubbed with copper ink to bring out the texture of the green cardstock.  Finally a sentiment was stamped on in brown ink and  some K and Co. acorn stickers were added for accent and to cover a boo-boo  ;)   Thank you for making a visit to my blog site. I hope you enjoyed what you saw and will return again for another look at my holiday crafting.

Sunday, November 10, 2013

Honey, I'm Gnome!


I purchased the gnome stamps at Viva Las Vegas Stamps and I've been waiting for the right moment to ink them up.  I thought they should be used with a mushroom/toadstool home, so when I found the new Sizzix pop up card die at Ben Franklin Crafts, I knew what to do.


Here's the card standing up to reveal the greeting.  After die cutting the card from kraft paper core brown card stock, it was run through a woodgrain embossing folder (maker unknown).  Lightly sanding the card brought out the woodgrain.  The gnome stamp had shading so it was easy to color the image with Copic pens from BFC.  For the stem of the gigantic mushroom I used Sierra Pacific birch bark paper.  The polka dot cap of the mushroom was cut using the card as a template. You could make the cap larger than I did but you need to use card stock that has a plain or coordinating back so it doesn't look funny on the back of the card. (My orange polka dot paper had ice cream print in the back and I didn't want it to show, so I cut the mushroom cap to exactly match the shape and size of the card half circle.)


This close-up gives you a better look at the embossed leaves and woodgrain.  I used the same technique for embossing the leaves as I explained in the previous ombre card post.


The side view of the card shows how the card stands up. I put a piece of the birch bark paper inside the card to have a smooth area to write a message. 'Happy Thanksgiving' was stamped in copper and embossed with gold powder. The texture of the green strip was highlighted by rubbing copper ink along the edges and mounting it on a plaid strip, rounding the corners with a corner punch.

I love this new Sizzix stand up card die because it has so many possibilities.  Ben Franklin Crafts has lots of new card dies which would be great for holiday crafting or gift giving.  Be sure to take the time to check them out.  I'm sure they'll get your brain connections exploding with new ideas.  Happy Crafting!

Thursday, November 7, 2013

Tag! You're It!

During November I always do a lot of baking and gifting.  To make even simple muffins look festive, I believe the secret is in the packaging.  Ben Franklin Crafts has so many seasonal and regular cello bags, ribbons, and paper crinkles to choose from that jazzing up your baked goods is easy.  Of course, I like to make beautiful tags to add to the packaging so I can include a sentiment/recipe/ingredients.  
Tags are a great way to use up scrap paper (gosh I have a lot) and test out new techniques/tools/materials.
Here's a close-up of a new product  (purchased at Ben Franklin Crafts) Mica Fragments (Stampendous) which I used to add a soft shimmer to the leaf.  I think this product (5 types in the package) adds an interesting look to dark paper. I first rubbed ordinary stick glue to the punched out cardstock leaf and then applied the mica powder.  To get it to adhere well, I rubbed it in and then sanded it a bit to bring out the paper texture and make it look less shiny.  Finally the leaf veins were scratched in with a sharp needle point. The edges of this tag were rubbed with the paste paint (Metallic Lustre), which is a super product for many surfaces, sold at BFC.
Of course this is my favorite kind of tag because it has a photo (my son in small kid days) on it.  Making photo tags and wrapping them around holiday napkins makes a good place card and it doubles as a favor.
This tag was cut with a Tim Holtz die (from BFC) and aged with TH Distress Stain.  The artificial leaf was taken from a garland and enhanced with Iced Espresso Metallic Lustre.

Thanks for taking the time to read this blog post.  I hope it's been an enjoyable experience.  If you have the time, I'd appreciate a comment from you.  It's always good to know there are blogland readers visiting. Okay, "Tag, you're it!" .......your turn to make and show your tags. LOL!

Sunday, November 3, 2013

Ombre Autumn Wheat Card

 I've been admiring so many cards recently (both in magazines and blogs) that have ombre colored backgrounds.  This graduated color palette is achieved through various methods.  I simply rubbed ink pads onto smooth, matte white paper. I started with the light straw color and added the orange from the other end, rubbing the color with a paper towel to blend the colors.
I saw a really lovely card on Annette's blog, Clever Creations. She used a wheat stamp as the focal point of her ombre card.  When I found a wheat stamp in the bottom of my autumn stamp box, I knew I wanted to do my own version of her card.  Thanks, Annette for inspiring me again.  (I don't know why this close up seems almost greenish....it was definitely light yellow like the first photo when it was in my files.)  The wheat was stamped in copper ink (Brilliance) and lightly dusted with gold embossing powder which was heat embossed.
The plaid paper and Fall color sticker are K and Co. products.  As you can see in the photo, the wheat stamp is from Hero Arts. The Heiko three color raffia ribbon was purchased from Celebrations (next to the BFC in Mapunapuna).  This simple card took very little time to make and will be used to send out holiday greetings with a family newsletter.  Christmas always gets chaotic with gift exchanging so I'm hoping to actually get this in the mail before Thanksgiving......I think I can....I think I can.....choo-chooo!