Friday, May 29, 2020

Floral 'Bloom' Card

I love flowers, but I haven't made a floral card in ages.  As I was tidying up my craft supply rolling carts (I ran out of shelf space LOL!), three never used products jumped up and said, "Use Us!" Being an obedient crafter, I listened.  I was pleased that I did.  It was so simple to use the Sizzix Tim Holtz die and cut the front of a Paper Arts linen card. Next, I adhered a piece of pearlescent vellum to the back of the card front because even though I originally imagined the card with a cut away front, the openings were too big to leave without a back.  I stamped the flowers on watercolor paper with red Memento ink and stamped the leaves with green ink. (I used Memento ink because it is waterproof and I planned to water color over the design.)  I am a very crude watercolorist but I tried my best with Kuretake watercolors and Prisma watercolor pencils.  The finished blossoms and leaves were die cut and attached with foam squares.  (The stamp and die floral set was a freebie from a magazine, but there are so many floral sets available that you can substitute one of your choice.)  The final step to this very simple card was to die cut 'Bloom' from gold foil paper and attach it with glue.
I have a lot of free time these days (who doesn't) due to self quarantining, so I decided to fancy up my envelope with the Sizzix envelope flap die set.  The envelope that came with the linen card didn't have a flap that matched the die shape but luckily I just happened to have a matching green one that didn't have a card. (Sometimes things just work out that way....hooray!) This was a good card making day....easy crafting and an addition to my all occasion card stash.  Hope you are having 'good crafting' days too!


Monday, May 25, 2020

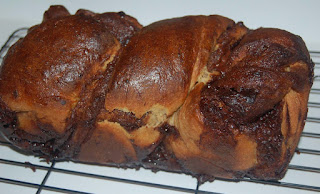
Chocolate Cinnamon Swirl Bread

 This year for Easter, I decided not to make hot-crossed buns or even my biscotti bunnies.  I saw on a Martha Stewart site a recipe for Chocolate Cinnamon Bread and I thought it would be a good challenge.  I am very proud that I was able to successfully follow the recipe and obtain a tasty end product. 
The recipe was a bit complicated and probably not for a novice bread baker.  Considering that I had some very old yeast and gluten flour, it was an Easter miracle that it came out with a good texture and moist deliciousness.
Since I know that this recipe is a good one, next time I think I will make several loaves to share with others.  This virus quarantine gives lots of us time to try new things. I hope you'll look for the silver lining in the dark clouds and enjoy learning while waiting for the sun to shine again. Aloha to all!


Thursday, May 21, 2020

Birthday Cards for Future Use

 Having lots of free time (due to the quarantine), I decided to make cards for my stash.  Also I decided to ink up stamps that have never gotten 'inky'.  I chose a Hero Arts postal background stamp and two Mama Elephant stamps sets that I thought would pair well with the background.
 Because the cute creature stamps came with dies, it was easy to color them and die cut them out.  The postal background stamp was used with dark blue Memento ink on Lawn Fawn speckled card stock.  HM Ben Franklin Crafts has an ample supply of inexpensive stickers which I used on these cards...so many cupcakes with foil edging. Oh yes, the Lawn Fawn 'celebrate' die was used on blue foil paper to create the delicate word on the top card.  Well, that's all for this post.  Hope you're keeping busy crafting cards and other cute items.

Sunday, May 17, 2020

Love You to the Moon and Back Card

 This card was made with no one special in mind, but with all the nieces and nephews having sons, I know that this 'boy' card will come in handy someday.  I was playing around with watercolor paper and Distress dyes but nothing stood out. I added some Liquitex gold spots (put the ink on a stiff brush and flick it) and then the piece seemed just right for an outer space card featuring the Whimsy images.  In the stamp set there is the sentiment, "Love You to the Moon and Back" which I stamped on black paper and heat embossed with silver Hero Arts powder.  The arrow was hand cut and points to the moon which was made from Yupo paper sponge dyed with alcohol inks. (I couldn't find my moon stamp with craters so this was my solution.)  The space creature and ship were stamped on Pearlized Silver Cardstock (Paper Accents) and heat embossed with Nuvo black sparkle powder.  I like the look of the metallic spaceship. Copic pens added color and Glossy Accents added some shine.
 For the inside of the card (click on the image to see the details better), I stamped the rocket on gold pearlized cardstock and heat embossed with HA silver powder.  Nuvo Crystal Drops added some color.  The words were stamped and heat embossed with silver powder and silver Liquitex was flicked on the entire inside of the card so the rocket would appear to be in outer space.  Most of these supplies were purchased at HM Ben Franklin Crafts.  If the stores are still closed due to the pandemic, I hope that you will be patient and know that we are trying to reopen as soon as possible. HouseMart Hugs!

Wednesday, May 13, 2020

Banana Blueberry Muffins, Mom's Banana Bread Recipe Re-make


 What are you doing to keep busy during the virus days?  I've been doing some baking to use up my 'someday' stockpile of frozen fruits.  (I throw cut up fresh fruit in the freezer when we go on a trip in the hope to someday put them in baked goods.)  In this recipe, I used frozen bananas and blueberries. I substituted 1 cup of the wheat flour with coconut flour just to see how it would affect the recipe.  (Cooking is always like a science experiment to me.)  I discovered the batter was a little thick so I added a splash of soy milk to thin it out.  Anyway, I really liked the way these muffins taste, so my experiment was a success.  I put the baked muffins in the freezer....hahaha! They took up the space once occupied by the fruit!


                                                      Banana Blueberry Muffins

1 cup sugar
1/2 cup butter
2 eggs
3 ripe or frozen bananas (mashed)
1 cup whole wheat flour
1 cup coconut flour
1 tsp. baking soda
1/2 tsp. salt
soymilk for thinning batter
1 cup frozen or fresh blueberries

Cream the butter and sugar.  Beat in eggs and mix in the bananas.  Stir in the flours. Add baking soda and salt.  Thin the batter with soy milk if necessary.  Gently mix in the blueberries.  Spoon the batter into 12 paper lined muffin cups.  Place the muffin tin into a cold oven and turn it on to 350 degrees.  Bake for about 20-30 minutes until a knife inserted in a muffin comes out clean.

Note: The original banana bread recipe is very old.  I don't think ovens way back then had a preheat setting which is why the loaf was put in a cold oven.

Saturday, May 9, 2020

Mother's Day 2020 Cards

 This card is going to a hard working doctor who is also the mother of two adorable twin boys.  It was pretty simple to make except for all the fussy cutting. Starting with a pre-made step card blank ( Hot Off the Press), I chose some Graphic 45 printed paper which reminded me of wallpaper.  The package of 5 cards comes with a pattern to cut printed card stock to cover the card, but it was not correctly sized so I ended up measuring and cutting my own pattern.  I stamped the Penny Black image twice, once on a printed paper and once on white marker card stock.  After coloring the image with Copic markers I cut it out and glued (Martha Stewart glue pen) it onto the printed chair before cutting out the entire chair and sitting lady.  I adhered the chair with foam dots.
 The side view shows how more dimension was added with a 'happy mother's day' banner (Lawn Fawn) and small roses.
 Here is another version of the card I made for myself and mothers in blogland who would rather craft than clean. LOL!  I used Ai stamp sets for the images and saying.
 I made the same sitting lady fussy cut image for the inside of the card and added a stamped (Dandelion Designs) sentiment on a Sizzix die cut.  I hope all of the messy, crafty mothers out in blogland have a good day of relaxation and crafting.....cleaning can wait!

Tuesday, May 5, 2020

Vintage Cameo Locket Necklace


Being home for an unknown length of time (due to the Corona virus) does have some benefits.  My husband has become stir crazy and started building shelving and organizing our clutter. Yay!  I have been shamed into a doing a little tidying up too.  On my barely visible side kitchen counter I discovered a myriad of items including the intricate curved metal piece that is holding the cameo.  Rather than tucking it away in a box of jewelry findings, I was inspired to create a vintage looking piece for myself.  Whenever I travel I try to peek into a few antique shops to pick up bits and pieces for my 'someday' creations.
Both the filigree part and the locket were found separately but somehow seemed perfect together.  The cameo (lady head carved out of shell) is set in a locket which is not a common find.  A gold filled bail and jump rings were used to combine the parts.
The gemstone chain was purchased at a trade show from a vendor who said it was made by hand in India. The bail was a lucky find from my ancient stash. I think I found it in a BFC sale basket of odds and ends.  As many of you know, I am a magpie (bird who collects shiny objects) and often gather pretty things for future use.  Making this necklace really made me happy because it closely resembled the finished piece I saw in my mind before I started(a rare occurrence) and kept me from dwelling on the local happenings with all the quarantines.  No worries; just craft and smile.

Friday, May 1, 2020

Llama Birthday Card

 I bought the Avery Elle stamp and die sets quite a while ago because I knew that it would make a great birthday card for my friend who adores llamas.  Recently, while playing with a Hero Arts background stamp, I created a background that somehow seemed just right for the llama images. (I think the colors and swirly pattern looks like an ethnic South American fabric.)  To make the llamas even more special, I used a glue pen to adhere white Fun Flock to them before die cutting them out.  I had to fussy cut the Lawn Fawn stamped conversation bubbles and rubbed some lavender ink on the edges to make them less white than the llamas.  The die cut cactus had white edges that were distracting,  so I colored them in with a light green Copic pen. (This is a trick you can use on the edges of die cut images so that they will blend into the background.)  Finally, on the back of the card I stamped a maker's mark from a Lawn Fawn set so that the recipient would know that I made the card especially for her.  It amused me to make this card for my friend and took my mind off the feeling of impending virus doom.  Send a friend an envelope of cheer and make yourself happy too!