Wednesday, October 28, 2020

Halloween Tags with Resin Charms

These tags started because I had lots of oddly shaped decorative paper scraps leftover from cutting out boxes.  Using the Lawn Fawn tag die, I cut out dozens of tags and began making resin charms.  Go to HM Ben Franklin Crafts to find the supplies and learn the how-tos.  I am planning to tie these tags onto treat bags of homemade cookies. After eating the cookies the recipient can remove the charm from the tag and attach it onto their bag or backpack.
These two matching cat tags (cat print on the backside of the plaid) and resin charms were made for two special trick-o-treaters who own twin dark grey cats.  The ribbon/yarn ties were from my hoarded stash but you can find a glorious supply of ribbons and yarns at HM Ben Franklin Crafts. Go check out what your favorite island craft store has for sale this Halloween. Happy Crafting!
 

Saturday, October 24, 2020

Trick-O-Treating Panda and Dragon Cards

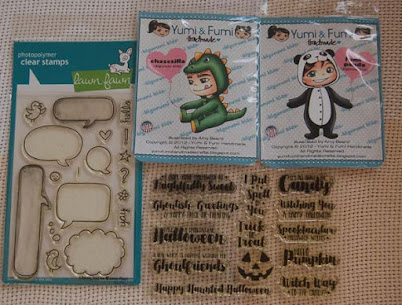
While digging around in one of my Halloween 'stuff' boxes, I re-discovered two really cute Fumi and Yumi stamps. Sadly, this stamp company may not be in business anymore, but if you are one of the lucky ones to have purchased their images, you can continue to make cute projects. This is the benefit of good quality rubber stamps. The costumed cuties were stamped with Memento black in on marker paper and colored with Copic pens.
I'm not sure which company produced the sentiment stamp set (probably a sample from Lawn Fawn), but it was easy work to stamp the words with in the stamped Lawn Fawn speech bubbles and then fussy cut them out.
Both the images and speech bubbles were adhered to the cards with thin double adhesive foam dots. The background papers are adorable designer papers from Pebbles and Doodlebug Designs.  I kept these cards simple because they probably are going to children and will eventually end up in the trash.  However, I do have two nieces who used to keep the cards I made, much to the annoyance of their clean/orderly mother. Hahaha!  Have fun Halloween crafting!
 

Tuesday, October 20, 2020

Masked Pumpkins and Distanced Squirrels

Here's another quick and silly Halloween card. I used Lawn Fawn stamp and die sets that I purchased but never inked up for at least a year.  The stems of the pumpkins were stamped on green paper, cut out and pasted onto the pumpkins along with white masks before the entire pumpkins were die cut.  I drew on the mask folds and the 6 ft. line.  This slim card measures 8-1/4" X 3-1/4".   I do believe that Halloween is a time for fun so I hope that this card puts a bit of humor into this crazy pandemic situation. Make a card and send someone some Halloween smiles!
 

Friday, October 16, 2020

Scaredy Cat and Wind-Up Mouse Halloween Card

This year I've decided to spend less time on Halloween projects so that I'll have more time to create Christmas items.  This card was super quick because it mostly require die cutting and gluing.  I did also draw in the mouse face and heat emboss the spider web with silver Nuvo powder.  Do you think the cat will like the taste of the mechanical mouse?  I hope the recipient of this card will think it is funny as he has a cat who once spent days hunting for a mouse in their house and then presented it as a gift. That was an amazing trick but definitely not a treat!
 

Monday, October 12, 2020

Quick Halloween Trick-O-Treat Bags


Since my grandsons may or may not be going trick-o-treating this year due to the pandemic, I decided to make them simple Halloween bags so they can at least collect treats from their grandparents.  The purple bags ( a set of various colors) are from HM Ben Franklin Crafts and make a great base for one-time-use bags.
The bat was made using a Lawn Fawn die set that was for decorating mini boxes.  I only used the face and wings.  Gold foil paper was glued behind the eye holes and the same was done for the ears (pink paper) and teeth (white paper).  
Some purple glitter was glued onto the wings and the bat was adhered with foam squares.


I wanted to make the bags identical (like my twin grandsons) but I only had one of each word cut-out.

I was happy to find a matching ribbon in my Halloween stash box.  In fact, everything used on these bags except for the LF die set came from my hoarded Halloween collection...I'm embarrassed that I can never resist a cute Halloween paper or embellishment. HM Ben Franklin Crafts always has a sweet selection of Halloween craft goodies.
Since I may need to mail these bags to my grandsons (if we are still in quarantine),  I made sure that my bags would fold flat without getting ruined.  Anyway, I hope that all of you try making trick-o-treat bags even if it's for giving goodies to older, bigger kids (a.k.a. adults). Making trick-o-treat bags can be a great way to use up your ever-growing Halloween stash...wink*wink*.
 

Thursday, October 8, 2020

Halloween Spooky Tag Bag


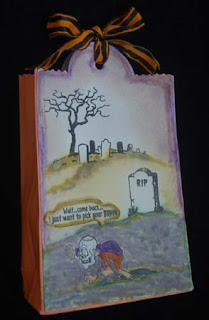
What is a tag bag?  Well, you've never heard of one because I just invented it...I think.  I was tired of making Halloween cards and tags so I decided to use the humorous/spooky Whimsy images on a new type of project.  I started with the extra large Little B tag die that I rarely use because of its gigantic size. ( I do use the other tag dies in the set.) I cut one tag from a printed card stock (the tombstones) and another from watercolor paper.  
Next I cut a piece of printed cardstock 12 x 8-1/2" (the orange bag).  Overlap the short edges of the rectangle by 1/4" and glue down the overlap. Center the overlap and flatten the piece before folding the two side edges in by 3/4".  Unfold and pleat the sides of the bag.  Fold up the bottom of the bag by 1-1/4" before tucking in to form the bag bottom. Use glue or double stick tape to seal the bottom flap.  Trim the side edges of the  large tags to fit the bag.  Measure the height of the bag so that the tag will sit even with the top straight edge of the tag.  Cut the excess of the bag top edge with a zigzag scissors.
 Using the Whimsy stamps and black Versa Mark ink, I stamped the scene on the watercolor paper tag.  Ranger Distress Ink pens and watercolor pencils were used on the images.  Water was sprayed on to blend the colors and give a grungy look.  After the watercolor paper was dried, I glued on the tags to the front and back of the bag.  A ribbon was tied into the tag holes to complete the look.  I love the way this new project turned out and I'm sure that I will make more tag bags in the future.  It is easy to do, makes a perfect-sized bag for treats, and uses up more scrap Halloween printed cardstock.  Yay!


Sunday, October 4, 2020

Halloween Mummy Slim Card

This year I resolved not to buy any more Halloween stamp or die sets but when I saw the Whimsy offerings this year, I caved.  I envisioned so many possibilities for the haunted house die and I loved the clever sayings in the stamp set. I started this card by rubbing Hero Arts distress ink onto watercolor paper.  I sprayed and sprinkled water until I achieved a look that I liked.  Once the paper was dry,  I used 3 in 1 Beacon glue to adhere the die cut house and scenery to the colored background.  You might prefer using a ballpoint pen with white glue as the clear glue leaves some shiny residue, but it does dry fast so I like that. 
The mummy was easy.  I just stamped Versa clear ink on black card stock and heat embossed with opaque white powder.  The image was then fussy cut and fastened onto the card with foam dots.
The words were stamped onto brown card stock and then hand cut into a sign shape.  I used an embossed woodgrain die to add some realism but I don't think it added much so next time I will omit this step.  I am pleased that this card turned out pretty close to the one I had in my mind and it was super easy.  Maybe I'll make just ONE more Halloween card....heeheeehee!