Friday, February 26, 2021

Frog Mini Envelope with Heart Closure and Small Card Enclosed

As usual, I didn't get around to making all the Valentine projects I had planned.  Normally, I would put the unused products into a box marked for Valentine 2022.  However, I had so many ideas that I knew I would forget by next year so I decided to complete a few projects and then put them into a box for next year. I loved playing with this little Lawn Fawn die which makes a mini envelope with a heart closure.
This die set even has a part to cut a little scalloped edge card and script letters spelling 'for you'. I cut the frog and heart from the DP paper that I used to make the envelope.
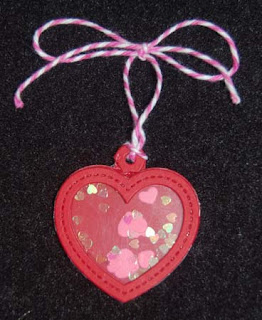
I also had a small LF heart shaped shaker die that I wanted to test out.  I cut two extra heart-shaped rings to thicken the walls that would hold the mini hearts (cut using the die) and Martha Stewart heart sequins. A piece of acetate was used under the top heart ring to form the window.  I think this mini shaker heart would be useful for jazzing up a small gift even if it's not Valentine's Day.  The little envelope and card can also be used all year round as a gift enclosure instead of or with a full size card.  Okay, I'll make a few Valentine-ish projects before I put my boxes away and start on Easter...promise!




Monday, February 22, 2021

Panda Tag and Gifts

I decided to make a panda birthday tag to go with a gifts of panda items that I  selected.  The adorable panda charm kit is from HM Ben Franklin Crafts.  The sweet panda make-up is from Tony Moly.
Using the Little B tag die, I set it slightly above the fold of the green card stock so that when cut, the tag would still be connected on the top. The pandas on the tag were colored with Copic pens and cut with the matching Whimsy dies.
The bamboo plants were stamped with green ink and a very old PSX rubber stamp (possibly no longer available) was used on the inside of the tag.  I think the gifts seem more special with the addition of a matching tag.  I hope the recipient will love it!


Thursday, February 18, 2021

Unicorn Picnic Birthday Card

Needing a birthday card for one of my favorite people, I decided to break out my Lawn Fawn unicorn picnic stamps and dies.  The birthday girl has a cheerful disposition which is why I think unicorns and rainbows match her. I also chose to use the LF reveal wheel die and extra parts because I love interactive cards....makes it look like I really worked hard...*wink*wink*
A close up of the reveal wheel shows how the recipient can rotate the words to show three  different adjectives.  Perhaps it would be better to choose shorter words because the ones I used barely fit in the cloud opening.  You can also see in this photo the pastel pearlescent paper rainbow which was cut with the Lawn Fawn rainbow die.
At first I was going to use the dessert stamps and dies that came with the LF sets, but then I found the Doodlebug Designs stickers on my messy desk and decided to use them instead.  I think it was a good choice because they look so luscious.  The unicorns were colored with Copic pens (gold pens on horns) and glazed over with Scribbles clear sparkle.  For the clouds, I used Martha Stewart flocking powder (white with sparkles). The background card stock (KaiserCraft) and the card base (Paper Accent) are products from HM Ben Franklin Crafts. If you're like me, you'll have fun playing with this type of card before mailing it off, which is reason enough to make interactive cards.  Send some sunshine in an envelope to someone who truly deserves it!


Sunday, February 14, 2021

Valentine Bears Shaker Card

I didn't get to use this Hero Arts stamp set last year so I was determined to make something with it this year.  I love the sweet bear images which I colored with Copic pens and die cut with the matching HA set.  I heat embossed the Crate Paper stamped words with white ink and embossing powder onto a printed swirl pattern vellum paper. I fashioned a packet from the embossed vellum and another piece of vellum to enclose tiny heart sprinkles and confetti. Along the inner edges of the packet I used foam tape to add some shaker room.
I cut a front panel from white parchment using the scallop edge  Mama Elephant rectangle die and aligned it onto the pink card before using the Little B heart die to cut through the front and inside layer.  Next I embossed the white scalloped panel with the Lawn Fawn quilted die.  Then the shaker panel was taped between the white scalloped panel and the pink card front.  Now the shaker effect can be seen from two sides of the card.  I hope your Valentine's Day is beary sweet and that you'll shake it up to send hearts aflutter!


Thursday, February 11, 2021

Sweet Potato Currant Bread

This is an update on the rosemary garlic bread recipe that I posted on Jan. 12th.  I did make the bread again in the Dutch oven but this time I took out the rosemary and garlic and added currants, purple sweet potato and cinnamon.  I originally thought I would use raisins but I saw the currants and thought they would work better because they were smaller.  You can refer to the original recipe and use same amount of potato, 1 tsp. of cinnamon, and about 1/2 c. currants.  If you're wondering, this sweet potato bread is an amazingly dense, sweet bread almost like a dessert.  Try it...I'm sure you'll love it!


Sunday, February 7, 2021

Valentine Mini Calendars


These are the quick mini calendars I made for Valentine tuck-ins.  (Tuck them into your mail or leave them on someone's desk.)  They use 8"x3" strips of scrap Valentine design card stock.  Sore the strips at 3", 6", 6-3/4", and 7-1/2". Fold the calendar bases and use double stick tape to fasten the ends.


Attach the Vippies calendars (I forgot to remove the Dec. 2020 front page.) and conversation heart foam 'candies'. 

If you are like me, you have tons of Valentine card stock scraps at least 8"x3" so you can make lots of mini calendars to give away.  If your paper is really busy put less foam hearts and add smaller blings.  Go ahead, make some smiles and use up those scraps and embellishments. Hoarding makes you ugly. LOL!
 

Thursday, February 4, 2021

Valentine Calendar Notepads


A long time ago I purchased (for under $2 each from HM Ben Franklin Crafts) these notepads with shiny foil covers.  I tucked them away with the idea that I would use them someday.  Well, my 'someday' is this Valentine's Day! I thought they were perfect to pair with my odds and ends of Valentine ephemera, card stock, washi tape and stickers.


My goal was to make eight different notepads to give to friends and family.  I tried to keep them relatively flat so that they could be kept in a purse and used for random note taking.

 
I also decorated the backs of the notepads.....gotta be pretty all around right?


The insides of the notepads were rather plain so I decided to decorate them too.  I added  calendars because I thought it might be useful to have one handy when writing notes and I still have lots of them leftover this year. LOL!

I only purchased one new item to make these notepads and that was a Sizzix die and stamp set.  I found it in the red clearance section of the Hilo Ben Franklin Craft store.  What a deal and very useful for many other Valentine crafts.  Whenever you see inexpensive, undecorated items don't be afraid to hoard them for a 'someday' use.  You never know when you'll have 'pandemic' time to create pretty little things to send as 'happy mail' to friends and family. Hugs!


Monday, February 1, 2021

Valentine Hanging 2021 Calendars

After purchasing a Lawn Fawn slimline Valentine die, I couldn't wait to try it out. Oops, I forgot to take a photo of it.  I like that it is a two-part one that includes a scallop edge one and an inner one that die cuts three hearts with cut out words inside of each heart. (The heart not shown says UR Cute.)  Because I haven't used my Santoro rubber stamps in a long time so I decided to ink them up for this project.

Using waterproof ink and watercolor pencils on watercolor paper gave me the desired effect on these images.  I pulled scraps from my Valentine paper box and used various ones to create four different slimline calendars.  Rather than fussing with the tiny letters, I simply pasted contrasting paper behind the hearts.
Between the layers I glued some Heiko (not photographed) ribbon and tied them in a bow for hanging purposes.  On the back of each panel I glued a LF die cut scalloped rectangular paper upon which I stamped a favorite saying.  I added Vippie calendars and various heart stickers from my overflowing collection.
I'm pleased with the outcome of this project but still have a problem....What do I do with all the calendars I still have leftover?  Unfortunately, calendars don't have an indefinite shelf life. LOL!