Tuesday, October 29, 2019

Up-cycled Autumn Gift Bag

Fall is the start of the holiday season during which there are lots of gatherings requiring hostess gifts.  I like giving baked goods in decorative gift bags.  The Hawaiian Airlines snack bag I received while on my last flight was a nice quality with great woven ribbon handles....perfect for up-cycling into an autumn gift bag. At HM Ben Franklin Crafts I purchased a really attractive hedgehog ribbon which I cut to size, removed the wire supports and glued to the bag on both sides. For the veined leaf (which is covering the HA logo), I used the dies that came with a recent Papercraft magazine.  I flicked (with a stencil brush) some gold Liquitex paint onto the solid paper leaf before gluing on the veined leaf.  I didn't spend a lot of time  decorating this bag because my baked goods are the real gift....right?  I truly believe that presentation makes the present even more delicious.

Wednesday, October 23, 2019

Going Batty Halloween Card

 I love the Penny Black cat and Whimsy Stamps bat images and thought they would look great together on a card.  However, I didn't want to fussy cut them out so I decided to try masking the images and laying Distress Oxide inks over them.  I started with a rectangle of watercolor paper and stamped the cat onto it before applying Nuvo black sparkle heat embossing powder. After setting the powder with a heat gun, I stamped the image on a piece of scrap paper and cut it out to form a mask.  While holding down the mask, I stamped the bat image to the side and heat embossed powder onto it too.  Keeping the masks in place, I blotted some Distress Oxide inks around the images and sparingly spritzed some water onto the inks until I was satisfied with the colors.  After the paper was dry, I used a stenciling brush (see photo below) (purchased from HM BFC) to flick on the Liquitex silver ink (also purchased at HM Ben Franklin Crafts) before moving the masks.  Next, I colored in the images with Copic pens. It was simple to put this card together with double stick tape and foam dots behind the K and Co. die cut sentiment.  Covering images with masks (not the bat one on the cat LOL!) is a good way to protect the images while working on the background and really cuts down on the intricate fussy cutting.  Give this technique a try on your upcoming holiday cards. Happy Holiday Crafting!


Thursday, October 17, 2019

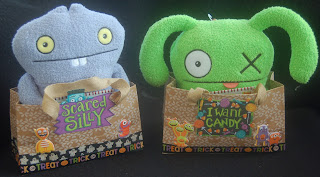
Ugly Dolls in Upcycled Treat Bags

 I spied these two 'Ugly Dolls' in HM Ben Franklin Crafts and knew that I had to get them for my twin grandsons.  I had been planning to decorate and upcycle some Hawaiian Airline food bags . They had the potential to be a perfect match with the Ugly Dolls.
I wrapped washi tapes around the bottoms of  each bag and glued on colorful K and Co. die cuts to cover up the airline logo.
  To match the Ugly Dolls I found some puffy, googly eyed stickers in my Halloween stash and stuck them on.  That was it...done!  Even though my grandsons are too young to beg for candy or dress up as monsters, I think they'll enjoy the toys as much as I enjoyed making treat bags for them.

Sunday, October 13, 2019

Winnie-the-Pooh Birthday Card

 I collect bears and Winnie-the-Pooh is one of my favorites. My Pooh bear is rather 'loved' so I decided to make this card to his likesness.  I started with a clear stamp that I purchased in Japan but I'm sure there are lots of images to purchase online.  This one had a nice shaggy look which I enhanced with Fun Flock. I fussy cut the image (stamped on yellow card stock) and applied (with a glue pen) a mixed combo of yellow and brown flock.  For the red shirt I stamped the outline on red paper and fussy cut it out. The honey pot was fussy cut and embellished with Nuvo yellow lacquer.  Luckily, I had a bee print paper in my stash which was perfect for the background.
 I struggled to find just the right paper to use for the script words and ended up using a gold foil for the (Hero Arts die cut) 'happy' and a colorful scrap for the 'birthday'  The scallop edge for the card was produced with a Lawn Fawn die that was offset a bit to keep the fold intact.  To give the (Hero Arts die cut) 'birthday' more interest and dimension, I just glued the ends to the card and folded the inside of the word so that it would pop out.
 Although you can barely see it, I impressed a Winnie-the-Pooh and Tigger design (Cuttlebug) onto the envelope.  I think matching the envelope with the card is a nice touch. I made sure to leave room for the name and address of the recipient and my return address.  I know that flocking images is an old school technique, but I hope that you will give it a try.  Afterall, something old can be something new again unless it's an old crafter like me.... I definitely need a time machine....LOL!

Wednesday, October 9, 2019

Cat In a Halloween Treat Bag

 This card is dedicated to Sophie, my son's cat, who believes she is human.  She's been known to snatch hamburgers and fries off the dining table and secretly unwrap and eat them under the bed.  I was planning to make a regular shaker card using a Halloween treat bag instead of making an acetate window.  However, I just purchased the Whimsey clear stamp set that had an image of a cat who looked like it was trapped.  My goofy mind decided that it was Sophie stuck in a giant stolen Halloween treat bag.
 I colored the image with Copic pens and fussy cut it out.  A little adhesive was placed on the paws, tail, and face. Sophie was stuck to the inside of the bag before adding some assorted sequins. The bag was sealed off and a ribbon tied on.  I stamped the saying on a piece of matching paper, heat embossed it with Nuvo black sparkle powder, cut the paper into a tag shape, and tied it onto the bag with twine.  The whole bag and tag were adhered with pop up foam dots.
 This is what the inside of the card looks like.  Funny that the card stock sheet I used for the front actually had a cat print on the reverse side.  After stamping the CC Designs sentiment in white and heat embossing it with Nuvo white powder, I added googly eyes and a strip of washi tape.  I really love the way this card turned out because it is almost exactly how I imagined it....that's rare!  Lots of the supplies including the treat bags (50 for $3.99) are from HM Ben Franklin Crafts.  Have a Happy Crafty Halloween but just make sure that your cat isn't getting into your craft supplies!

Saturday, October 5, 2019

Candy Corn Resin Jewelry

Yes, candy corn is one of my favorite Halloween candies and I just learned that it is my son's favorite too....must be the bright colors and soft but not sticky texture.  Anyway, I figured out how to turn these iconic Halloween treats into jewelry with the use of the new LED resin available at HM Ben Franklin Crafts. It was so simple to insert a 3" piece of gold wire into the top of the candy and apply a drop of resin to the joint. After the resin is set (only takes a minute and there's no mixing), I applied the resin to the surface of the candy and set it.  I did it again to insure complete coverage. I've discovered that my finger is the best tool for this procedure.  Once the second layer of resin is set, jewelry pliers were used to form the wire wrapped loop.  A final drop of resin was applied to the tip of the candy and set to strengthen the wire wrapped joint.  For the bracelet, wires were inserted into both ends of the candy corn and loops were formed after resin was applied and set.  I hope you'll give these resin projects a try so you can wear them to your Halloween parties.  I have plans to make gummy bear jewelry next....if I don't eat all the candy first...LOL!
Tip: Realized that while on the wire the candy corn could be dipped into the resin in the bottle for coverage before hardening under the LED light.  This is a better method than spreading the resin with my finger. I dipped each candy corn twice and hardened the coating after each layer.

Tuesday, October 1, 2019

Halloween Bat Tonic Cards


This card was created because I love the Whimsey image so much that I inked it up almost as soon as I got the stamp set.  At first I was going to do a watercolored background but then I realized that I had a gigantic stack of Halloween papers that were begging to be used so I found two prints that worked well with the image. 
I also discovered in my Halloween box of stuff, a Tim Holtz web die that I had never tried after hoarding it for years.  I used it on silver vellum paper which was great looking but a bit of a bother to remove all the little cut out pieces.  Luckily, one pass trough the Big Shot machine yielded a web big enough for both cards. 
The images were colored with Copic pens and the edges of the circles were rubbed with lavender pigment ink.  The word labels were from my really old stash of Halloween stickers which need to be used up before the sticky backs dissolve...LOL!  For a little more color and sparkle, I added some Doodlebug Designs crystal dots. I guess I really am obsessed with all things Halloween as I have more card and projects rolling around in my head. I hope you'll visit again soon to see what I've created for this season of spooky happenings.