Monday, July 29, 2019

Resin Floral Key Chains

 I wanted to make something simple for three ladies I am going to see for a rare lunch date.  While at the Japan Hobby Show I came across a booth that sold dried flowers and clear plastic key chains, coasters, bookmarks, etc.  I decided that the key chains would make a perfect something-something friendship gift.  Once the dried flowers were sealed in the plastic case, I decided to paint on a layer of LED resin to the opening.  I feel that setting the resin with the LED light would add protection to the flowers from humidity.  To complete the gift, I put each key chain into a windowed Daiso bag (10 for $1.50) and sealed it with a thank you sticker (which comes with the bags).  See what you can do with a little effort, time and very little money. Make a gift today and make someone smile!

Thursday, July 25, 2019

Cotton Candy Birthday Card

While shopping at HM Ben Franklin Crafts, I spotted the Avery Elle cotton candy stamp and die sets.  As a child, cotton candy was my favorite carnival treat so of course I had to purchase the sets.  It brings back wonderful memories of childhood.  To capture the fluffy spun sugar look, I glued on pink raw wool fibers.  Fluffy yarn could also be used.  I stamped the words on a dotted print card stock circle and glued that into the cotton candy. 
 Once the fluff is pushed aside the words are revealed.  I added (with foam dots) the Hero Arts stamped animals that were colored with Copic pens. Some sequins and crystal glitter were added for sparkle.
 I also used the dies to make a small tag. The bigger die was used to make the tag from a folded card stock and the smaller die cut was glued on top with the wool fibers.  I tried spray glue and Beacon glue but Crystal Lacquer worked best for adhering the glitter.
With State and County Fairs coming up,  summer is the perfect time to create a cotton candy card and tag. I hope that they bring the recipients sweet memories too.

Sunday, July 21, 2019

Lavender Resin Pendants


So sorry for the lousy, dark photos.  It was hard to capture the realistic look of the real lavender flowers encased in resin. The first one is the pendant that I am sending to my July born friend.  It is very delicate just like her.  The oval bezel was purchased from HM Ben Franklin Crafts in the resin department.  A piece of wide, clear tape was placed under the bezel before pouring in just a little LED Padico resin and setting it with the LED light.  The light automatically shuts off after about a minute.  Next I added the real lavender and more resin.  Once that is set, more resin is added to form a dome. Then I removed the tape and did the same on the backside.  Since this oval bezel had a bail, it was simple to add a jump ring and string the pendant on a dainty chain.  All findings are from HM Ben Franklin Crafts.
Here is another pendant I made with LED resin and lavender flowers.  It was made in a heart-shaped silicon mold.  The tiny screw eye was a little tricky to set onto the resin heart, but tacky putty helped steady it while I added a tiny drop of resin.  Because the LED resin is quick setting (a minute and no mixing), this pendant was completed in just a few minutes.  I added a lavender silk cord to match the color of the flowers in the resin.
This is what the adjustable back looks like.  I overlapped the cording and hitch knotted it on both sides before putting a dab of glue to secure the ends. I plan to apply some lavender oil to the cording to give the necklace more appeal.
For the third pendant, I decided to try a silicon mold with a hole peg.  Because the resulting hole is rather large, a big sterling jump ring was needed.  I could have just strung the sterling chain through the large jump ring, but I decided a fancy sterling silver bail might be nicer.  Our local HM Ben Franklin Crafts now carries the LED resin and lamp.  I think the resin brand sold there can be set with LED or UV lights.  They both don't need measuring or mixing and set quickly....the UV requires about 15 minutes and the LED just takes a minute!  You really need to try your crafting skills with resin...so much can be created effortlessly!

Wednesday, July 17, 2019

Lavender Gifts

A few posts ago I showed blogland a birthday card with a lavender fairy theme.  Well, I finally got everything together for the gift I plan to send to a dear friend.  I thought you might like to see the gift items in case you didn't understand what I was talking about.  From my vintage collection of plates and cutlery, I am giving her a hand painted dish and butter knife.  The knife is so she can cut slices off the homemade chunk of lavender soap. (Soap supplies are available at HM Ben Franklin Crafts.) Also in this photo is an oval resin pendant that is filled with real lavender flowers from Hokkaido. I hope that the birthday girl will love these personally chosen and crafted lavender gifts.  In the next post I will show close-up photos of three different lavender resin pendants.  Please stop by this site to view them. Thank you for your interest.

Saturday, July 13, 2019

Wedding Reception Photo Frame and Table Vase


Remember when I said I'd show you what I made using my Daiso purchases?  Well, here's what I did with the all white photo frame.  First, I rubbed the surface of the frame with gold metallic paste. HM Ben Franklin Crafts sells several brands of gold rubbing paste so you should check it out. 

This photo shows how the gold paste highlights the scrolls on the frame.  Next, I glued (with Beacon 3-2-1) on various flowers and some butterflies cut out from colored vellum. 
A little lace was added to showcase the flowers. 
The butterflies were made by stamping (Hero Arts) and embossing the wings before die cutting.  Nuvo crystal white embossing powder was used to give the iridescent look..
The same butterflies were used to decorate the table vases.  Probably fresh flowers will be used and not the artificial hydrangeas (from HM BFC) in the photo.  Although, I really think artificial flowers are very realistic these days. The table markers were simply made by stamping the Sizzix Table and No. onto white paper circles. The elegant hand blown vase is also from HM Ben Franklin Crafts.  I've tried to keep this reception simple because there was a real wedding earlier and the costs keep mounting.  Wish me luck in pulling off all of the festivities and leaving everyone still smiling!

Tuesday, July 9, 2019

Panda Bear Gift Bag

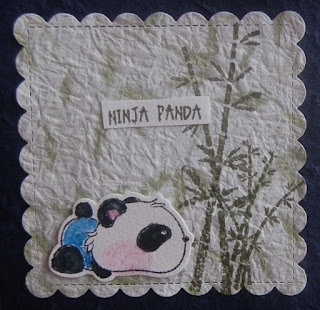
 Do you recognize the Daiso $1.50 textured bag?  It's amazing how easy it is to jazz up the surface with the humorous Whimsey panda stamps. I started by using a Lawn Fawn scallop square die to cut some leftover crinkle washi paper.

Next, I stamped the bamboo images on the panels with olive green Momento ink (available at HM Ben Franklin Crafts). The words were stamped with the same ink and cut into labels.
 The bears were stamped on watercolor paper because I hoped the colors would bleed and look more ...ahhh...'Asian'? However, Copic pens require a steady hand especially black pens.  I reverted back to my trusty watercolor pencils....scribbled a little and 'painted' with a wet brush....just like small kid play time.
 I couldn't resist making a matching tag with the funniest image.  I found a weird cording?yarn? in my ever-growing stash of fiber stuff and it seemed perfect for this tag.
This project didn't require many supplies but produced a fancy, cute bag for a special gift for that special person.  Okay, head on over to Daiso to get these bargain priced wonderfully textured gift bags and enjoy crafting you own one-of-a- kind 'cuter than a panda butt' bag!

Friday, July 5, 2019

Daiso Items For Crafters

 Have you shopped at Daiso....where practically everything is priced at $1.50?  I never fail to find a multitude of amazing items for crafting.  I plan to use the wooden boxes to house a bag of coffee and a mug plus maybe some cookies for a unique Xmas gift.  The pastel plastic trays will make a good holder for a gift of make-up. BTW the make-up sold at Daiso is really quite good comparable to some high priced department store brands.
 All lovers of washi tape will go nuts for the $1.50 rolls...even the wide ones!  Besides the cool designs there are canvas washi tape holders with clear windows. Washi collectors will also like the plastic  washi tape dispensers.
 I'm very fond of Japanese paper covered tablets especially the ones with string binding. These can be dressed up with stamped designs or other Japanese print papers.  In this photo is a cool textured white picture frame which can easily be gilded with gold paste and then fancied up with flowers and ribbons.  The colored twine will possibly be used for braided bag handles.
I love the floral plastic trays and have already used them to be the base for gift baskets.  The round faux laquer trays are also going to hold some Xmas goodies.  I was excited to discover the real bamboo trays at Daiso because I knew they would be perfect under homemade soap...avocado?
                                      

As I was leaving Daiso, I spotted some lovely textured bags with corded handles.  I can already envision these decorated with Japanese paper and some Asian stamped designs.  Please return to this site where I will post the finished crafts.  Lots of Xmas crafts to complete...get started!

Monday, July 1, 2019

Lemonade Shaker Card


Nothing says summer more than lemonade, so when I discovered two sets of lemonade themed stamps and dies in my stash, I was super excited.  I guess I was saving them for the day when I realized that they would be marvelous together.  I started the card by applying water diluted Distress Oxide inks to a watercolor paper panel for the front of the card.  Next, I used the Pink Fresh bottle die to cut an opening in the watercolored panel.  Before double sticking a piece of acetate to the back of the cut out bottle, I traced the opening on to a sheet of foam the same size as the watercolor panel.  I also traced the bottle shape onto the card front so that I would know where to place the shaker stuff and the front panel.  I put double stick tape all around the bottle opening and the edges of the watercolored panel but only removed the tape protector around the bottle.  Before sticking down the front panel, I stamped and die cut the straw.  The bottom of the straw was glued down so that it would be inside the bottle and the top part was cut off and glued to the outside of the bottle.  A pile of Queen and Co. yellow sugar and clear ice sprinkles plus green sequins were placed in the traced outline of the bottle on the card front.  Then I carefully pressed down the bottle shape with the acetate window and then removed the double stick protectors from the edges of the watercolor panel.

The My Favorite Things girl image was stamped on marker paper and colored in before paper piecing her dress. She was adhered to the card on foam pop up pieces.  The citrus fruit slices were stamped and die cut before adding them to the card.  I know my explanation is a bit lengthy but hope you can understand it. Write to me if you need more clarification.  I'd love to hear from you.  Hope your summer is refreshingly sweet!