Thursday, October 31, 2013

Happy Halloween Winner!

To thank all my loyal readers, I have decided to randomly select one comment from the month of October and send the writer the gift card holder shown in my last post.  In the holder I will include a $25 Ben Franklin Crafts gift card.  As in the past for every comment you sent in, you had one chance to win ( i.e. 6 comments=6 chances).  I do this type of random drawing several times a year.  Okay, without further ado......the winner is......drum roll please........ Niki G. (Stampn HI).  Niki has a great blog site and leaves frequent comments on mine.  She has also been a lucky winner before.  Congrats!  I will be contacting you soon to mail you the BFC gift card.


           HAVE    A    SWEET   AND   SAFE    HALLOWEEN !


Note:  These banana pumpkin spice muffins/cupcakes are made with           oatmeal, whole wheat and nut flours.  Even the frosting is                   healthy Splenda sweetened Greek yogurt (no one will know).             The decorative sprinkles,paper cups and picks are Wilton                   brand (purchased at BFC).   Yes, your Halloween
          breakfast can be spooky fun, sweet, and healthy!                

Tuesday, October 29, 2013

Happy Halloween: Zombie Gift Card Holder

Seems like everyone is crazy for zombies these days....maybe it's because of the show, Walking Dead.  Anyway, I just love the zombie stamp set with words that I found on the Pink Hippo website.  I think the image is spooky-funny and the words in the set are hilarious.  First I die cut the gift envelope (Sizzix seed packet) out of Bo Bunny Halloween cardstock.  I cut the white marker pen paper with the Sizzix decorative frame set. Next I stamped and colored the zombie image with Copic pens. For a gruesome touch, I splatted the Victorian violet Distress Stain dauber (lots of colors to choose from at BFC) to look like blood drops in the background of the zombie label.
  The Hero Arts 'love this' arrow was stamped with Neon ink (not shown)  and decorated with dots of WOW glitter (purple with flecks of blue).  For the other words I stamped a word bubble from a Hero Arts cling set and then stamped the words inside the bubble.  Except for the Pink Hippo stamp set, all the products and tools used on this gift card holder were purchased at Ben Franklin Crafts.
This was a quick, 'NO BRAINER' gift card holder perfect for a Halloween treat to someone who can't or prefers not to eat sweets.  For a crafter, this Halloween card holder with a Ben Franklin Crafts gift card will surely bring out a pumpkin grin.  Thanks for stopping in for a visit.  Hope you enjoyed this post and will leave a comment if you can spare the time. BOO-yah!

Sunday, October 27, 2013

Little Witch Girl Treat Box

As I was straightening up my craft room and looking through my Halloween stuff, I discovered lots of items that I haven't tried out.....I'm a bad hoarder.  Anyway, the Hero Arts cling stamp set caught my eye because the image is so precious.  Somehow I felt that it paired well with the long shape of the tall box with scallop flap (Sizzix die from Ben Franklin Crafts)
To make use of my bagful of Halloween paper scraps from previous years, I decided to do a patchwork effect on the box base.  With my warped sense of humor, I think that it's funny that the sweet little witch seems totally unaware of the evil eyed skulls behind her.  I debated about the closure for the box and finally settled on using a blackboard clothes pin (Sierra Pacific).  The mini blackboard serves also as a place to write a name or message.  I purchased the blackboards awhile ago and could not find them at Ben Franklin Crafts anymore, but I did find and purchase a 12x12 pack of blackboard paper.  When I run out of the blackboard clothes pins, I plan to simply cut a rectangle of heavy Kraft card stock and a smaller one of blackboard paper and glue them onto a mini clothespin.
Maybe since I have all my supplies and scraps out, I should get a head start on next Halloween's goodie containers. I'm sure that you also have lots of Halloween scrap papers so you should consider using them to decorate your treat boxes.  It's a great way to use them up and I'm sure that the recipients of your boxes will be more interested in the treats than the fact that all the boxes are not exactly the same. Now the big question is, "What treats should I put in the Halloween boxes?"  No-calorie craft supplies?

Thursday, October 24, 2013

Wrapped too tight? .......Who's Your Mummy?

When I saw this Pink Hippo mummy stamp set (on someone's blog site), I knew it had to be added to my collection.  The main image is so scary cute and the included words made me smile.   Bo Bunny Halloween cardstock (from Ben Franklin Crafts) was adhered to chipboard using spray adhesive and the  treat box was cut using the Sizzix die called 'bag, caddy'. The caddy was secured together with Merikan double stick tape.

Next, the mummy imaged was stamped and colored with Copic pens.  At BFC I bought the Tim Holtz dusty Concord Distress dauber which was used to smudge the background.  A frame for the image was cut using the Sizzix decorative frame die which I also purchased from BFC. The framed image was adhered to the caddy using pop-dots so that the ribbons had room to be tied onto the caddy handle.

So that the back of the treat caddy wouldn't look too bare, I stamped words and added WOW neon orange glitter (available from BFC).  I think that moms who are creative and go all out to make Halloween a fun time for their children need to be treated too, so I plan to put lip gloss, hand cream and other mother pampering goodies in this Halloween treat caddy and give it to a special mom.
Note: Niki G.(Stampn' HI) must be a literature buff because she quickly was able to tell me the poet's name (Lear) that I couldn't remember while writing my last post.  Thanks Niki, you saved me from going insane trying to remember.

Monday, October 21, 2013

Last of my 'Authentic' Halloween Cards


Although I could keep playing with these vintage-look Authentique Halloween 12x12 sheets that I bought at Ben Franklin Crafts, I need to move on to other projects.  This last card started with the cute owl with pussy cat panel and the grossgrain ribbon with yellow polka dots. Somehow I felt the dots paired well with the full moon.  For the background paper I chose a zebra print paper from Canvas Corp because it was sort of cat-like or woodgrain for a forest feel. The typed sentiment was cut from the header on the Authentic sheet because I liked the sound of the words and it was like a freebie that would otherwise be thrown away.  The paper for the banner is also fashioned from an Authentique cardstock sheet.  The circular paper with the words, 'Trick or Treat' was snipped from the bottom of a Martha Stewart paper candy cup.  I was attracted to the crispy texture of the paper cup (like muffin liners) and I thought that the colors and shape worked well with the rest of the card.  The twine was added to give another rustic element.....and it was on my desk, LOL!  Finally, three yellow crystals were affixed to contrast to the homespun look and repeat the yellow dots again. I enjoyed making this card because it just sort of fell together and turned out pleasing to me. Okay, as promised this is the third and last Halloween card I'll show using the 'Authentic' papers....well, at least for this year. Thanks for visiting.  Enjoy crafting everyday!

 Note:  Does anyone remember the story or poem about the owl and pussy cat?  Do you remember the author/poet? Thank you Niki for telling me the poet's name. It saved me from going crazy trying to remember it.

Friday, October 18, 2013

Quick Post: Another Vintage-Look Halloween Card


I love the vintage look of the Halloween Authentique 12x12 papers I purchased at Ben Franklin Crafts so much, that I decided to make a couple more cards before putting away my Halloween supply box.  This card is similar to the one on my last blog post, but I think I like this card a little bit better.  All the papers and stickers used on this card are Authentique products from BFC. Hope you will return to see a few more Halloween projects which I will post before the 31st.  Please leave a comment if you can spare the time....I love  'em!  Have a crafty week!

Tuesday, October 15, 2013

Sharing Halloween Treats with a Friend

 As I mentioned before, I didn't think I would make Halloween cards this year....that was before I saw this year's line of Authentique Halloween papers at Ben Franklin Crafts. The vintage looking series really caught my eye and there was a particular image that I thought would be perfect to add to a card and enclose in a box of Hawaii treats I was mailing.  I saw a vintage-looking Halloween card in blogland that I thought I could imitate, but alas mine turned out totally different.....not bad, but different.  I ended up assembling the papers kind of like a crazy quilt and I think it works well with the vintage style of the main image.
The 6" square card base was formed from half a sheet of Canvas Corp kraft cardstock.  I think the graphic words (which show on the back of the card) of Live, Love, Laugh are a good match for the sentiment of this card.  The Authentique sticker, 'This is where the Magic begins' made me think that this card would be perfect to frame as an additional gift so I am including a frame in the box of goodies so that after reading my interior message the card can be inserted into the frame and hung wherever appropriate....perhaps the kitchen...perhaps another room? LOL!  Well, that's the fun for today......if you like vintage, go check out the Halloween AND Christmas papers at Ben Franklin Crafts...have some shopping fun....you deserve it!

Friday, October 11, 2013

Instant Shabby Chic Vintage Look

I've been trying to get my mini store locker (acrylic locker boxes in Ben Franklin Crafts) ready to showcase my handmade crafts.  The regular display stands seemed too bland so I decided to make my own cases.  I love the vintage shabby chic look so I intended to paint some display boxes with crackle paint.  However, when I was shopping at Ben Franklin Crafts I happened upon a new product called Inka Gold by Viva which intrigued me.  It is a paint paste that comes in many luscious metallic colors. I rubbed the platinum paste straight onto the unpainted wooden frame with clothes pins.  Because I was going to use the frame as an earring display, I removed the glass front.  In just a minute the frame was dry and I painted Speedball adhesive size (for metal leafing) onto the frame.  When the adhesive was still tacky, I rubbed on some metal leafing.  Next I used sand paper to rub off some of the leafing and push some of it into the wood grain.  
Here is a close up of the distressed shabby chic finish.  Lastly, I cut some vintage looking scrapbook paper to fit the back panel and taped it into place with Merikan double stick tape.  If photos were attached with the clothes pins and the glass replaced, this would make a lovely picture frame(which maybe was the intent).
This is the case I made for displaying my necklaces.  I used the old silver, rose quartz and platinum Inka Gold paint on this one. There are lots of wooden boxes, frames, etc. at BFC that could benefit from a shabby chic finish.  It's simple to do with the products shown in the photo below.
With Christmas coming up I think you could make lots of beautiful gifts for friends and family with the wood products and finishes available at Ben Franklin Crafts. Now is the time to start crafting for the holiday season. Thanks for stopping to read this blog post.  I hope the information has been of interest to you.

Monday, October 7, 2013

Yummy and Healthy Ginger Scones

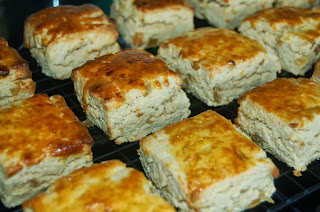
I'm always trying to invent the perfect scone to go with my specialty teas.  My latest creations turned out really delicious and no one would guess that they are made with healthy ingredients.  They are light, buttery, and melt in your mouth with just the right amount of candied ginger.  The first photo shows the scones as they came out hot from the oven.  I always bake on parchment paper to prevent burning and make clean up a breeze.
Here the scones are cooling on a rack to ensure that the bottoms of the scones don't get soggy.  The tops of the scones got a little dark because of the egg yolk wash but my hubby who was drooling said, "They look more tasty with the brown tops."  Isn't he sweet?  He knows how to get free scones. *wink* These scones are simple to make so give the recipe a try and let me know how they turn out.

                                 Ginger Scones                         

2 cups white whole wheat flour (King Arthur)
1 cup almond flour
1 cup coconut flour
8 tsp. baking powder
5 T. Splenda Blend
10 T. butter (cut into small cubes)
1 cup (approx.) chopped candied ginger
2/3 cup to 1 cup buttermilk
1 egg yolk

Preheat the oven to 400 degrees. Sift the flours, baking powder, and Splenda Blend together into a large bowl.  With your fingers work the butter cubes into the dry mixture until the butter is in little pea-sized pieces. Add in the chopped ginger pieces.  Pour in the buttermilk slowly, stirring until a soft dough forms.  (You may or may not have to use the whole cup of buttermilk.)  Pat the dough into a 8x8 square about 3/4" to 1" thick on a parchment lined baking sheet.  Cut the square of dough into 16 pieces separate the scones on the baking sheet. Brush egg yolk on the top of each scone. Bake the scones for 12-15 minutes.


Thursday, October 3, 2013

Baker Cat Birthday Card

When I first saw the window box die (Sizzix) I knew that it was a must for my die collection.  I've had it for awhile and decided it was time to use it to make a birthday card.  I think Joy (Joy of Crafting) used it to make a treat holder but I wanted to see if I could turn it into a bi-fold card so that I could include a Honey Pop element.
After cutting the window and box, I measured an 8-1/2" x 6" piece of cardstock and scored it at 4" and 8". This left a 1/2" strip on one side which was used to attach the backward-folded card to the window. The Inky Antics cat images, honey pop cake, pedestal, candle, and words were stamped, colored and cut out. The words were stamped into thought balloons  from a Hero Arts Cling set.

To add more interest to the cake, flower ribbon was glued on.  Glue only the ends of the ribbon to the card so that it can fold easily without ripping the Honey Pop paper.  I'm not sure what I will put into the window box. Maybe I will fill it with craft flowers or perhaps include a small gift of stamps or chocolate.  Since the card will be bulky, I will probably package it in a cello bag rather than try to squeeze it into an envelope.
I forgot to show the label die (Sizzix). It was a set of three tag/labels with holes.  I fastened the label to the window box with tiny button brads. Oh, and the blue flowered paper background and hand cut rug are from an Authentique 6x6 paper pad.  Okay, that's it for this post.  Hope you liked what you saw and that it will encourage you to return for another visit. Please leave a comment if you can.  I love hearing from you.