Thursday, June 27, 2019

Summer Beach Card

 As soon as I saw the Hero Arts beach sets demonstrated on the Joy of Crafting TV show, I knew I had to purchase them.  They didn't disappoint me as they were easy to use and resulted in a very 'oceany' scene.  For the base of my stamping I used a matte white card stock which may have been too slippery for unicorn white Hero Arts stamping ink. After several tries, I blotted it off rather than heat embossing it. I ended up using the cloud dies (the die set matches the Hero Arts images) on a misty white vellum paper and attaching it to the card.  The inks I used for the waves and sky were Versamark colors.  I had a little trouble with the sand embossing powder because I tried to use a sand colored ink as a base for the embossing powder. It didn't stick very well and so there were a few 'bald' spots which I filled in with Copic markers. The girl image (My Favorite Things) was also colored with Copic markers and then cut with the matching dies. The 'thinking of you' sentiment was heat embossed with brass Hero Arts powder.  The mini shells were glued down with 3-2-1 Beacon glue.  The Hero Arts stamp and die sets are must purchase items for local crafters....so many tropical projects...so little time!

Sunday, June 23, 2019

Dino-Mite Dinosaur Gift Bag

I love using decorated gift bags instead of wrapping gifts in the traditional way with paper and ribbons.  This one started with a plain green bag (from HM BFC) and was whipped up in fifteen minutes.  First a 6x6 square of printed card stock (from the So Puny Doodlebug Designs 12x12 paper pack) was adhered to the front of the bag with double stick tape. Next, the Avery Elle 'I Lava You' was stamped on the cloud above the volcano. Then, all the die cuts (including the Dino-Mite one) were affixed with foam squares.  For added interest, I placed a strip of DB dinosaur washi tape along the top of the bag just below the serrated edge.  Since I still have lots of stickers, I think I'll make a fancy tag to match the bag...no need for a card! Making 'So Puny' themed bags is the perfect way to replenish my happy goodie  bag stash...they'll be there when I need them.
P.S.  Okay, here's a matching tag that I whipped up in less than ten minutes.  Using my faithful Little B tag die, I cut a base from a sheet of 6x6 Doodlebug Designs paper pack.  To make the dinosaur and words stand out, I used the back side of the leftover paper from the 6x6 sheet.  The dinosaur image was just a plain sticker that I added foam dots to and dusted with cornstarch before removing the backs of the foam dots. This is an easy way to make pop-up die cuts from stickers...economical too!

Wednesday, June 19, 2019

Upcycled Sliding Cookie Box


 I like baking cookies almost as much as I like eating them, so after I devoured the La Tour shortbread cookies (coconut) I saved the box.  I knew eventually I would get around to decorating it to house my own baked goods.  The new Doodlebug Designs 'So Puny' 12x12 papers and die cuts were perfect for this project.  I didn't even measure the paper, simply traced around the box and cut with my Fiskar desktop paper cutter.  The paper was attached to the sides of the box with double stick tape.  The top of the box with the clear window was embellished with die cuts from the DD packs.
For more interest I added fine crystal glitter to the sugar bag and fake sprinkles (from BFC resin department) to the cookie.  Upcycling sturdy boxes by decorating them gives me a head start on packaging my holiday baking.  All the supplies (except for the empty box) can be purchased at HM Ben Franklin Crafts. Hurry down to the stores before the good stuff sells out!

Saturday, June 15, 2019

''So Much Pun' Cards in Minutes

 I love silly word puns, so when I saw the new line of Doodlebug Designs selling at HM Ben Franklin Crafts, it was a no-brainer that I would be making some cute, funny cards.  The bases for these cards come from the Doodlebug Designs pack which has several styles and colors of cards and envelopes.
 For this outer space card, I started by flicking with a brush some Liquitex silver ink onto the black front of the card  Once it was dry, I added the colorful card stock from the Doodlebug Designs 6x6 pack to the lower front flap. Next I adhered the Doodle Pop stickers and word die cuts....card one done!
 On this card I used double stick tape to attach the colorful DB food print to the top half of the card.  With the addition of the layered Doodle Pop hamburger sticker, the french fry sticker and a word banner, the card was finished faster than the time it takes me to eat a real burger and fries!
I wanted to show you what the inside of the flap looks like because the sticker extends beyond the edge.  I wiped the exposed sticker with cornstarch so that it wouldn't stick to the front flap of the card when it was engaged.  I hope you will check out the new line of Doodlebug Designs 'So Much Pun' at HM Ben Franklin Crafts.  I know your brain will be flooded with card and tag ideas as soon as you see these colorful,clever products. Have 'Pun' Crafting!

Tuesday, June 11, 2019

Lavender Fairy Card


 Despite all the boo-boos, I think this card turned out decent enough to send to a dear friend.  Because I was giving her a birthday gift of a loaf of homemade lavender soap in a vintage floral plate with a vintage butter knife (for slicing the soap), I decided to use my favorite lavender themed stamp. (I collect vintage/Victorian tableware and dishes.)  Initially, I was just going to stamp the image on a Ken Oliver Water-Media Greeting Card (sold at HM Ben Franklin Crafts), but the surface of the card was too bumpy to clearly accept a stamped image. (The Ken Oliver card does have the benefit of being very sturdy so it holds up through lots of layers of watercolors.)  Anyway, I decided to use Kuretake watercolors and paint over the entire front of the card and flicked silver paint on the surface.  This turned out nicely until I noticed that paint seeped into the inside of card...boo hoo!  Saddened, I cut off the card front and trimmed it down to fit a dark purple card.  Next, I stamped the fairy image onto a less bumpy watercolor paper and colored it in with Derwent watercolor pencils.  I like using color pencils because it's easy to color fine line images. After it was all colored in, I simply used a brush with plain water to activate the colors....super easy!  The final touches for this card were to add a little fine crystal glitter to the wings and a dangling bow of fibers from my stash. ( I am so addicted to ribbons, twine, and pretty yarns...I think I need an intervention...LOL!)
 While I am making a card, I often test the inks, sparkle paints, colors, etc. on small scraps that I later turn into tags....waste not want not.  Here is the tag that I plan to attach to the gift to explain a bit about the contents of the package.  I hope you've enjoyed this one post peek into my crafty life.  Please return often to see what else pops out of my mind's eye.  Comments? Blogland is so quiet these days.

Friday, June 7, 2019

DIY Wedding Guest Book


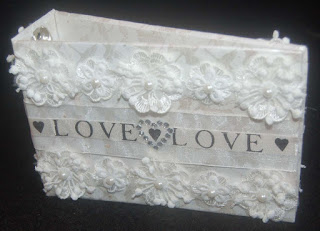
 For my son's wedding reception I wanted to make a simple guest book for the bride and groom. (Writing thank you notes is always easier if all the info is in one place.)  I started the book with a simple two ring binder that I found in a clearance bin.  ( I always think about re-purposing possibilities when perusing the sale tables.) I've been hoarding three of these mini albums for a while so it was exciting to finally find a use for one.  The project started by covering the outside and inside with Japanese crane print washi paper.  I didn't measure, just pressed the paper against the album before cutting to get an approximate size.  I adhered the paper to the album with wide double stick Heiko tape.  It's available at HM Ben Franklin Crafts and is fairly forgiving if you need to lift up and shift the paper.  I had planned to decorate the album with an asymmetric design on the front but after taping down the washi paper I noticed that the zigzag paper on the original cover showed through. I decided that my best course of action was to camouflage the zigzag pattern with ribbon and lace.  I glued on the lace flowers, LOVE ribbon, and heart bling (all from HM BFC wedding department) with 3-2-1 Beacon glue and Glossy Accents.

 I glued the floral lace  and LOVE ribbon all around the album, placing two flowers on the spine.  I added the heart bling just to the front center of the ribbon.  In the photo the heart ribbon and bling look black but actually the words and hearts are silver.  The reason I chose a two ring binder for this project is because I wanted the reception guests to fill out a two holed card with their information.  This way I will have the ability to add the cards gradually to the binder and not make the guests wait around to fill in just one book.  I was pleased that I was able to transform a generic binder into an guest book attractive enough for a wedding reception.   Thanks for stopping at this blog site. Please leave a comment if you have some time.  I enjoy hearing from you. Wishing you crafting bliss!

Monday, June 3, 2019

Hoppy Father's Day Card

 My husband is the best father to my boys (and me).  He's kind, generous, and wise (at times). I decided to make him a froggy Father's Day card this year because he loves frogs, except for Coquis. (I don't mind them and prefer to think of them as singing night birds.) Because my husband admired the resin frog page marker (seen on a previous blog post), I thought that I would try to include it on the card as a small gift. (You can include a pen if you prefer.)  After seeing many shirt motif Father's Day cards in blogland, I imagined one as an aloha shirt with a frog popping out of the pocket.  It wasn't hard to hand cut (from hibiscus print paper) a portion of a shirt and draw in the stitching.  I made a double layer pocket so that the metal part of the page marker wouldn't show when the frog was clipped on.  Two real wooden buttons (like on the old Aloha shirts) were glued on for more dimension and realism.
 For the inside of the card I stamped some of the images from the Lawn Fawn set, colored them and fussy cut them out.  The images were adhered with foam dots and the sentiment was arranged in a curve before stamping in green ink.  Adding a few blue color pencil lines brought the whole card together.  I love this Lawn Fawn stamp set because it has so many cute frog images, scenery add-ons and useful words.  Look for it in HM Ben Franklin Crafts even if you aren't a frog lover.  It's sure to become a well used set for lucky frog Vegas cards. Hoppy, hoppy Father's Day!