Saturday, March 31, 2018

Tales of Two Easters

 The Sugar Easter Egg

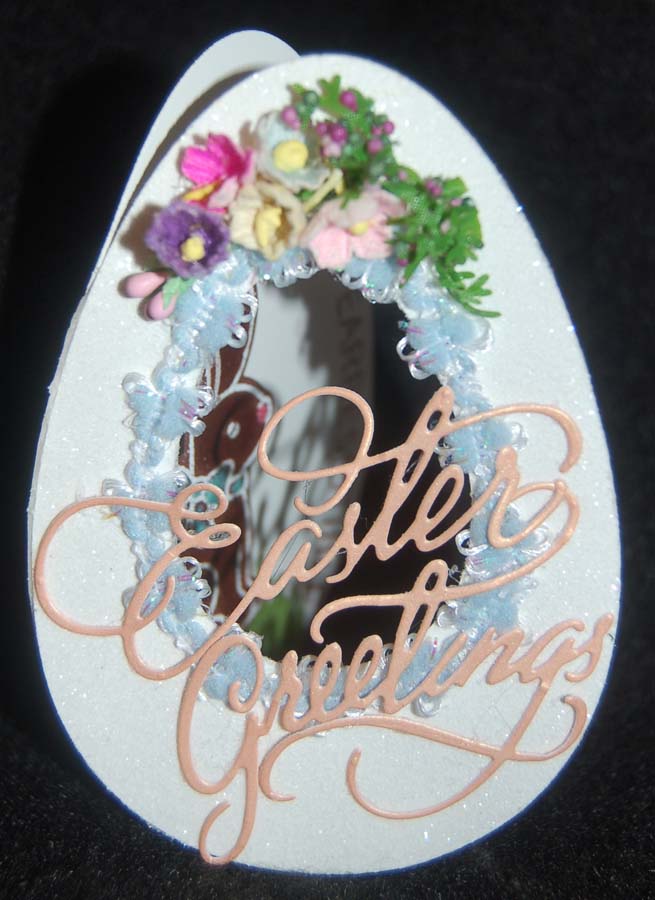
One Easter long ago my parents gifted me with a much desired sugar Easter egg. (You know the kind, decorated outside with icing and with an opening to peek in and see a beautiful scene made of icing.)  I loved that sugar egg and never ate it...wonder what happened to it?  Anyway, that long ago treat inspired me to make this card.  I started it by die cutting (Spellbinders) two egg shapes from white card stock and die cutting a smaller egg shaped hole in the center of one of them.  The one with the hole was run through a Xyron machine to apply an adhesive backing.  Onto the sticky background I sprinkled some fine white sparkle glitter to give it a sugary surface.  I found some frilly blue trimming and vintage-looking flowers in my overflowing stash and applied them to the front of the card.  Using the Impression Obsession 'Easter Greetings' die I cut the words from DCWV shimmery peach colored paper. I think the front of the card succeeded in giving a feeling of the delicate beauty of the too-good-to-eat Easter treat lovingly given to me by parents who knew I 'needed' it even though it was really did not fit in our family's limited budget.

The Chocolate Rabbut

The second Easter tale is one of woe not wonder.  It started with another Easter celebration gift from my parents, a large decorated chocolate candy rabbit.  I loved chocolate but I really had a difficult time taking even a tiny bite of the ears or tail because I feared spoiling the look of my treasured treat.  Our family was traveling to the other side of the island for a camping trip so I carefully placed my chocolate bunny on the ledge of the backseat in our non-air conditioned car. You can guess what my Easter rabbit looked like after the two hour drive. My sister and I cried over the loss especially since the ants attacked the chocolate puddles in the boxes making the whole melted mess totally undesirable. Anyway, the inside of this card is homage to that sad, sad Easter.  I started by stamping the Lawn Fawn image onto brown card stock with white ink. I sprinkled the inked image with white opaque detail embossing powder and melted it with a heat gun.  Next I applied Glossy Accent to the parts I wanted to look like chocolate and used Bo Bunny Pearlescent Paint to detail the ribbon, ear, nose and tail. Then the chocolate rabbit was die cut and mounted with foam dots. The grass was cut with a hand punch and the sentiment (from the Lawn Fawn set) was curved on an acrylic block before stamping.  I hope you've enjoyed reading the two tales of my childhood Easters and now understand that background stories often influence my craft work. Have a sweet and memorable Easter celebration!

Tuesday, March 27, 2018

Die Cut Easter Candy Basket

When I saw the Sizzix die for this basket, I wasn't particularly inspired because the cover photo showed the basket in a grey metallic color like an old lantern.  I thought that the die would be perfect to cut an Easter basket if the right paper was used...a dotted yellow one!  This basket took four die cut panels to form (about half a 12x12 sheet).
I used the grass border punch to form the strip I wrapped around the bottom of the basket.  The bunny and eggs were stamped and die cut with Lawn Fawn sets.  By using printed paper for the eggs I saved coloring time and the bunny only had one pink ear to color. Bo Bunny pearlescent paint was used to add some dimension to the ribbon and tail. I'm not sure why, but the basket handle had a tiny hole on each end. I decided the holes needed some finishing touch so I added (after much indecision and button changing) a pale pink flower button that seemed just right. (I found the buttons in a jar of assorted buttons I purchased at BFC....I think.)
Before using this basket as a candy holder, I filled it with shredded grass (from BFC). I think I need to buy more foil covered chocolate eggs to put in the basket....I already ate the ones I bought earlier....LOL!  Tip: If you don't have time or can't find the Lawn Fawn sets, you can use felt bunnies and carrots (Darice) to decorate your basket.  This will be less work if you have lots of candy baskets to make. Have a sweet Easter!


Friday, March 23, 2018

Glass Nail File With Resin Bunny Topper


I wanted to add a little something handmade to a purchased Easter gift.  These nail files seemed to be the perfect thing to enclose since I already had a bunch of these pretty glass nail files from HM Ben Franklin Crafts.  (The nail files really work well even for shaving off rough edges on resin projects.)

I started by putting a little of the new soft clear resin in the bottom of the tiny bunny mold.  (The new resin really comes out cleanly from the molds.) I set the resin in the UV light and then cut out some tiny acetate sheet flowers (available in the BFC resin department). These flowers were placed in the mold and a little more resin was added and set.  Finally a white liquid colorant was added to some resin and poured into the bunny mold as the last layer.  Once hardened in the UV light the bunny will have a slight depression in the back into which I added a little resin and placed the end of the file on top.  To keep the file level, I used some fun tak ( Loctite) under the file.  I hope that you will check out the resin program at HM Ben Franklin Crafts.  I'm sure that you will find some thing there that you would like to make....it's easy and creative and FUN!

Monday, March 19, 2018

Pampered Thank You Note

Our computer screen saver scrolls through our stored photos so when I saw a card I made years ago, I knew I wanted to make a similar one as a thank you for some beauty products I received.  In the old card I used a card stock that had a bathroom tile design...too bad I couldn't find it again so I used a two sided geometric print from a Sizzix paper pad.  Because the card base die was a thick old style one capable of cutting several sheets at once, it weakened the card at the fold.  Luckily, I have lots of washi tape which not only saved the card but even improved it with a cute cat design  (The recipients love cats!).  On my old card I used acrylic bubbles (Remember when that was a popular embellishment?) to add some realism.  I surprised myself by finding the acrylic dots with very little effort....amazing because my craftroom is so disorganized.
Here is the inside of the card with the swiveling panel upon which I glued a die cut  (Taylored Expressions)'thanks'.
At first I was planning to position the standing figure on the inside of the card but it interfered with look of the card front, so I used foam dots to adhere it to the back of the card.  I forgot to mention that the thought bubbles were made with a hand punch and stamped with words that came with the Greeting Farm stamp set. Although this card is not exactly like the first one I made years ago, I do think it is just right for expressing my thanks for the special pampering gifts I received.  Take some 'me time'.....you deserve it!

Thursday, March 15, 2018

Natural Crystal Set in Resin Pendants

Just a few photos of some jewelry experiments I've been doing. On a trip to the Tucson Gem and Rock Show, I acquired these crystals and set them in resin to form unique pendants.
 It was easy to use the L'Bell supplies (available at HM Ben Franklin Crafts) to set the crystals in the findings with UV resin.
For the top pendant I used a chain made from wire-wrapped gemstones.  The lower pendant has a wire-wrapped bail on a sterling chain.  Hopefully, I will be making more of this type of jewelry to sell in my locker at Hilo Ben Franklin Crafts.  I hope this post has given you ideas for using UV resin to make one- of- a -kind jewelry. Experimenting with your crafts can yield amazing results...give it a try!

Sunday, March 11, 2018

Raccoon With Sunglasses Thank You Card

Recently, one of my longtime friends (from first grade!) sent me a wonderful pair of Mohala sunglasses for my birthday....lucky me!  I wanted to make her a special thank you card.  I happened to be putting away my Valentine stamps and dies when I realized that I didn't use my Valentine raccoon set.  Also, I noticed the raccoons had masks that looked like sunglasses....so I knew immediately what to create.  The Hero Arts dies cut out the stamped raccoons very easily and coloring involved very little work. For the sunglasses, it was simple to stamp and color the Lawn Fawn image, then apply Glossy Accents to make them stand out.
The thought balloon was stamped and hand cut.  Both middle raccoon and the thanks balloon were raised up on foam dots.  The card base was cut from a sheet of Sizzix Geometrics double sided paper. This pack from BFC has lots of good simple designs perfect for backgrounds. As you can see the background really changes the feel of the card.  I hope that you will check out the Mohala sunglasses website for some classy eyewear...protect your eyes this summer!


Wednesday, March 7, 2018

Happy Mail Thank You Card

This card was inspired by a TCW stencil and a Lawn Fawn die purchased from HM Ben Franklin Crafts. I was supposed to use the supplies to make a Valentine card.  However, since I ran out of time to use them for V-Day, I decided to employ them to create a thank you card.  I started the card by spraying the back of the stencil with re-positional Elmer's adhesive.  The stencil was then adhered to watercolor paper before dusting on some Ken Oliver Color Burst powder and spraying with water.  Next, the mailbox was die cut from DCWV shimmer paper.  I found a woodgrain paper to die cut the mailbox post. To make the stenciled, watercolored image seem more postal, I trimmed the edges with a fancy scissors.
 This different colored version of the same card has a nicer color palette, but the blurry image (I sprayed too much water) seems less like a post mark.  However, the Impression Obsession "Thanks" cut from DCWV foil paper does show up well.  Thanks for reading this post. I hope you found it interesting and will leave a comment if you have some time.  I do enjoy hearing from you.

Saturday, March 3, 2018

Happy Girl's Day!

I love, love, love the new Paper Crane design products by Photoplay....available now at HM Ben Franklin Crafts.  The 6x6 paper pad is perfect for local card makers.  I used the cherry blossom design for my card background.  First I used two of the hexagon  Spellbinders dies to form the shadow box (foam dots between the layers).  I stamped the Dandelion Designs sentiment on the back hexagon before running it through the Darice cherry blossom embossing folder and dusting it with pink chalk. The kokeshi doll image was stamped and die cut before coloring it with Copic pens.  The artificial cherry blossoms are from my stash (maybe originally from BFC).  I think they add the perfect touch and give some dimension to an otherwise simple Girl's Day card.  This card is dedicated to all my blogger GIRL friends...enjoy the day!