Sunday, November 30, 2014

Fleas Navidad

This card was created for my cat-lover son who is learning Spanish.  When I saw the wonky C.C.Designs 'Grouchy Claws' stamp at HM Ben Franklin Crafts, it was a no-brainer purchase as I knew I could use it for other projects and it paired well with the sentiment I found in a Paper Smooches stamp set, 'Santa Paws'.  I began by stamping the image on a die cut piece of watercolor paper (because I didn't want to fussy cut the image).  Then I proceeded to make a mask to cover the image so I could I heat embossed the stamped snowflakes and watercolor the background. (I discovered that the best mask was made by stamping the image on a scrap paper and generally cutting it out before passing it through a Xyron sticker maker with a re-positional sticker cartridge.)
The resulting panel was just going to be used as an experiment or perhaps a tag, but I had just purchased the box of American Crafts (40 cards, 4 of each 10 designs) from BFC so I decided to mount it onto one of the plainer cards. (I chose the 'Snow Day' set because it has many cards that would be suitable for non-holiday cards. There are many sets to choose from which contain cards to simplify your card crafting.) The little vial of Martha Stewart tiny beads comes in a set.  The red beads really remind me of miniature holly berries.  I like using these beads in shaker cards because they make a nice swooshing sound. Anyway that's it for now....come back again to see more of my holiday crafts.

Friday, November 28, 2014

Stenciled Pouch and Card Set Hostess Gift

During the holiday season, I'm sure you all have many dinner parties to attend.  I think it is nice (maybe old fashioned) to take a hostess gift.  Since sometimes it is frowned upon to take food or liquor if you were not asked to, so it maybe gracious to give a sweet homemade gift of note cards.  HM Ben Franklin Crafts has lots of blank cards and envelope packs that you can easily stencil and package in a simple burlap pouch (also available at Ben Franklin Crafts).
I used acrylic paint and Martha Stewart stencils (both from BFC) to achieve this look.  Be sure to use a stenciling brush, keep the paint-loaded brush on the dry side, and pounce it up and down to prevent paint from seeping under the stencil.
HM Ben Franklin Crafts also has packs of autumn colored buttons which really look nice on the burlap pouch when adhered with twine.  (I also used the twine to create the button loop.) There are also other styles of Sierra Pacific zippered pouches which can be stenciled and given for holiday gifts.  I hope that you will try your hand at stenciling because it is really easy and fast....great for last minute gift giving.  Thanks for stopping by today!

Wednesday, November 26, 2014

Deer in the Snow

 When our friends send us Christmas cards from Japan, I am often impressed by the subtle designs and colors on them.  With this 'less is more' philosophy in mind, I decided to forgo my usually over-embellished Christmas card and just used three colors and two dies on this one. The snowflake die by Impression Obsession is very intricate but cutting it from opalescent vellum wasn't a problem. However, gluing down the die cut vellum was a bit of a conundrum.  It was too delicate to use the Xyron and too translucent to use most liquid glues.  I found the best solution (although a bit tedious) was to adhere it to the sparkle blue card stock with a glue stick.
It was hard to get a good photo of the card because of the sparkle and shiny foil surface.  The edge of the card was sparkled up with Zig Wink of Stella clear.  You can see in this photo how this helps to pull together all the elements of this card.
I forgot to photograph the inside of the card in which I heat embossed in silver one of the sentiments from the Paper Smooches set. The deer die is a Brenda Walton Sizzix product.  The foil card stock was from a DCWV 6x6 paper pack that I purchased from HM Ben Franklin Crafts.  I also didn't show the sparkle 12x12 pad from which I obtained the blue sparkle card stock. I couldn't believe it, but I found this holiday pack in the clearance section of BFC!  There are so many marvelous everyday bargain priced items for you to discover in your locally owned HM Ben Franklin Crafts stores. They are definitely your one-stop shop for crafting supplies.  Merry Crafting!

Monday, November 24, 2014

Gnome Bottle Tags

I'm not sure why I like gnomes.  Maybe it's because like fairies they live in the forest and are supposed to be magical.  When I see rubber stamps of their image, I usually can't resist buying them. The image on the left is a Paper Smooches product (Jerome) and could actually be an odd Santa if dressed in the right colors.  The gnome sleeping is my favorite image from Viva Las Vegastamps where I also found a bunch of funny  'gnome' sentiments.  I feel that gnomes are a perfect decoration for autumnal cards and tags.
 While most people might use the Avery Elle die to cut wine bottle tags, I decided that this year I would be giving holiday and hostess gifts of flavored vinegar and olive oil.  For this reason, I shortened the tags by tearing off a bit from the bottom.  Distress ink rubbed on all the edges helps to impart a rustic forest detail.  After paper piecing clothes on the gnome on the left, I added some Flower Soft for the beard, Canvas Home Design twine and Dress It Up buttons (all from Ben Franklin Crafts).  For the tag on the right I fussy cut the Copic colored image and drew my own word bubble.
Bottle tags like these are a snap to make and really add a special touch to a simple gift.  If you want to use these tags for packages you can pass the ribbon through the tag or cut a slit on the side of the hanging hole so you can hang it around a big bow.  If you can't find this tag die you can probably make one by rounding the corners of a long rectangle and using a circle punch for the hanging hole.
Dress it up for the holidays but always remember:  There's no place like gnome!

Saturday, November 22, 2014

More Sand Dollar Jewelry

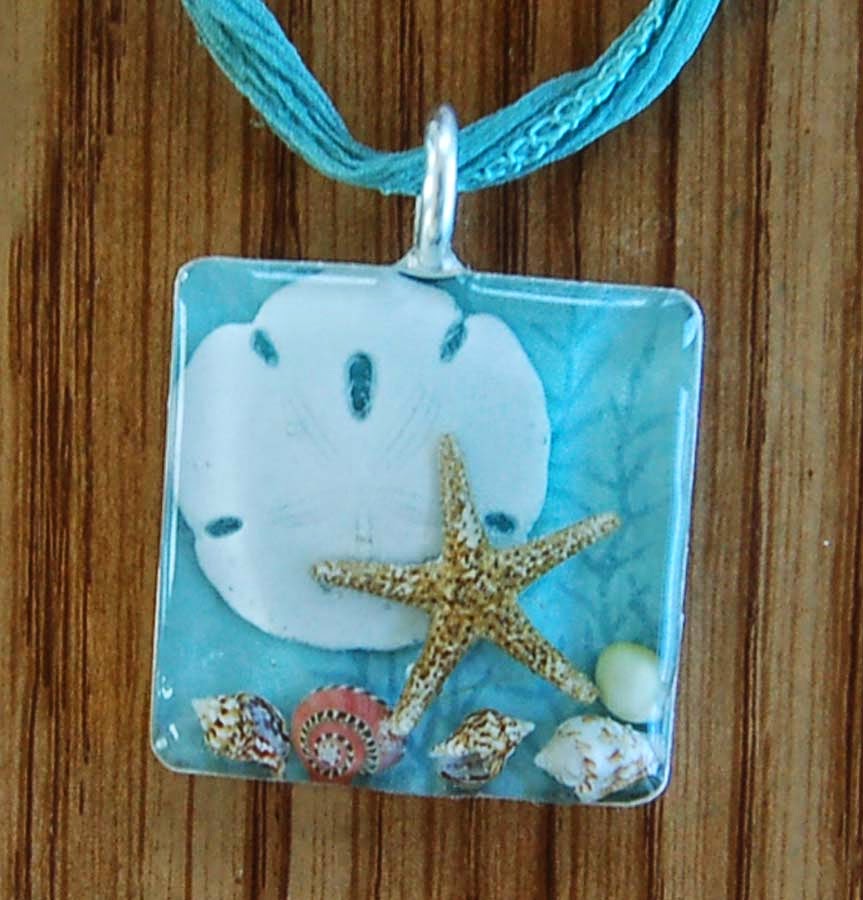
As I mentioned in the last post, I am determined to use sand dollars in my jewelry despite their fragile nature.  For this pendant, I put clear packing tape over the front of the sand dollar after wire-wrapping a bail for it.  Then I poured UV resin on the back of the sand dollar and used a UV light to set the resin.
After the resin was cured (about 5-10 min.), I added a chain to the bail and then attached the sea horse charm, aquamarine faceted teardrop, and wire-wrapped pearl.
Here is a back view of the resin coated sand dollar.  You can see a bit of the resin through the holes of the shell so perhaps next time I will fill the holes with beeswax before applying the resin.  I think the beeswax could be removed after the resin hardens.  I am very pleased with the end result of this sand dollar pendant because I can now wear it without fear of breaking it.  I hope that you will try making your own sand dollar jewelry for yourself and for Christmas gifts.  This style of jewelry is easily constructed and would make a lovely bridal shower gift or bridesmaids' gifts.  Happy Crafting!

Thursday, November 20, 2014

Sand Dollar Necklace with Gift Box

I've always loved sand dollars and thought that they would make lovely jewelry, but alas they are too delicate.  When HM Ben Franklin Crafts started carrying tiny sand dollars in their Bead Shop, I had an idea that they could be encased in resin to make them durable.  Since the UV resin is so easy to use, it took little effort and time to whip up this necklace.  I put some scrapbook paper in the pendant base before adding in the shells and resin.  In less than twenty minutes I had a new piece of jewelry to wear.  I love the way it turned out and preserved the beauty of the sand dollar and starfish.
 I think a necklace like this would make a fantastic Xmas gift for someone special especially if wrapped in this Island Heritage box.  The package contains 12 laser cut boxes with ribbons.  They are sold in the wedding department of BFC.  Lots of beautiful items sold there....go take a look, even if you are not planning a wedding. For an additional special touch, a shell from the BFC bead department can be glued onto each favor or gift box.  Let your creative mind roam freely in any of our HM Ben Franklin Craft stores; it will surely improve your day and life.

Monday, November 17, 2014

Happy Holidays Autumn Card


 Because of the Sizzix magnetic platform (purchased at HM Ben Franklin Crafts), I have been doing more die cutting crafts.  This card was a snap to make because the great Impression Obsession dies were held in place by the magnetic platform.  I cut the tree from a piece of  dark brown smooth card stock that was in a pack found in the BFC clearance section (check it out for some super bargains).  The words were die cut from foil card stock found in a DCWV paper pad.  I love that the IO  intricate dies cut the card stock sheets like they're butter.
I used Reeve's watercolor to bring Autumn colors to the watercolor paper. I also spritzed the watercolored paper with Mister Huey gold to add a touch of sparkle.  After finishing the card, I realized that the candy corn colors paired with the 'spooky' tree made this card look Halloweenish .....hahaha! Oh well, I still plan to send it out as a holiday family card. Autumn Greetings Everyone!

Friday, November 14, 2014

Banana Brownie Bars

As often happens, I had a few bananas which were beyond the point of ripeness.  However, I didn't feel like making banana bread so I came up with this recipe for banana brownies.  While it doesn't have any chocolate in it, it does have the same dense, rich taste of a brownie but with a banana flavor. I try hard to infuse my baked goods with nutritious ingredients so I won't feel like I wasted my allotted calorie intake for the day.  Hope you like this somewhat healthy recipe as much as we do and take it to your holiday family get togethers.


                                   Banana Brownie Bars


1/3 cup coconut sugar
1/3 cup Splenda brown sugar blend
1/2 cup butter (one stick softened)
1 egg
2 ripe bananas
1/2 cup rolled multigrain oats
1/2 cup coconut flour
1/2 whole wheat white flour (King Arthur)
1 T. flax seeds
1/2 tsp. salt
1/2 tsp baking soda
1 tsp. cinnamon

Mix the sugars with the butter.  Add egg and mashed bananas.  Stir in oats and flours.  Mix in the last four ingredients and spread the batter into a 9"x 9 "parchment lined baking pan.  Bake the bars in a preheated 350 degree oven for 20 to 25 minutes or until a knife inserted comes out clean. Cool, cut and enjoy!

Tuesday, November 11, 2014

Autumn 2014 Necklace

 When I first saw the elliptical shell beads at HM Ben Franklin Crafts, I knew that they would be perfect for my annual autumn necklace.  The cut shell beads have a nice rainbow iridescence.  I'm not sure exactly why I feel the need to make an autumn necklace every year but perhaps it's because we don't have a true fall season....so I have to wear it...LOL!  Anyway, I also wanted this necklace to reflect the current trend of shell jewelry.
This close-up shows a bit of the rainbow colors on the elliptically cut shell beads.  Actually all five of the pieces have a very alluring opalescent sheen.  I strung the shells on dark orange beading wire and finished off the closure with silk cord.  This necklace took me only about 2-3 hours to create so it could be easily reproduced for gifts.  Go take a look at the many shell beads available at BFC and you should be inspired to make some wonderful Xmas gifts. Thanks for visiting this site and please leave a comment if you have some time.

Saturday, November 8, 2014

Autumn 'Joyful Greetings' Card

 I am still learning how to use the gelatos and decided to try it with Liquitex light modeling paste (purchased at HM Ben Franklin Crafts) instead of the embossing paste used in the last project.  I think the modeling paste (I chose light because I was putting it on paper but there is heavy modeling paste too for other surfaces) blended better with the gelato colors than the embossing paste.  As this was just a test, I used leaf stencils made from leftover pieces after die cutting Lawn Fawn leaves. In my previous experiment, I used my finger to apply the embossing paste which left a nice leaf-like texture. This time I used a credit card to level the paste applied to the stencil cut out and this resulted in a less interesting surface so perhaps veins should have been drawn in while the paste was still moist.  Since I was rather sloppy with this technique I had to cover up the smudges with Mister Huey gold and added color to the leaves with Zig Wink of Stella.  Both products are available at BFC and are perfect for holiday projects. To achieve the torn kraft paper edge, I used a cardstock with a kraft inner core. After die cutting the Paper Smooches sentiment out of foil cardstock, I decided to apply Elmer's spray adhesive to the back of the words.  This would have worked fine except I kept moving the pieces around and so they left a bit of residue.  Oh well, this was just a test and I learned a lot from playing around. Have fun with your craft experiments!  You just might make a great discovery!

Wednesday, November 5, 2014

Experimenting with Gelatos

 I finally got my hands on a set of Gelatos.  These are crayon-like color pigment sticks made by Faber Castell and are now available at HM Ben Franklin Crafts.  I haven't played with this new product too much but there is a booklet enclosed in the set that shows how to achieve many different effects. Since I had some card stock that had leaves punched out, I decided to use them as stencils.  By mixing various colors of gelatos with embossing paste (Dreamweaver), I was able to fill in the stencils to achieve a leaf-like texture.  Since I still wasn't satisfied with the look, I rubbed on some Viva metallic paste paint and sprayed some gold Mister Huey.
For the gold foil 'thanks' I used a Paper Smoochies die (not shown) on DCWV foil card stock. This card stock cuts easily resulting in a sturdy die cut.  The pack contains many luscious colored foil sheets.  The pretty ribbon with the gold edge is a Heiko product available at Celebrations.  Well, time to get back to experimenting (playing) with my Gelatos.  I think I need to get more colors (two stick packs sold at BFC)....wink*wink* ;D  #timetoshopatBFCagain!

Sunday, November 2, 2014

Hedgehog Tags

Whenever I have leftover papers and parts from a card making session, I make tags....so useful for spur of the moment gift giving.  I just had to use up those extra cute furry hedgehogs and die cut leaves.  (See previous post for a photo of the card I made...after making four cards I still had leftover pieces.) To make the tags more 'autumnish' I added the raffia-like Heiko ribbon that I purchased at Celebrations (I think).  (Celebrations is the cool store next door to the Mapunapuna BFC.)
I used the second largest tag die from the Little B set (sold at BFC).  Love those dies, especially the little teeny one. To add more interest to the leaves. I rubbed on Viva metallic paste paints.  (I understand that this product is being discontinued by the manufacturer, so you better get some while they are still in BFC.) Well that's it for now.  Please visit this site again for more autumn craft ideas.