Thursday, November 28, 2019

Sky's The Limit Birthday Card

The holiday season has begun and my crafting is lagging behind.  Remembering that I needed a birthday card for a 1 year old and a wedding card made me hunt through my stash of handmade cards. Happily, I found a suitable wedding card so I just had to whip out a birthday card.  Because the party is being held at the Pacific Aviation Museum, I decided to hunt for the Dandelion Designs stamp set I purchased years ago.  My memory was accurate and the set was just right for this card and paired well with the Lawn Fawn stamp and die set that I acquired recently.  I stamped the images on marker paper and colored them in with Copic pens before fussy cutting them out.  I embossed the Lawn Fawn cloud images onto the pearlized card blank.  I wanted the clouds to show on the front of the card so I left a big border by die cutting the LF scalloped rectangle of printed card stock smaller than usual.
To make the child's name standout, I die cut the X-cut letters from blue foil paper.  They were then run through a Xyron sticker maker to apply adhesion.  On the inside of the card I used the images from the LF set and used the die set to cut them out....so much easier than fussy cutting!  I like that the clouds show on the inside and outside of the card.  I hope this card gave you some ideas of how to put together an easy birthday card. Okay, onward to Christmas crafting!

Sunday, November 24, 2019

Snow Globe Tags

 As soon as I found the Lawn Fawn snow globe tag die set at HM Ben Franklin Crafts, I knew that I would have fun making Xmas tags with it.  Next to the die set I spied the cute Stampendous cling stamps.  They were only $3.49 so I grabbed a few designs.
 If you've made shaker elements before, you should have no problem assembling the snow globe. I die cut the inner layer from red sheet foam.  This gives a raised area for the sequins and 'snow' to move around.  Clear acetate was glued with 3 in 1 Beacon glue to the back of the die cut green circle of glitter paper.
 The birds and dogs were colored with Copic pens.  I like that the globe tag has its own hanging hole for the twine.  If I could make one change to the tags, I would color the Santa caps a different color so they would stand out more from the background.  Perhaps I could make the tags a light blue instead of red ....ah, next time.  I know I'll be using this snow globe tag die set for many other occasions.  There are other non-Xmas small inexpensive mice stamps available at HM BFC which would be adorable in the snow globe tags.  I have the perfect Valentine tag in m mind's eye....can't wait to show it to you IRL!

Wednesday, November 20, 2019

Autumn 2019 Family Newsletter Card


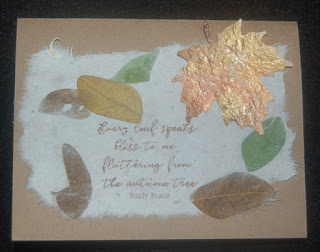
 Every autumn I try to create a card or calendar to go with my family newsletter.  This year we just returned from Japan so I have less time than usual to get everything together and in the mail.  To keep it simple, I decided to rely on the beauty of washi paper with leaves embedded in the fibers that I purchased from a Japanese craft store.  To tear the paper in a desired shape with wispy fibrous edges, I used a wet paint brush to draw the shape and used a straightedge plus fingers to gently pull.  I punched the leaf shape (EK Success) from a crinkled Japanese paper that had some sparkly foil bits. After rubbing some metallic paste to the surface of the leaf, I decided that there weren't enough foil bits so I added more with glue and NUVO gold leaf foil.  I'm not sure when or where I bought the stamp set which includes the Emily Bronte saying, but it is perfect for the newsletter that I am writing that will contain some leaf shaped photos. I am happy that the card is natural looking, autumnal, and easy to replicate. Well, onward to finish the rest of the cards.....each one will be a one-of-a- kind just like my friends and family!


Saturday, November 16, 2019

Woodland Fox with Lemonade Tag/Card

 A dear friend of mine is enduring some major rehab due to a stroke so I wanted to make her a card and attach it to some edibles.  Since I was in an autumn state of mind, I decided to use my Lawn Fawn die set to make this cute fox tag/card.  This set can make three different animal cards with hugging arms.  The dies cut out all the parts even for the eyes and nose...so  easy to put together the animals with a little Beacon 3 in 1 glue (available at HM BFC)
 Rather than have the fox holding a heart, I made a glass of lemonade mini card using a Whimsy stamp set. I stamped the sentiment, "when life gives you lemons" on the outside of the card and  "make lemonade" inside the card.  I really feel this saying is appropriate for my friend who is courageously doing her best to return to normal.
 The inside of the card and the back of the fox provide lots of room for a message.  I added twine so that the tag could be attached to the get well goodies I am delivering.  For added cuteness, I used a Copic pen to make rosy cheeks and glued on a sweet flower.
I love the words that came with the Mama Elephant stamp set (see below), "Hand Crafted Hugs enclosed"and I thought that they paired well with this hugging fox card/tag. Of all the autumn dies I've invested in, I think this Lawn Fawn one is the cutest and most useful.  I like that it can make three different animals a fox, a raccoon and a reindeer. The folded arms add dimension and can 'hold' a calendar, photo or shaker element. Think of the possibilities! Come on, get crafty for the holidays!


Sunday, November 10, 2019

Autumn Blessings Tree Card


 The IO (Impression Obsession) tree die is one of my favorites. I think I use it at least once every autumn.  This year I chose to make it more tree-like by cutting it out from a woodgrain paper that sort of looked like a wooden floor.  To hide the lines between each plank of wood, I smudged on some brownish-grey ink after the tree was cut out.  Somehow, the salmon colored paper with musical notes (from DCWV Autumn Melody pack) seemed just right for embossing with the leaf design (free from Papercraft Magazine).  The musical notes and raised leaf design are barely visible, but I think they really add to the overall look of the card.  To balance out the design, I added a die cut maple leaf (die also free from Papercraft  magazine) that was rubbed with copper metallic paste and flecked with gold ink.  The copper heat embossed words (TPC stamp) were made with Nuvo embossing powder (available at HM BFC). I am very happy with the quiet look of this card as it is sort of what I visually imagine falling leaves sound like in the early morning.  Gosh, I wish we had a real fall season, but I guess then I'd be grumbling about raking up leaves. LOL!

Monday, November 4, 2019

'Dream Big' Magnetic Coaster Calendars

My Vippies calendars just arrived so I started thinking about what I would do with them this year.  I had already purchased a large package (50 I think) of coasters from our Celebrations store (next to the HM BFC Mapunapuna store) so I decided to use them as the base for the calendars. 
Because I have so many calendars to make for an upcoming event, I decided that they had to be simple.  I decided to use the Penny Black 'Dream Big' die because I think everyone needs to set their goals beyond what they can possibly imagine achieving.  The words were cut out of a Tim Holtz gold foil paper from a pack.
For the base cover paper I used sheets from Me and My Big Ideas 'Mambi' 12x12 pack.  There are some great designs in this set, some with gold glitter.  I chose the marble sheets because then each calendar would be different.  Each 12x12 sheet yielded nine 3-5/8 squares which were glued onto the coasters (double sided tape could also be used).  Edges of the papers were trimmed close to the coasters before the gold sentiments, calendars and magnet sheets (on the back) were adhered.
Some of the covered coasters were not as sparkly as I desired, so I flicked on some gold Liquitex paint (before adding the words and calendars) and added a few adhesive backed acrylic gems.  I think by keeping these calendars simple, I won't get 'burnt out' while making multiples and will have more time to spend on other holiday creations.  Keep smiling while crafting throughout the 'jolly holly' season!