Thursday, January 28, 2016

Valentine Cookie and Puzzle Holder

I was inspired to make this treat holder after seeing the simple instructions at the Hilo HM Ben Franklin Crafts.  Because I am intending to include a large iced shortbread heart cookie with the puzzle, I made the holder wide enough to accommodate them.  (Did you notice the card stock print is of heart-shaped cookies?) The measurements of the Pebbles card stock are 4-1/2" x 12", scored at intervals along the length at 4-1/2", 5-1/2" and 10".   
 If you are planning to include the puzzle, you can make the holder flatter. (Many schools do not allow sugary treats to be passed out in class.)  The red heart topper was made with a Joy Crafts die that was cut a bit to fit the holder.  A Hero Arts 'love' die was used to cut the DCWV foil card stock into an elegant script embellishment.
Inside the treat holder I used Little B washi tape to affix the mini zip bag containing the puzzle heart that is actually the cutout from the front of the holder.
 If you are only giving the puzzle with the treat holder, you should keep it together so that the holder doesn't look empty.  The Taylor Expressions heart puzzle die comes with some words to stamp but I like the ones in the Hero Arts clear stamp set that I just purchased at HM Ben Franklin Crafts so I printed sentiments on both sides of the heart.
There are lots of possibilities of what you could contain in this simple to make treat holder which can be re-sized for your needs. Also the variety of papers and embellishments you choose can make this project your own original creation. Hope you'll try making these sweet goodie holders and pass them out with 'love' on Valentine's Day. Happy Heart Day!

Monday, January 25, 2016

Valentine Goodies Now at HM Ben Franklin Crafts

Just a quick post today to show you just a few of the amazing products for sale at HM Ben Franklin Crafts in Hawaii.  I told myself, "No more Valentine card stock, but they were so-o-o cute.  I chose some made by Pebbles and Doodlebug Designs....love the sugar cookie and elephant designs.  Also in the photo are some Hero Arts dies and stamps that I couldn't pass up...love script with matching die, a floral heart die with words to stamp inside and some beautiful script sentiments.  From Paper House, I found 3D animal stickers, perfect for children's cards. Finally, my crafty eyes spied some Little B gold foiled washi tape that I HAD to have.  Oh, the book (Leisure Arts) you see is from HM BFC, too, and features hundreds of fabulous Valentine and wedding projects...easy yet elegant.  I hope I've excited you enough to make a stop at Ben Franklin Crafts to see what's going on for Valentine's Day. See you there!

If you visit the Hilo store, be sure to follow the handwritten  messages on the floor to find a beautiful Valentine's Day display. You'll see instructions for a super cute favor filled with heart-shaped candy. Take a look and get inspired for the big day! 

Thursday, January 21, 2016

Mini Composition Book Birthday Card


I just received a new My Favorite Things stamp set and I was anxious to ink it up.  I also wanted to come up with an original birthday card that wouldn't be thrown in the trash after a few weeks.  (Can you believe that some people discard lovingly handmade cards?)  Mini composition tablets (3 in a pack for $1 at the dollar store) were just sitting on my shelf hoping that I would give them a new look so I thought, "Why not?" I started by stamping the girl image on a piece of watercolor paper (large enough to cover the tablet) and coloring it in with Copic pens.  Next I made a mask from some no design washi tape.  Since I didn't have any no print tape that was wide enough, I overlapped three strips on a piece of computer paper and then stamped the image with waterproof ink.  After cutting out the image, I ran the piece under water and rubbed off the computer paper on the back of the cut out tape image. This then became the mask used to protect the image from watercolors or inks applied for the background.
Before the back was colored with ink splatters, I stamped the 'happy birthday' in white ink and then applied white detail embossing powder. This was then heat embossed before the distress ink splatters were applied.  If not all the words are stamped clearly, you can brush off the powder and start again. Also after heat embossing, blank spots can be filled in with a white gel pen. I like the artsy look of the embossed words (Stampendous) and by stamping them sidewards,I think they really add to the overall free-spirit look of the birthday card.  After stamping on the Eiffel Tower and French words, the finished watercolor paper cover was lightly sprayed with a matte finish (to protect the design from damp hands) before it was glued to the tablet with Beacon 3 in 1 glue.  A craft knife and scissors were used to trim off the excess paper.
I plan to write a message inside the composition book to wish the recipient a 'happy birthday'.  I hope the birthday girl will keep this notebook card in her purse for those times when she needs a piece of paper and the cell phone won't do.  It is also my hope that she will look at the composition book card often and see every day as one for celebrating her life.  No one would throw this card away....would they?

Sunday, January 17, 2016

Macaron Mini Tablet Cards


 I'm still playing around with the idea of making greeting cards that the recipients will save because they can see the effort that went into making them and that these cards are useful, not just desk clutter.  (Because of the plastic cover, it was difficult to get a photo of both cards without a glare...sorry.)
 These tablets came in a set of three from a 100 yen store in Japan,...should've bought more.  They have printed white doilies on the back and front.  Because the doilies are on top of the plastic, I had to strategically place the images I had stamped and colored with Copic pens.  I didn't need any printed card stock for the cover because the tablet came that way.
I did add a real paper doily to the side and under the Neat and Tangled image.  I love this stamp set because it has so many usable pieces.   However, I didn't particularly like the Eiffel Tower on the girl's head so I substituted the macarons.  To do this, I first stamped the macrons on some marker paper and then masked the lower part of the bottom macaron with washi tape.  (Stamp the bottom of the macarons on a piece of plain washi tape and cut it out to form the mask.)  Next stamp the macarons so that they overlap the first macarons. Do this again but this time stamp the girl.  Voila!  You have an image of a girl with macarons on her head.  I colored the macarons and then coated them with clear Stickles before adding a macaron 'filling' of white Bo Bunny perlescent paint. Cut the entire decorated image out.
 I found the banner riveted tags at HM Ben Franklin Crafts...the birthday one was pre-printed and I applied a thank you rub-on and rub-on flowers to the plain tag. Tie the tags onto the macarons with twine and adhere everything down with sticky foam pieces.
If you keep your eyes open, I'm sure that you will find lots of mini tablets that you can turn into cards. Be sure to write a greeting to the recipient inside the cover.  I hope that you will creatively think 'outside' the card.  Your friends will surely appreciate a card that is a mini gift too.

Wednesday, January 13, 2016

Teacup Luggage Tag Card

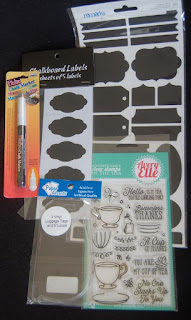
I travel a lot so I love luggage tags.  It seemed only natural to turn my mini cards into vinyl covered luggage tags (Paper Accents).  I started by making a small card from card stock printed with pastries (DCWV) on one side.  Next, I stamped the teacups on marker paper and masked out the saucer with washi tape before stamping the girl image (Neat and Tangled,....sorry no photo of item,....see previous post).  After coloring the girl with teacups on her head, I cut her out.  Using white ink I stamped the sayings (Avery Elle) onto the blackboard stickers (Sierra Pacific and AC Remarks....purchased from HM Ben Franklin Crafts) and heat embossed them after sprinkling on white embossing powder. To complete the chalkboard look I used a Bistro chalk marker (Marvy, sold at BFC)  along the edges of the sticker labels.
Out of the luggage vinyl tags, the mini cards can be used like a regular greeting card and a tea bag can be inserted in as an extra gift besides the tag itself.  It is a tight fit but there is an inner flap in the tag that the card is supposed to fit under but I didn't use it so that the tea bag and card can be removed easily by the recipient. She can tuck it in nicely after she writes her home address inside the card (just in case her luggage gets lost).
I posted this close up so you could see the detail of the Crystal Accent covered teacups, paper doily (for texture), Stickle decorated heart and mini flower accent.
Although it was a challenge to squeeze all the elements into the luggage tag format; it was a fun project.  I am pleased that the recipients of these tag cards will get the enjoyment of receiving a greeting with a tea bag and even better she may think of me when she goes on a trip!  Bon Voyage to bloggers in craftland!

Saturday, January 9, 2016

Cherry Blossom Confetti Card

After seeing the beautiful Dandelion Designs sample (instructions come with the stamp set) in Hilo BFC, I started thinking about stamping directly on acetate with a permanent craft ink (Versa Craft). I was able to get a sharp image on the first try but it stayed wet for a long time so I sped up the process with a heat gun (slowly and gently to prevent warping the acetate).  Once the ink was dry, I painted the back of the images with acrylic paints (Americana folk art).  This reminded me of the Disneyland cartoon cell art that I once saw for sale.
 I am not a clever paper engineer, so I kept the card basics simple, adding only 1/4" borders. I cut with a trimmer and craft knife making tabs to cover the 6mm thick pink foam edges.  I decided to use a foam sheet instead of the usual carpet tape to make the inner window between the acetate and origami paper background. This allowed more room for confetti and the pink foam is less visible than the white foam tape most crafters use.
I taped and glued all the edges together with double stick tape (Merikan) and 3 in 1 Beacon Glue. I originally planned to just put punched out sakura blossoms in the shaker card, but added little Martha Stewart beads to add some noise and help the flowers slide around more.
 You maybe wondering why I have the Fiskars  paper trimmer in the photo...well, I've been meaning to show it for a while because I've been so pleased with the way it functions.  I can't believe I struggled with my old 20years+ trimmer for so long (five years of working with a non-straight straightedge). This new one cuts paper like butter and has lots of features to keep my papers squared off. Anyway, besides the DD stamp set I used a Funny Bones script saying that I know will be useful for many other projects.   That's it for now.....got a lot of ideas floating around in my head...better make some of them before I forget them....hahaha!

Tuesday, January 5, 2016

Thank You So Much!

Do you think writing thank you notes is a chore?  Maybe it will be easier to complete the task if you have some fun supplies.  I found a cool tool, Deco-Rush at Celebrations (next door to Mapunapuna BFC).  Deco Rush is a pen-like implement that dispenses a rub-on style of decorative words and designs. For this card I chose the 'thank you' with hearts.  There are dozens of Deco Rush designs to choose from at Celebrations and they have refills, too.
In this close up you can see the pretty Martha Stewart heart confetti in the shaker window that was cut with a Sizzix die.  I used the Paper Smooches curved border die to cut the hills that were decorated with the Deco Rush applicator.  I started with a card from the American Crafts boxed set of golden designs. After placing a piece of acetate behind the cut out circle, I enclosed the entire back of the card front using foam tape to seal in the confetti.
This thank you card was so easy to assemble that I am already planning some Valentine cards in a similar style.  I really do believe that nothing says 'thank you' or 'love' more than a handmade card, so be sure you send some out to those who made your holiday season bright and jolly.

Friday, January 1, 2016

Happy Year of the Monkey!


Wow!  It's 2016 already!  My son was born in the Year of the Monkey, so I was excited when I saw the Dandelion Designs stamp set.  I knew I had to make a card for my son just in case he didn't realize it is his year.  The hardest part of making this card was finding the right printed card stock.  It's a good thing that I am a paper hoarder because I located (in my stash) just the right Hambly 12x12 sheet with green bamboo on a gold background. I was anxious to use the new Jen Long Sizzix folding card die set that I purchased at HM Ben Franklin Crafts.  I think the die cut card was supposed to be folded, sealed and mailed without an envelope.  However, I decided to put some Velcro tabs on the flap and use an envelope.

It was simple to stamp (with Momento ink) and color the images with Zig Kuretake brush markers. For added texture, I used a Martha Stewart glue pen to affix some brown Fun Flock to the monkeys. I really love the pop-out feature of the card.  I can imagine so many different cards using this clever Sizzix die set.  The stamp set also can be used for other non-new year projects....the monkey is so cute!

Here is an example of how just a little tag (made with the scraps) can add so much to the finished look of a hostess gift.  It's chocolate *wink*wink* ......dark chocolate is now considered healthy, so I wish all of you more chocolate than you can possibly eat in 2016! Happy New Year of the Monkey!