Saturday, November 8, 2014

Autumn 'Joyful Greetings' Card

 I am still learning how to use the gelatos and decided to try it with Liquitex light modeling paste (purchased at HM Ben Franklin Crafts) instead of the embossing paste used in the last project.  I think the modeling paste (I chose light because I was putting it on paper but there is heavy modeling paste too for other surfaces) blended better with the gelato colors than the embossing paste.  As this was just a test, I used leaf stencils made from leftover pieces after die cutting Lawn Fawn leaves. In my previous experiment, I used my finger to apply the embossing paste which left a nice leaf-like texture. This time I used a credit card to level the paste applied to the stencil cut out and this resulted in a less interesting surface so perhaps veins should have been drawn in while the paste was still moist.  Since I was rather sloppy with this technique I had to cover up the smudges with Mister Huey gold and added color to the leaves with Zig Wink of Stella.  Both products are available at BFC and are perfect for holiday projects. To achieve the torn kraft paper edge, I used a cardstock with a kraft inner core. After die cutting the Paper Smooches sentiment out of foil cardstock, I decided to apply Elmer's spray adhesive to the back of the words.  This would have worked fine except I kept moving the pieces around and so they left a bit of residue.  Oh well, this was just a test and I learned a lot from playing around. Have fun with your craft experiments!  You just might make a great discovery!

Wednesday, November 5, 2014

Experimenting with Gelatos

 I finally got my hands on a set of Gelatos.  These are crayon-like color pigment sticks made by Faber Castell and are now available at HM Ben Franklin Crafts.  I haven't played with this new product too much but there is a booklet enclosed in the set that shows how to achieve many different effects. Since I had some card stock that had leaves punched out, I decided to use them as stencils.  By mixing various colors of gelatos with embossing paste (Dreamweaver), I was able to fill in the stencils to achieve a leaf-like texture.  Since I still wasn't satisfied with the look, I rubbed on some Viva metallic paste paint and sprayed some gold Mister Huey.
For the gold foil 'thanks' I used a Paper Smoochies die (not shown) on DCWV foil card stock. This card stock cuts easily resulting in a sturdy die cut.  The pack contains many luscious colored foil sheets.  The pretty ribbon with the gold edge is a Heiko product available at Celebrations.  Well, time to get back to experimenting (playing) with my Gelatos.  I think I need to get more colors (two stick packs sold at BFC)....wink*wink* ;D  #timetoshopatBFCagain!

Sunday, November 2, 2014

Hedgehog Tags

Whenever I have leftover papers and parts from a card making session, I make tags....so useful for spur of the moment gift giving.  I just had to use up those extra cute furry hedgehogs and die cut leaves.  (See previous post for a photo of the card I made...after making four cards I still had leftover pieces.) To make the tags more 'autumnish' I added the raffia-like Heiko ribbon that I purchased at Celebrations (I think).  (Celebrations is the cool store next door to the Mapunapuna BFC.)
I used the second largest tag die from the Little B set (sold at BFC).  Love those dies, especially the little teeny one. To add more interest to the leaves. I rubbed on Viva metallic paste paints.  (I understand that this product is being discontinued by the manufacturer, so you better get some while they are still in BFC.) Well that's it for now.  Please visit this site again for more autumn craft ideas.

Friday, October 31, 2014

Vintage Style Card and Happy Halloween Winner

 Last year I made a bunch of vintage style Halloween cards so this year I decided not to do any....until I saw the Impression Obsession stamp and of course I had to get it.  This stamp is so gorgeous and it has a cat!  What I like the most about it is because it has all the shadows drawn in I didn't have to do any shading.  Yup, I just applied the Copic markers like I was doing a coloring book page.  Except for the black sparkle cardstock, all the papers and stickers were Authentique products(from my stash). To call attention to the cat in the pumpkin I decorated it with Martha Stewart black sparkle flocking(from a set). I think this really was the perfect embellishment (sorry, it doesn't show up well in the photo).
 I stamped the image in dark brown Momento ink but thought that the black ink looked better on the card.  Rather than discard the colored image I decided to turn it into a Project Life card (with a tab). The printed kraft paper is from a Tim Holtz 12x12 Halloween pad and the typed sentiment strip was the label cut off the 12x12 Authentique cardstock...yes I love to use up scraps!  Funny that the sentiment is the same one  found on a sheet of stickers and used inside the card.
On the Project Life card I tested out more of the Zig Wink of Stella. I really love the effect of the colors on the leaves (too subtle to see in a photo) and I definitely plan to use them on future autumn and Christmas projects.  The pens can be purchased singly, but the three pen sets are the best buys. Both the pens and MS flocking set were obtained at HM Ben Franklin Crafts.

Okay, time to announce the winner of my 'How many trick-o-treaters?' contest (see previous post).  Last year we had '0' trick-o-treaters knocking at our door.  I guess our house is too spooky looking...LOL!   Anyway, congratulations to Rylex who had the closest guess of 28! (Rylex, please send your mailing address to this email address: Lsakami@aol.com and I will mail you some crafty prizes.) Thank you to the readers who ventured to participate in my contest. Happy Halloween Everyone!

Tuesday, October 28, 2014

Autumn Hedgehog Card

Have you ever seen a live hedgehog?  They are really tiny.  I thought they were as big as guinea pigs but they are really the size of mice.  The ones we saw in a Japanese department store were so cute I wanted to buy one, but of course Hawaii doesn't allow them as pets.  The best I could do was buy a Lawn Fawn hedgehog die and stamp set.  To make the hedgehogs more realistic, I die cut them and then glued on some Fun Flock.  After the glued flock was dry, I stamped the hedgehog image over the flocked die cut shape. I discovered that some inks print over the flocking very lightly and other inks print a dark image, so you will have to do a test to see what look you prefer.  The die cut leaves used on this card were also Lawn Fawn products. Don't you love the veining?
The card was cut using a die from the Little B set that I purchased at HM Ben Franklin Crafts.  This set is great because the die precisely makes a neat fold in the card as it cuts it out.  Also the set has several card sizes and shapes to add to the front.  I was thrilled to find the green textured paper (12x12) and the Hero Arts sentiment stamp in the clearance sale bins at Ben Franklin Crafts.  They both perfectly fit the look I planned for my card!  I hope that you will search for autumn crafting goodies at your nearest BFC store too.  See you there!

Sunday, October 26, 2014

Halloween Bookworm Bookmark Treat Bag and Halloween Contest

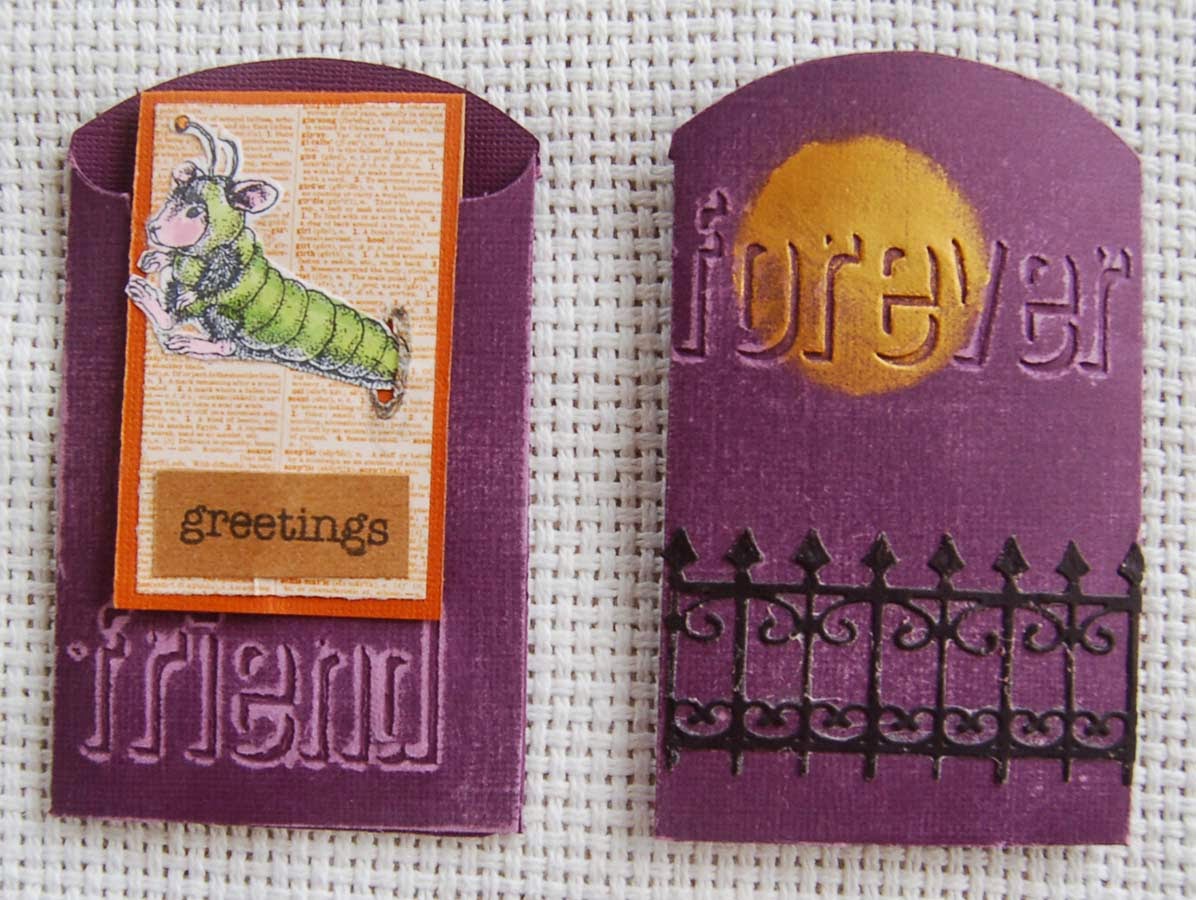
 Here is the second version of a magnetic bookmark treat bag.  Like the last one, I used cardstock with kraft paper inner core so that the words could be embossed (with Sizzix folder) and sanded to highlight.  I had two jokes going on with this treat bag.  The mouse in the worm costume seemed perfect to portray a bookworm on a bookmark. Funny? The other humorous (well, I think it's funny) part is that because the back of the bag looked like a tombstone, I added a die cut (Spellbinders) wrought iron fence and the embossed word, 'forever'. The stenciled moon (Viva creme paint) was the finishing touch on the spooky back which contrasts with the cute front.
 The old House Mouse Halloween set also had mouse footprints so I couldn't resist stamping them on the back of the bookmark. As with the last bookmarks, the magnets were taped between the layers of paper. Okay, this is probably the last of my Halloween projects for this year.  I think I am ready for trick-o-treating.  Oh yes, Contest time!  If you can guess how many trick-o treaters came to our house last year I will send you some cool prizes. You have until midnight Oct. 30, 2014 to send in your guess by commenting on this post.  If you win, you will have to send your mailing address to my email address. The first one to guess the right number or the closest guess will win. Good Luck!

Friday, October 24, 2014

Halloween Cat Bookmark Treat Bag

The inspiration for these treat bags came from Emily Leiphart  (Art From the Heart) who posted her bookmark treat bags on her blog.  She used Paper Smoochie products and although I do have the PS bag and bookmark dies, I decided that I wanted to try making  magnetic bookmarks. (The PS bookmark die cuts pieces that just hook over the page.)  Also I discovered that HM Ben Franklin Crafts sells two different Sizzix treat bag dies. After die cutting on style of treat bags from a sturdy cardstock that had a kraft paper inner core, I used an embossing folder to impress the word, 'smile'. The bag was then assembled with Merikan double stick tape.
 
From my stash, I found just the right vintage-looking Tim Holtz Halloween cardstock.  The bookmarks are 2" wide and have small,very strong Sierra Pacific magnets (from BFC) taped between the layers of papers. To make the wonky (Studio G) cat look more scruffy, I glued on black Fun Flock.  A little sanding of the orange treat bag helped to highlight the letters.
 The magnetic bookmarks can also be used as refrigerator magnets that could hold several papers between the super strong magnets.  Even with the bookmark in the bag, there is still room for some candy.  If you don't want to give sweet treats, a gift card would fit nicely with the bookmark.  This mini bag can be adapted to many occasions.  Stay tuned for another version of this project.