Saturday, November 7, 2015

Autumn Leaf Necklace

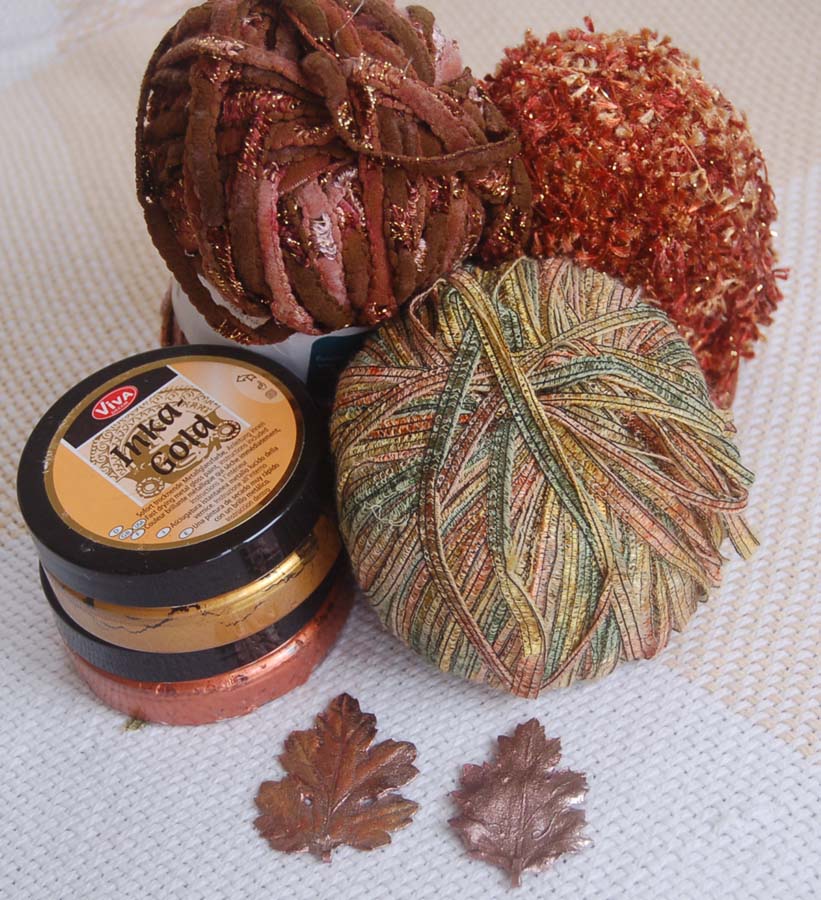
Years ago I purchased a bunch of leaf pendants from Fire Mountain Gems.  I think they are real electroplated leaves because each one is different.  I wasn't inspired because they were rather flat in color so I put them aside for years.  Because they were in my autumn box of stuff, they emerged again and this year I had an idea.  I decided to rub on some Viva Inka Gold paint to the front of the leaf.  It added just the right touch of autumnal color to match with the yarns I thought would work together to make a soft fall necklace. I picked antiqued copper findings for the closure and glued the yarn tails into the part that had to be crimped to form the end.


I wish my photos gave you a better picture of the subtle colors that glow from this necklace, especially the leaf pendant.  I really love the way this piece captured the essence of autumn to me.


Whenever I see an interesting yarn I buy it and put it in my seasonal color groupings. This makes it easy to choose just the right yarn when the project takes shape.  In the front of this photo are two electroplated leaves. The one on the left is the one I added color to and the one on the right is the original color. I'm not sure if the electroplated leaves are available anymore, but you can probably find a suitable substitute is you hunt around.  Even though we don't really have a fall season, I think it is a beautiful time of the year.  This autumn necklace helps me to celebrate the glory of nature.

Wednesday, November 4, 2015

There is No Place Like Home Autumn Card

The Paper Smooches stamp set and the Viva Las Vegas Stamp sentiment were the inspiration for this card.  I thought that this would make a touching card for my son in school on the east coast who hasn't been home for Thanksgiving in five years. I colored the toadstool house and squirrel with Chameleon pens.  The tree and leaves were stamped in colored ink.  A black Chameleon detail pen was used to add lines to the tree. The printed circle was cut from My Little Shoebox DP with a Spellbinder die. Okay, that's it for this post....onward to more fall projects.

Sunday, November 1, 2015

Autumn Photo Box Wall Decoration

I am a saver (hoarder) and can't bear to throw away good boxes.  I somehow (*wink*) managed to build up a pile of Big Island cookie boxes.  What shall I do with them?  Seeing some old Thanksgiving photos gave me a 'light bulb' moment. (Keeping photos in computer files is a waste of memories because who looks through old files?)  I decided to change the cookie boxes into photo keepers.
First I covered the lid and the bottom of the box with burlap fabric (Paper Accent 12x12 sheet), leaving the side uncovered so that the lid would still fit.
Next, using a brush, I applied UV resin (available at HM Ben Franklin Crafts) to a few sprigs of dried flowers (also from BFC).  To cure the resin I placed the flowers on a piece of parchment paper before setting it under a UV light for about 10 minutes.  I brushed on two coats of resin  to the front of the flowers and one coat to the back, leaving it under the UV light between each coat.  The resin makes the flowers less brittle but still pliable.
After attaching the sprigs to the box with Beacon 3 in 1 glue, I tied on a ribbon and added the copper foil die cut, 'grateful,' that I cut from DCWV paper (foil paper pack) using a Dienamics die from the set shown below.
Because the ribbon is removable, the box can be filled with photos printed out from your computer. Then by hanging the box on an accessible wall, you can peruse the photos whenever your heart desires.  On the top two photos you can see that I have a squirrel clip (from Celebrations?) attached to the ribbon.  I put it there so I could clip on the photo I wanted to highlight for awhile.  You could put a decorated clothespin, push pin or even a corsage pin on your photo box. Leaving the box simple is also a good option.  I hope this post has inspired you to make your own photo box wall decoration. Okay, I am going to search my files for more 'too cute for words'photos to add to my box.  Think I'll make a Halloween photo box next. O-o-o-o spooky fun!

Thursday, October 29, 2015

Halloween Cat Costume Card


My husband was organizing our photo files and came across this adorable photo of our son at about  a year old.   Since I had just received the hilarious Art Impression stamp set, I knew that I had to make one more Halloween card and send it to the 'kitty' in the photo.
 I know that it would have been easier to use the  Sizzix banner die to cut the photo into the shape but I wanted to send the whole photo (I'm in it too) so I decided to use the die to cut an opening through all three layers of card stock. I cut the layers separately and then used Merikan double stick tape (from BFC) to adhere them together.  The mother cat in the costume was colored with Copic pens and the speech bubble was cut with a Paper Smooches die.  I covered the hand cut orange banner with Little B Halloween washi tape (from BFC) and added Doodlebug Halloween dot stickers (also from BFC).  Oh yes, the printed papers used were also Doodlebug products available at HM Ben Franklin Crafts.  Okay, this really is the last Halloween project for this year! Be scary but be safe!

Monday, October 26, 2015

Halloween Diorama Card

Just as I was putting away my Halloween supplies for this year, I discovered this Lawn Fawn stamp set that I bought after Halloween last year (on sale) and put aside for this year.  I decided I HAD to make another card so this stamp set wouldn't feel 'uninkable' LOL!  It's been a long time since I made a diorama card (I think that's what you call it) but it used to be a favorite style of mine because it looks fancy but it's super easy to construct.
 I started with a 12"x 3-3/4"piece of purple card stock. Measuring from the left, I scored at 4-1/2", 5-1/2", 10" and 11".  Before folding the diorama frame, I stamped the sentiment in white pigment ink, sprinkled it with white embossing powder and applied heat with a heat gun to melt the embossing powder.  Then I stamped the images on white marker paper (from BFC) and colored the house and tree with Copic pens before cutting them all out.  For the moon I punched out a 2"circle of yellow card stock and stamped the bats on it.  The diorama frame was formed by using double stick tape (Merikan from BFC) on the extra flap. The ghosts and house were attached with pop dots for added dimension. From the top view you can see how quickly this card can be assembled and that it can be folded flat for mailing.  This was so much fun to make; I think I'll make one for Thanksgiving..... ....maybe several to use as table place cards. Have a super and safe Halloween!

Saturday, October 24, 2015

Halloween Treat Bag Card

 Because the Halloween items at HM Ben Franklin Crafts are 30% off, I bought a few things for next year.  (I've already finished my Halloween crafts and bagged my treats.)  But then, I watched this week's Joy of Crafting and was inspired by Kelli's card using washi tape to form a shaker bag. *light bulb moment* I could make a shaker card using the treat bags I just bought!

Here is what I came up with....sorry for all the glare.  I cut the bag apart so if desired I could make two cards from each bag.  I stuck the bag front to a piece of vellum using foam mounting tape to give the sequins a little shaking room.Then I simply taped this shaker pocket down with Halloween washi tape...so many to choose from at BFC..easy peasy!

To let the vellum frostiness show, I cut a window in the front of the card before taping the shaker pocket down.  Although this is not a super fancy card (no embellishments here), it is quick and easy....just what I want in a Halloween craft project.  Hope that you'll visit HM Ben Franklin Craft stores to satisfy your Halloween crafting needs and don't forget items like the washi tapes and treat bags I used on this project are on 30% off right now....hurry and shop before they run out!


Wednesday, October 21, 2015

Hedgehog 'Hello' Calendar Card

Don't you just LOVE this Penny Black hedgehog image?  I purchased the stamp awhile ago from a clearance bin in a Boston craft store.  I knew that I would use it this fall for some of my calendar cards. When I spied the Echo Park printed card stock at the Market City Ben Franklin Crafts (I'm pretty sure it was on sale), I mentally paired it with this image...perfect!  I used my old stand by Sizzix die to cut the stand up card.  A circle die from a Sizzix set cut the stamped image before I colored it with Copic pens.
For a little texture, I added brown Fun Flock (Stampendous) to the hedgehog fur and mini leaves (from a BFC garland) near the calendar. (Still haven't ordered 2016 calendars yet...LOL!)  Oh, the die/stamp set from Hero Arts was used to cut the 'hello' and stamp the words under the calendar.  This set has lots of great sayings which would be appropriate for a calendar.
I only made a few of these calendar cards because I get bored easily and I don't want to send everyone the same item.  To me it's more fun to do a variety of designs.  These are for my friends/family who experience fall and have the joy of going apple picking.  One day I WILL pick real apples off a tree....my future dream trip!