Sunday, May 31, 2015

Bangle Bracelets


I heaven't done much jewelry crafting recently so I decided to take a look in Hilo's HM Ben Franklin Crafts Bead Shoppe to see what cool supplies I could find. I really love wearing bangle bracelets so I excitedly purchased some inexpensive parts with no idea what I would create.  See bottom photo.  The bangles with the hooks and the one with the screw off bead ends screamed, "possibilities".  The rhinestone anchor (prettier in reality) caught my attention too.  By simply wire wrapping some beads onto the anchor, I totally personalized it.  This one matches lots of my clothes but recently I bought a few summer shirts with coastline themes so I might make a red,white and blue version next since the parts were so inexpensive.

 Here's what I did with the other bangle.  I had a bit of difficulty finding African glass beads with large enough holes but eventually I did.  I like the contrast of the metal against the ancient look of the African beads.  The ring beads came from a large pack of assorted silver colored beads that I also found at BFC.
Here's another view of the bracelet which shows the beads as they slide around the bangle.  I enjoy wearing jewelry that have moving parts to fidget with.....LOL!
These are just a few of the items which you can purchase to make your own bangle bracelets.  I think that I will do some UV resin decorating on the heart charm and the tree one.  If successful, I will post the results.  Thanks for stopping by today.  Crafty smiles and hugs to you!

Wednesday, May 27, 2015

Japan Hobby Show and ABC Craft Store


While in Japan I had the opportunity to attend the Japan Hobby Show in Tokyo.  It was big and crowded as usual but worth the effort to try and see everything.  I only tried one of the make-and-take-it projects because the rest of them required signing up way in advance. There were resin, knitting, fabric, jewelry, and many other types of traditional Japanese crafts to try.  Many of the projects were way too detailed for me especially because they were being taught in Japanese.  The crafters in Japan have lots of patience and are really skilled in handwork.  I was again most intrigued by the 'fake' sweets because as you can see from the photos they look good enough to eat.  Can you believe these are made from clay?


The upper photo is of the little project I tried at the show.  It was very easy to do because the assistants spoke English!  The base of this memo holder (the little silver ring is for the note) is a styrofoam-like piece and the clay-like frosting is piped on like real frosting.  I bought some of the products like the dish memo holder for closer inspection (to copy???) and I hope to show you what I create.....someday.


Here are some of the crafts that were displayed at the ABC craft store in Osaka.  Their resin work is fabulous and the creators of some of their line will be in Hawaii during July to demonstrate and sell some of their products.  They also have a product line that can turn pretty paper napkins into pieces to iron onto plain canvas purses, folders, aprons, etc.  This craft will also be coming to our HM Ben Franklin stores.

 While in Japan most people take pictures of scenery and famous sites, but the crafter in me takes more photos of craft work so I can remember what I see and I can someday replicate or be further inspired by the handcrafted items. To me a vacation is to breathe in the sights and sounds, then absorb new ideas and let the gears in my brain start cranking all the way home.  Crank, cronk, clang...clink!

Saturday, May 23, 2015

Graduation Leis

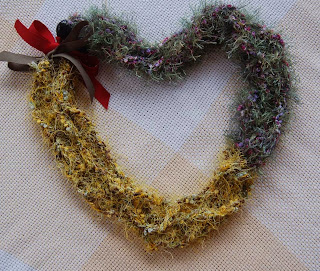
 Yes, it's graduation time again....lei making time!  This year all the leis I made are going to graduates who are attending schools away from Hawaii so of course they can't contain fresh flowers.  I realize that many handmade leis remain in the graduates' rooms after the big day....all those hours of work and the leis never get used again.  With this in mind, I decided to make simple crocheted leis this year.  Each of the above leis have only three single crocheted strands twisted together.  I picked yarns that were somewhat hairy and crocheted several pieces of yarn together so each strand was fairly thick and looked plant-like.  The yellow one was finished with a simple grosgrain bow and the top one was done traditionally with kukui nuts and a ribbon.
Here are two leis I purchased from HM Ben Franklin Crafts.  I thought the red and white one could use a bit more decoration and wanted to add to the gift.
Using accordion folded money and pipe cleaners (light green thin Japanese ones from BFC) I tied  rosette bills back to back onto the lei.  Of course you could just accordion fold wide ribbon but most graduates appreciate a bit of cash.  Dressing up a pre-made lei is super easy and at least conveys the feeling that you took the time to make something special and handcrafted.


Even if you don't have much time for lei making, you can easily make single crocheted leis or embellish store bought leis.  You can learn from BFC employees and use up the yarn you've been hoarding....LOL!  Wishing lei love to all 2015 graduates!

Tuesday, May 19, 2015

Nautical Luggage Tag Birthday Card

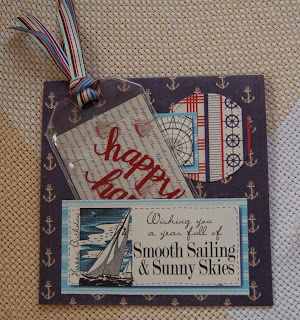
 When I woke up this morning I had no idea what kind of birthday card I was going to make for my friend, but I knew I had to work fast.  Since she is going on a cruise soon after her birthday, I decided on a nautical theme.  Have you noticed that HM Ben Franklin has a wonderful supply of nautical crafting supplies...shells, anchors, printed 12x12 card stock, etc.?  Since I had one Paper Accent vinyl  luggage tag left from the 3 tag package I purchased at BFC and just bought a bunch of nautical themed Canvas Corp and Authentique card stock sheets, I decided to make a birthday card that incorporated a little gift luggage tag.
As you can see from this photo, the Authentique card stock has a vivid red stripe side upon which I plan to write my birthday message. The pocket with the tag was made by simply cutting out and taping three sides of the stitched label from a Canvas Corp card stock sheet.
Here's what  the card looks like without the tag.  At first I didn't have the circle and other label on the front but decided that I wanted the card to look complete even after my friend removed the tag.
This is the front of the tag.  The 'happy' was cut from card stock using the Hero Art die from the stamp set.  I will suggest that my friend use the vinyl loop (putting that in the envelope) and remove the ribbons if she desires a less gaudy luggage tag.
The bon voyage label on the back was also from the 12x12 Canvas Corp card stock.  There is enough room on it for a name, email or address to be written...just in case the luggage goes on its own trip ;(
The 6-1/2 " square envelope was so big and white that I just had to decorate it .  Since I still had the Lawn Fawn stitched circle and banner dies out, I used the smaller banner to make a name tag.  Pebbles rub-on words and Dear Lizzy letters (just bought them from a clearance bin at BFC) plus some twine finished the look nicely.
I was surprised at how quickly this card came together.....no coloring!  I really hope that my friend is 'happy happy' with the card and the enclosed luggage tag.  Because everything just seemed to sail into place, I had a great crafting day. Yay!  Please stop by this blog site again and if you have the time leave a comment .....I love hearing from you!

Friday, May 15, 2015

Congrats Card 2015

I wanted to try the new Sizzix transfer sheets I saw at HM Ben Franklin Crafts.  They seemed to be a new way to make use of dies and embossing folders. I also saw a new Hero Arts product that included a 'congrats' die and matching clear stamps.   Combining the two products I was able to make the fancy looking gold and black  'congrats' on the red circle.  It took a few tries to get the pressure correct so that the word printed out nicely but once you discover the right shims for your machine and thickness of paper, you'll be a pro.  The transfer sheets come in lots of colors and can be enhanced with ink stamping (I used black ink).
 On the inside of the card I wanted to use a raccoon Ai stamp because the graduate is an animal lover.  The glitter on the sign looks weird in the photo but it really is great with the sequin grad caps from my ancient supply (LOL).  The stitched sign was made with the Paper Smooches die.
 My favorite part of this card is the back because it adds a touch of humor to what appeared from the front to be rather boring.  It does look a bit like the flag of Japan....hahaha!
Here are some of the transfer sheets and the platform for the Big Shot.
The large grad cap sticker came from a Jolee's package and the paper was from a Doodle bug 6x6 paper pad.  Oh, the 'You Did It' is from a TPC Studio stamp set...contains great stamps! I traced the letters with a glue pen and added the red glitter.
These are the dies I used but you can surely use the ones you have or hand cut some of the shapes.  Hope this post inspired you to visit HM Ben Franklin Crafts and check out the new products that are arriving at the stores.  You are sure to see something that you would love to use on your craft projects.  Happy Shopping and Crafting!

Monday, May 11, 2015

Grad Goodie Bags

 I had the challenge to come up with graduation goodie bags to pass out after my son's graduation dinner.  Since they would have to travel to the east coast I needed to be able take them disassembled and assemble/fill them quickly once we arrived at the destination.  I came up with these owl bags which were amazingly easy to create due to the Echo Park owl die I bought at HM Ben Franklin Crafts. I also used a die ( Quilled Creations purchased at BFC) to cut out the leaves.
 The parts, including the googlie eyes were glued with Aleene's Turbo Tacky Glue (great adhesion and wonderful applicator pen).  The cap was created with a Dandelion stamp used on the same brown colored card stock as the owl head so that the tassel wouldn't need to be so carefully cut.  Being unable to find the right sized number stamp, I had to hand write the year.
I used the 3 in 1 Beacon glue (got it from BFC) to adhere the owls onto clothespins which will eventually be used to close the bags of Big Island cookies.  The bags with the windows were from a store in Japan, but I'm sure you can find a windowed bag somewhere and you can stamp words on them to jazz them up.  I am very pleased with the outcome of this project because it wasn't too time consuming and I will be able to pack everything easily in my suitcase and give the guests something attractive and tasty to take home.  Hip Hip Hooray!

Thursday, May 7, 2015

Cat Graduation Card

 No, the cat is not graduating.....my son is!  I wanted to make him a card that was very special, just for him.  He is a loving owner of two cats who have helped keep him sane during his college years so I had to include them. It was easy to construct this card with the use of the Paper Smooches Polaroid die and computer photo paper.  I used the same die to cut out the cat photos that were inserted into the frame.  Black Momento ink stamps well on the photo paper and is waterproof as well.  The stamps used on the card front were from a Studio G set (I think). The circular congrats one was heat embossed with gold powder and the gold photo corners were in my stash but should be easy to find....maybe at BFC.
 I wasn't planning to decorate the inside because I wanted lots of room for a message but I couldn't not include this smiling face.  The silver grey space will not be enough for all I have to say, so I guess I will just have to continue on the back.  The gold metal stars are actually fabric studs that I found at the bottom of my sequin/confetti drawer...hahaha...they must be from the 80's!  The Hero Arts stamp set and Doodlebug 6x6 paper pad were from HM Ben Franklin Crafts.
I hope this post has given you some ideas for personalizing your greeting cards.  Including photos is sure to please the recipients and later they can easily incorporate the cards into their scrapbooks. Happy Crafting!

Tuesday, May 5, 2015

Happy Boy's Day!

This is a Boy's Day decoration that I purchased in Asakusa, Japan where my favorite paper store is located.  There are many well crafted paper items in this store which is right at the entrance to the trail leading to the temple.  However, that is not where I saw the Colonel Sanders statue....that was in Osaka, Japan.  The three guesses to my previously posted contest all had the right country but not the right city so I am awarding the prize package to Annette Allen who was the first one to submit a guess.  Congrats, Annette!

P.S. For the person who wondered where I purchased my plastic luggage tags.....they were Paper Accent products from HM Ben Franklin Crafts, my favorite craft store of course!

Sunday, May 3, 2015

Where in the World?

I've returned from a whirlwind trip to ......???? Can you tell from this photo?  If you can correctly identify where this statue is located (exact area, city, and country), I will award you a bag of crafty goodies I purchased while on vacation.  If there is a tie, the prize will go to the one who posted a comment first.  If no one gets the place, I will choose the closest one or draw a name from all entries...so by all means, guess!  You will have to check back to this blog site to see if you are the winner; if you are the lucky one, you will be asked to email your mailing address to me.  I will announce the winner on May 5, 2015.  Good luck to all!