Sunday, November 29, 2020

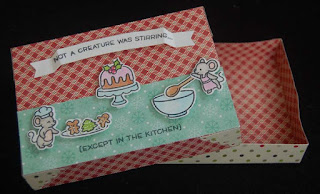
Christmas Mice Stirring (box, tag bag and tags)

I loved the Lawn Fawn 'A Creature was Stirring' stamp and die sets as soon as I saw them.  I do Christmas baking and so I knew they would be perfect for decorating my tags , bags or boxes.  The die set for the Lawn Fawn box is old but you might still be able to find it.  It makes a cute sized box that I thought might be perfect for a slab of my homemade peanut butter fudge.
It took a 12 x 12 sheet of printed card stock to make the box and the reverse side made the bottom  I like that the box die also makes the cute corner braces.  I used the Lawn Fawn banner die and stamped the cute saying on it.  The rest of the box was decorated in the usual way...stamping, coloring with Copic pens and die cutting the images before affixing them with foam dots.
Here is another of my tag bags which should hold some treats for someone special.  It took a 12x12 sheet of card stock to make the bag.  (Write to me in the comment area and leave your email address if you want me to send you directions for making a tag bag. I've explained it in earlier posts.)  
With the scraps from the box I made two large tags.  I also used up the extra images that were stamped and colored.
Because the tags seemed rather sparse in decorations, I added the garland with pips (from Ben Franklin Crafts).
I thought the garland was a bit too much so I only used snowflakes on this one.  The shanks were cut off  the Darice snowflake buttons before gluing them down. I was able to use up some snowflake card stock scraps on these projects, so that made me happy.  Any lessening of the stash pile is a good thing...right?  Keep smiling as you work on your holiday crafts!


Wednesday, November 25, 2020

'Let It Snow' Snow Globe Tags


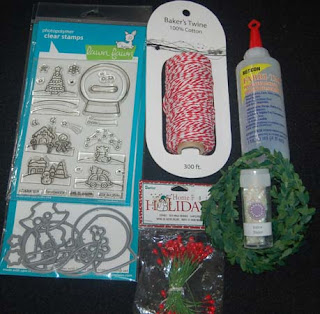
Lawn Fawn has several snow globe stamp and die sets even one for making tags, but I decided to use the sets that had tiny winter scenes to include in the snow globes.  (The LF die to make snow globe tags was just a tad too small to accommodate a mini calendar on the back.)                                                  
It was easy (but somewhat tedious) to cut the parts from red card stock, clear acetate, foam sheet, stamped and Copic colored card stock, and printed card stock. Then it was simple to use Fabri-Tac glue or Martha Stewart glue pen to adhere the parts together. Don't forget to add the Martha Stewart mica flakes!
Red and white twine (purchased at HM BFC) was added between the last two layers to form the ties and also around the edges to give the tags a clean finish.  Mini leaf garlands and red pips (from HM BFC) were glued in place.
By clipping off the corners of a mini Vippies calendar, it will fit on the back of the tag.  I think I might tie some of these tags to simple cards so that the recipients can take them off the card and use them as tree ornaments.  During the holidays, I like to give tiny gifts to those who I think of during the year.  Sadly, because of the pandemic, I will probably not see most of them during this holiday season.  I hope you take the time to do a little mailable crafting and give someone jolly holly happy mail! Holiday Hugs!
 

Saturday, November 21, 2020

Winter Gratitude Card


This card began as a test of the Hero Arts black watercolor paper.  I thought I would make a background for a Halloween card.  Using Gansai Tambi Pearl Colors (from HM Ben Franklin Crafts), I swirled on some blue and silver watercolors.  Maybe I added a touch of green and yellow, too.  I let the paper dry and was pleasantly surprised with the sparkling result.  Somehow the elegance of the colors did not match the stamped cartoon Halloween character I was planing to use. So the Halloween card became an Autumn card.  I pulled out one of my favorite Autumn dies, the Impression Obsession tree and started searching for the perfect paper to die cut.  I had a frosty silver card stock in my stash which seemed perfect but now the card looked more like a Winter card....LOL!  Once again I changed the direction of this card.  It still looks a bit spooky but with the 'GRATITUDE' word I hope that it conveys the feeling that I have even during this pandemic.  (My very old gratitude stamp was applied with VersaMark ink and heat embossed with Nuvo classic silver powder.) I am grateful for all I have and can do everyday even though it may be only clearing off the messy surface of my craft table....at least I have a space to clear...hahaha!


Tuesday, November 17, 2020

Pumpkin Spice Tag Bag

I would love to go to a pumpkin patch and select my own pumpkin. Making a pumpkin tag bag is my way of dealing with the inability to find a field of round orange globes.  I used a 12x12 card stock sheet to make the pumpkin patch bag. Please note that I used the same Little B large tag die to cut the top of the bag and unlike previous tag bags did not layer tags onto the front and back of the bag.  I think this allows more of the printed card stock to show.  The bag was folded so that it would fit within the frame of the tag die. I explained how to fold the bag in a previous post, but if you want a better explanation please leave me a comment and include your email address.
Here is a close-up of the Hero Arts (monthly kit) stamped panel.  I love this kit because it allows for color layering and lots of variety.  The appropriate (for pumpkin flavored treats) signage was a lucky save fussy cut from packaging.  My pack rat nature kept a bunch of autumn themed paper ephemera that was destined for the trash. LOL!  Liqutex gold ink was flicked onto the stamped front panel.
This side view shows that the width of the bag allows for lots of yummy treats.
The bag was fastened at the top with some Heiko wired paper cord. The curls were formed around a pencil.
This back view shows that the bag is constructed like a normal pleated paper bag.  The bottom photo shows some of the supplies that came with the Oct. Hero Arts Monthly Kit.  There were also some sparkly papers, word stamps, and dies...a good deal!  I like that tag bags like this will make a small dent in my 12x12 stack of papers. Okay,  I mean STACKS of paper LOL!  HO!HO!HO!  Time to start making Xmas tag bags for holiday treats. 


Friday, November 13, 2020

Autumn Upcycled Cookie Box

After enjoying the Big Island Candies 'Hawaiian Salt Cookies',  I was sad that I ate them all (so good) but happy that the remaining box was super sturdy and had a snap shut magnetic lid.  I began decorating the box in an effort to match the card shown in my last post, however the box began to look very masculine and did not match the cute images in the Lawn Fawn stamp set.  Therefore, I went with an autumn theme using decorated papers, words, and die cuts from my stash of fall decorations. (See...hoarding makes crafting easier! LOL!)
This photo shows what the box looks like undecorated.  The box took longer than I expected because I measured wrong...twice! But in the end I liked how the papers coordinated with each other. The papers were adhered with double stick Heiko tape and 3 in 1 Beacon glue.
Because my 2021 Vippies calendars arrived in the mail, I just had to use one.  I added a folded ribbon tab to the box lid because it is somewhat difficult to open the box due to the strong magnet.  Be sure not to glue anything to the edge of the lid which will prevent a good closure....guess how I know this?

These copper heat embossed words are the only thing that coordinates with the card on my previous post. As I said in that post, I am planning to fill the box with a s'more kit but I may include home-baked s'more brownies instead.  Well, that's it for today.  Hope this post gave you ideas for what you can do with an empty cookie box. Be crafty!

Monday, November 9, 2020

S'more Everything Card

I love these 'Love You S'more' Lawn Fawn stamp and die sets. They are so darn cute and I can imagine many future projects using them.  The papers are from my autumn  paper scrap pile so I am happy to lessen that pile a bit.  I heat embossed the words with Hero Arts copper powder onto the backside of the tree design card stock.  The images were colored with Copic pens before die cutting.  Perhaps my next project will be a decorated box to hold s'more making supplies.  This might be a great gift to give with the simple card in this post.  Happy Autumn Everyone!


Thursday, November 5, 2020

Acorn Calendar Tags

As a small child I lived in Illinois for a few years. We didn't have much, so small things from nature (like acorns) were my playthings.  It is no surprise then that this Lawn Fawn die set was a must have purchase. I thought that it would work well as the centerpiece of a calendar tag.
I love the details of this die...note the stitching on the cap and the cute windows.  You could put any small die cut animal in the doorway but I thought the squirrel was appropriate.  I used a small punch to cut out clear acetate for the door window. (For some reason there was no die piece to cut out the circle.)
I truly believe in this Driscoll quote that I discovered on a Penny Black wood handled stamp.  I used 3 in 1 Beacon glue to add on the leaves and scrolls that were die cut from copper colored foil.
Most of the autumn themed printed card stock that I had in my stash had only print on one side so I used the Little B tag die (from a set) to cut fronts and backs that coordinated and glued them together.  I thought the acorns were a bit plain so I added the leaves plucked from a garland purchased at HM BFC.
The squirrel came from a Lawn Fawn set sold last year which I think is still available.  I think it is one of the cutest Thanksgiving stamp sets.  Since there will probably be no big Thanksgiving dinners this year (pandemic masks tend to discourage feasting), I think I will bake goodies and tie calendar tags onto the bags so the recipients will know that I am grateful for their long distance friendship. Autumn Hugs!


Sunday, November 1, 2020

Autumn Girl tag Bag

Yes, it's another tag bag creation!  This one has a front that was embossed with a woodgrain Sizzix folder rolled through my Big Shot machine.  I like the way that it gives a faux tree trunk look that complements the artificial leaves (from HM Ben Franklin Crafts) and Whimsy stamp image.

I colored the sweet autumn girl image with Copic pens, keeping it soft and subtle.  The words were stamped on a hand cut flag and heat embossed with copper Hero Arts powder.
This decorated back view also shows the printed cardstock that was used to form the bag portion.
Here you can see the pleated side of the bag and it shows that a generous amount of treats can fit inside.
Using a double sided cardstock paper to form the bag makes even the inside festive.  If you want to know how to fold the bag and the dimensions, please scroll back to my previous post, Halloween Spooky Tag Bag. If you need more instructions, leave your email address in a comment and I'll get back to you. (I forgot to show the Sizzix woodgrain embossing folder with the supplies...sorry.)  I just got my Hero Arts Monthly Kit and so I just have to sneak in more tag bag post before beginning my Christmas crafting. Golly Jolly Holly time!