Thursday, May 30, 2019

Super Hero Father's Day Card

 This year has been quite a learning curve for our son who became a first-time father...of twins!  For all his hard work and courage, I decided that I had to make him a special Father's Day card.  I see him as a hero to his family, so I chose the Paper Smooches stamp set and dies.  I colored the super hero image with Copic pens and fussy cut it out.  The 'Our Hero ' thought balloon was hand written and cut out...can't you tell?
 Not only does my son have the cutest smiling panda bear-like boys (a grandma's prejudice), he also owns two twin grey female cats (who are super-well behaved around the boys).  It is on their behalf that I made this card....yes, they begged me to make it. LOL!  The printed comic-like card stocks used for this card were from Studio G and Doodlebug Design paper packs. I used a stamp from a Recollections stamp set which is perfect for this type of light-hearted card.  Hope you'll take a break from time-consuming frilly layered cards and create a simple graphic card. It will definitely be a super burst of creative energy.

Sunday, May 26, 2019

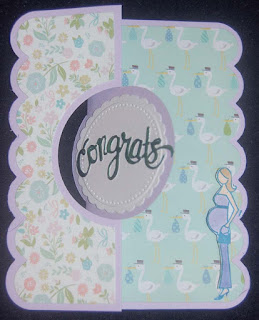
Baby Boy Shower Card

 This card was easy to make but difficult to photograph.  The 'congrats' is actually a blue green foil die cut but it looks black here.  The base of the card was made using an old Sizzix die set. I like the scalloped edges and the neat way it folds and the circle swivels out.  However, the folded parts are what make the card hard to photograph.
 The words 'There's a bun in the oven' are stamps from a Lawn Fawn set. I tried to find a thought balloon or banner to stamp them on but ended up cutting out my own balloons because they needed to hold the words and fit behind the 'congrats' circle.  Even though I didn't use it, the Doodlebug Designs pop-up sticker was the inspiration that started this card.  The sticker did not fit behind the circle but luckily I did have the LF stamp set so I printed my own oven and colored it in.  The Studio G mother-to-be stamp was purchased from HM Ben Franklin for only $1.50.  This card was fun to make because it required minimal coloring and the dies cut out all the parts.  I suspect I will have many more baby cards to make because our family and friends seem to be expanding rapidly. Hooray!

Wednesday, May 22, 2019

DIY Resin Hair Clips and Page Markers


What can you do with stickers and resin?  You can create a multitude of cute hair clips and page markers.  I just love stickers but couldn't think of a reason to keep buying them.  Then the idea came to me to resin them onto hair clips and pins.  I think I found the findings in the HM resin department but you can also get them from stores like Daiso. 

It is so easy to attach the stickers to the findings with the resin (especially if you use the LED kind that requires no mixing and hardens in 1 minute under LED light).  The LED resin is available from Padico (online) and should soon be selling in HM Ben Franklin Crafts.  If the stickers have a puffy or waterproof front there is no need to apply the resin to the front, but I like the raised shiny surface that the resin gives to the front of the sticker so I apply the resin to the front and back of the piece.

The page markers (for journals or books) could be used for hair pins too but I think they look very attractive in my journal.  The easiest pins to use have the round pad on one end because they give a good base for the resin.  Lots of local stores do sell a variety of pins and clips that you can combine with the endless choice of stickers at HM Ben Franklin Crafts.  I hope that you will try creating your own style of hair clips/page markers using resin and stickers. Have crafty DIYfun!
PS: My observant husband noticed that some of the hair clip stickers would not be facing the right way when the hair clips are worn...isn't  he smart! Be sure you place the stickers the right way before applying the permanent resin to the clips! If there are some rough spots after hardening the resin, you can smooth them away with a glass nail file.

Saturday, May 18, 2019

Shaker Light Bulb Birthday Card

 When I saw the Jillian Vance Design stamp and die sets, I knew I had to purchase them to make a birthday card for my son, who recently got married at the Edison and Ford Museum in Naples, Florida.  He is a research scientist whose work sometimes requires the collection of statistical data so I thought the circuit board background was a good starting point.  I stamped the circuit board design with silver ink, sprinkled the wet ink with Nuvo silver embossing powder, and heat embossed it. Using the light bulb dies, I was able to make a simple shaker card with foam tape under the acetate.
 I liked the sentiments that came in the stamp set and decided they would work well on the Lawn Fawn banner die cuts. (This set is a very useful one because the die cut banners can be stamped and then folded to give more dimension to your cards.)
 The inside of the card seemed too plain (even for a 'boy' card)so I stamped a bit of the circuit board design here and there, leaving room for a message.  I hope that you too, will 'Shine Forth' and do some bright idea crafting! If you have some spare minutes, please leave a comment about what you are crafting or what you hope to see on this blog. Thank you!

Tuesday, May 14, 2019

Origami Star Resin Charm

 Recently while in Japan, I purchased a pack of origami paper strips with instructions to fold stars. HM Ben Franklin Crafts has for many years sold similar kits to make iridescent wishing stars to fill in a jar. The stars were easy to fold. I didn't include the cords that came with the kit because I wanted to use fancy braided ones with the metal findings.

Although the instructions were in Japanese, I was able to follow the numbers and complete the stars using 9-1/4" x 3/4" strips. This kit was convenient because the assorted strips of paper were already cut to the desired width. You can of course cut your own strips from large origami sheets purchased at our Celebrations store in Mapunanpuna. After folding the stars I brushed on LED resin (available on line from Padico). Because the curing time is so short (about 1 min.), it was easy to brush each top, bottom, and sides several time and set the resin.  (Work over parchment paper for easy clean up.)  Attaching the bell cap finding (from HM BFC resin department) is a little harder because it needs to balance on the very top of the star. I discovered that applying a small dot of resin on the top of the star and hardening it provides a good base to then attach the bell cap.  If the stars end up with some rough spots, you can smooth them out with a glass nail file.  I hope this post has encouraged you to try the new resin projects ( no messy mixing of resin chemicals). Just imaging all the resin projects you can create. Visit this site again to see more!


Friday, May 10, 2019

Origami Kimono Birthday Card

 While in Japan I purchased an origami paper pack that had English instructions for folding a kimono and included a folded sample.  I thought it was pretty simple and I felt confident that I could make the folded kimono.  My first attempt turned out fairly well despite the fact that the paper pack contained slightly smaller papers than the one that was used to make the sample. Since my niece, who is quite adept at the Japanese language will be celebrating a birthday soon, I decided to use the kimono on her card.  A circle die cut from a shimmery, crinkled white paper became the moon backdrop. A Japanese character birthday phrase was stamped on a cherry blossom print rectangle that was layered over gold foil paper.  The final touch was the addition of delicate cherry blossom stickers. The translucent  stickers really give the feel of the cherry blossoms we saw on our trip. (I wish I had purchased another pack of cherry blossom stickers...next time.)
 This inner sentiment really expresses how I feel about my my niece.
 After finishing the card, I set it down on a drop of water which made a boo-boo so I wrote 'oops!' but then I had the idea to cover the mistake with the extra petals. Next time I won't point out the flaw and just cover it up....hahaha!
Here is the origami paper pack (12 6x6 sheets and a sample kimono).
 Hopefully you can blow up these instructions and follow them to make your own origami kimonos.
The wooden sentiment stamp I used was from Hero Arts. The other one with the Japanese characters is from my ancient hoarder collection and I can't even remember where I bought it from about 25 years ago. Some of my rubber stamps will be antiques someday unless my kids put them in the garage sale of the century. LOL! Visit this site again to see what other crafty things I make with the items I purchased in Japan. See you soon!

Monday, May 6, 2019

Baby Elephant Card

 As usual I needed a baby boy card...uh..yesterday so I whipped this one up the day after we returned from Japan.  Luckily, I store all of my baby crafting supplies in one giant box so it was easy to find fun items to use.  I chose a Doodlebug Designs stamp and die set because it was cute and well....if I chose the right paper, I wouldn't have to do any coloring.  This was a great time saver.  I used a Lawn Fawn banner die to cut the aqua piece used to hold the Simple Stories brads, the Heiko tri-colored ribbon and stamped, die-cut baby elephant.
 For the inside of the card I used an old Stampendous stamp with a sentiment that I love.  I fussy cut the scalloped oval. The die-cut baby animals were adhered with foam dots. This was a super easy card so....yes, you CAN make a baby card in under 30 minutes!   Happy speedy crafting!

Thursday, May 2, 2019

Hap-pea Mother's Day Card

 When I saw the Lawn Fawn 'Be Hap-pea stamp and die sets, I knew I had to get it to make cards for my twin grandson's and their parents. (I wish I had discovered the LF sets while the boys were still 'in the pod'.)  Anyway, since this is the first Mother's Day for my hard working daughter-in-law I thought I'd use the pea in the pod theme for her card. I also discovered the Sizzix emboss and cut folder (at HM Ben Franklin Crafts) that made the card base.  Not only did the folder cut the opening it also embossed the pretty floral design and stripes. Sorry that the embossing doesn't show up well in the photo.
 I think the stamped and die cut script 'hap-pea' is very cute and pretty.  It works well with the 'mother's day' script stamp which I had in my misc. word stamps stash.  Both the die cut banners on the front and inside were made with the Lawn Fawn 'fancy folded banners'die set.  This is a very useful set and makes 3-D folded banners which really 'pop' on the card.  I'm pleased with the outcome of this card especially since it matches the bright can-do attitude of my daughter-in -law.  Happy Mother's Day to all the loving mothers out in blogland!