Tuesday, November 29, 2022

Five-Minute Daiso Baby Card


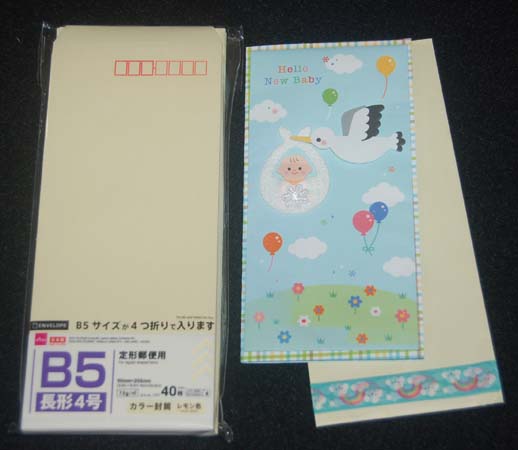
Knowing that I would be in Japan when our niece would give birth to a new son and not having enough time to create a suitable card, I opted for a cheat.  I saw a really cute 3D baby card at Daiso and snapped it up for a $1.75 bargain price.  Upon opening the the packaging, I realized that it was not a baby card but a decorated envelope...huh?  Still determined to use this really sweet Daiso product, I decided to double stick  tape it to the front of a printed card made from a folded double sided card stock.  I chose a baby print card stock (plaid outside) that has a light design of clouds inside over which I can write a message.  To make the card even more special, I decided to leave the top of the envelope (card front) unattached so that money or a check gift can be concealed.  Daiso also sells colored envelopes that fit this slimline mini card.  They do have small red rectangles on the front which is probably for postage.  I used washi tape to conceal the rectangles but because my tape didn't conceal it with one layer, I doubled up.   I am very pleased with this quickie baby card because it looks good and worked well in a pinch. Go check out your nearest Daiso store to see what goodies you can find to make your life delightful!


Friday, November 25, 2022

Autumn Forest Tea Party


HM Ben Franklin Crafts has some lovely Echo Park 12x12 printed card stock which I wanted to use as the background for this card.  I chose a leaf print and then stenciled on Hero Arts bare tree trunks with Distress walnut stain.  I like the way that the leaves of the paper show through the tree trunks and make it look like the leaves are falling.  If you can't find the Echo Park paper, you could use the Hero Arts leaves stencil (shown in the photo below) behind the stenciled trees.  For the scene in the foreground, I chose Avery Elle stamp and die sets, Fall Picnic. I love the cute woodland creatures and colored them with Copic pens.  I tried to keep the colors muted so they would blend in with the forest background.  This card is my favorite one and celebrates a beautiful time of the year.

This autumnal card is the last one I will make this season and it is a thank you for my followers in blogland.  If I could I would throw a little party in the woods amongst the falling, rustling leaves.  There would be cake, tea and charming stories.  You are all invited!  


Monday, November 21, 2022

Chocolate Pecan Scones


 I just made a batch of Ina Garten's (Barefoot Contessa) Chocolate Pecan Scones (recipe available online). They turned out quite well...tender, buttery and light.  The dough was so heavy and sticky that I thought it would be scone bricks. LOL! I think next time I would add more pecans and perhaps take out some of the chocolate pieces.  These scones taste wonderful but perhaps a little jam or lemon curd would make them taste even better. I am a messy, lazy cook so I cut corners whenever I can.  For example, this recipe said to use a mixer to form the dough, but of course I just used a fork.  Also, the dough should have been rolled out with on a cutting board with a rolling pin but I just patted it out (with my hands) directly on the parchment paper that I was going to bake the scones on. I cut out the scones right on the parchment too....see lazy and messy!  But the results are what matters...right?..and these were  delicious so I guess I don't have to be a perfect cook to make perfect scones. Hahaha!

Thursday, November 17, 2022

Apple Picking Framed Collage

Recently, while on vacation we had the opportunity to go apple picking. It was something I had always wanted to do.  I learned that apple trees are a lot smaller than I imagined (see the trees in the background of the photo).  Also, there are lots of delicious apple varieties that never make it to markets in Hawaii. Anyway, once again I decided that a photo collage would be the best way to highlight the beauty and sweetness of the day.  First, I found a background paper that had a colorful graphic design of apples.  Because I wanted to show the apple trees in the background, I simply cropped the photo so that a good portion of the apple print paper was visible.  Using the Lawn Fawn die set with apples, it was simple work to cut and glue down apples, leaves and stems along the bottom of the collage.  Finally, the mice and framed sign were stamped, colored and die cut. The words from the stamp set were stamped with permanent ink and then cut out with a paper trimmer before coloring with a Copic marker.  I am very pleased with how this collage saves the special memories of the very special apple picking day, including the sweetness of the little fellow enjoying the crisp, sweet, just-picked apple.  I smile every time I look at this super easy project. I realize that it is a much better way to feature a photo than putting it in an album which would rarely get opened. Keep your sweet memories close to your heart.


Sunday, November 13, 2022

It's fun to see what I can create with less than perfect pearls and gemstones.  It makes me happy to make something pretty from parts that others would pass by.  These two pendants were wire wrapped with gold filled wire (don't use plated wire as it will lose its plating with handling).  The baroque pearls were strung with small gauge wire since pearl holes are super small. This thin wire was wire wrapped around the the larger gauge wire that was strung through the agate (top) and light blue gemstone (bottom).  The gemstones were rather plain looking before the pearls were added. These are truly one-of-a-kind pieces which I hope will be worn with pride.


Wednesday, November 9, 2022

Framed Pumpkin Boy Collage


What do you do with photos that are less than perfect?  Well, you can make them into a collage and frame it for gift giving or to mount on your wall.  This collage was inspired by some pages I saw in a scrapbooking magazine (but I don't do scrapbooks any more).  I started it with some printed card stock 12x12 paper that I purchased at HM Ben Franklin Crafts.  The card stock was cut to fit the frame (purchased from HM BFC).  I stamped the Whimsy cat image and colored it in before fussy cutting it.  I also fussy cut the little boy's photo so that the unwanted parts were eliminated.  The words were die cut from green foil paper and all the parts were glued down to the printed card stock before fitting it into the frame.  I really like the way this framed collage turned out mostly because it reflects the happiness of the day that we found the "ORANGE PUMPKIN" !!!!!


Saturday, November 5, 2022

Baroque Pearl and Amethyst Pendants


These three pendants were inspired by the stones and pearls I already had in my stash and influenced by jewelry I'd seen in jewelry magazines.  The top baroque pearl is a really unusual one that I found on a string of normal looking baroque pearls. I really love this pearl because of its shape and tri-color aspect. The bottom pendant was made from an amethyst irregular faceted gemstone and an earring that I made but couldn't find a second fancy amethyst head pin to make a pair.  These pendants may appear in my Hilo locker box or wrapped up as Xmas gifts for friends. Maybe one of them will end up in my jewelry box...heeheehee!  Merry Xmas to me!

Tuesday, November 1, 2022

Gemstone and Baroque Pearl Earrings


 These earrings were inspired by an online jewelry site.  I saw the prices that were being charged and decided that I could easily make them with supplies I already had.  Fancy sterling and gold filled head pins can be purchased from HM Ben Franklin Crafts or online.  The baroque pearls were in my pearl stash but HM BFC usually has strands of them for reasonable prices.  There are online sites that also sell them but you won't be able to choose the ones with good luster and color.  These earrings will be put in my Hilo locker box for sale or maybe given as Xmas gifts.  I hope I've inspired you to get started with your jewelry crafts.  Earrings like these are super easy to make and inexpensive too.