Sunday, October 30, 2016

Pumpkin Everything Tags

 When I spied the Neat and Tangled clear stamp, I knew I HAD to get it....my sentiment, exactly. After using a Little B tag die (set available at Ben Franklin Crafts) to cut out a watercolor paper tag, I began playing with the wonderfully rich colors in my Kuretake watercolor set (available at Ben Franklin Crafts) to achieve just the right autumnal blend. Once the tag was dry I stamped with dark brown pigment ink and heat embossed with a clear sparkly embossing powder. (This effect doesn't show up well in my photo but does look great IRL.)  Since I felt the colors were not dark enough, I applied more watercolor paint and let it dry.  Once satisfied with the look of the tag, I trimmed the edges with a deckle edge scissors and adhered it to a non-trimmed brown card stock tag. A sparkly ribbon completed the tag and made it ready for tying onto goodie bags filled with baked pumpkin treats.
I am once again showing the Misti stamping tool and Kuretake watercolor set because I think either or both would be excellent gifts to give a well-deserving crafter this Christmas.  Both items are among my favorite crafting tools available at HM Ben Franklin Crafts.  Happy Xmas Shopping!

Wednesday, October 26, 2016

Halloween Resin Jewelry

 Hope that you've been to Market City or Mapunapuna Ben Franklin Crafts to make some resin jewelry.  Until the end of the month both stores are offering make and take classes for just $5!  You can make either the ghost or pumpkin pin.  Yours might turn out a little different from mine because I did my pins at home so added fluorescent powder to the pumpkin and MS stars plus mica flakes to the ghost. (Sorry, my photos don't really show the iridescent bits in the pieces, but they are really pretty and magical looking.)  The cat necklace was created using parts from the Halloween Resin Special Box I purchased from Market City BFC.  It has loads of molds, metal findings, colorants and sparkly stuff.  Although the kit doesn't have English directions, once you've done a make-it-take-it resin piece you should have no problems following the pictures. You will also need a bottle of resin and a UV lamp. I know you will think this kit is a fabulous bargain buy.  There is also a Xmas resin kit for you to try and really get hooked on this exciting new craft from L-Belle.

Saturday, October 22, 2016

Easy Thanksgiving Napkin Rings and Placecards


                               front                                          back

I usually don't start Thanksgiving decorations until the end of October, but this year I decided to get a jump on the holidays....let's see how long that lasts....LOL! I saw a package of cute felt turkey stickers and one of loose autumn leaves at HM Ben Franklin Crafts.  I thought that glued together they would make excellent napkin rings (even if you don't use cloth napkins). I pulled the backing off the turkey sticker and glued the leaves in a circle using 3 in 1 Beacon glue.  To lessen the stickiness of the finished ring. I dusted the back with cornstarch.


Here is the Pilgrim-style place card that I made for my Thanksgiving table.  I used gray gauze paper from a 6x6 DCWV paper pack and added a 'turkey' feather....both items were purchased at HM Ben Franklin Crafts.  The rest of the place card was simply a matter of straight cuts of black & white card stock and adhesion with double stick Heiko tape.


Even though these are two really simple projects, I think they will really add to the festivities of your Thanksgiving dinner.  If you are attending a dinner at someone else's house, ask the hostess if she would like you to make table decorations. A more casual hostess will probably be thrilled to have your help.  Gobble, gobble.....Happy Thanksgiving!


Tuesday, October 18, 2016

Goldfish Bowl ShakerTag

I needed a goodie bag tag for some cookies that I was giving to people who work in a pet store and did a favor for us.  The new stamp set that I purchased at HM Ben Franklin Crafts seemed perfect for this project.  The tag began with stamping the bowl image on a 4" square of card stock.  The interior of the bowl was fussy cut and a pencil was used to draw a line inside the cut space onto another 4" card stock piece. This second bowl interior was cut out too.  Two pieces of clear film were formed into a pocket with foam tape and filled with acrylic dew drops and Queen Co. diamond toppings. This  clear pocket was taped inside the  card stock fish bowl windows. A 4" square of blue card stock was stamped with green plants and fussy cut stamped and colored goldfish were glued onto the scene. Finally, the decorated blue square was taped to the back and die cut 'thanks' glued to the front of the tag.  I was happy with the final resulting tag and the fact that I could use up some of my card stock scraps which are um-mm-m overflowing my craft table and expanding daily!

Friday, October 14, 2016

Halloween Shaker Jack-O-Lantern Tag

 The cute Lawn Fawn stamp and die sets (purchased at HM Ben Franklin Crafts) inspired these tags.  The shaker Jack-O-Lantern bases were made with an EK Success pumpkin face punch in a printed card stock circle.  Then two circles of orange foam sheets and one of orange card stock were cut. The center of the foam circles were cut out to form a cavity for the sequins.  All the circles were cut free hand into a pumpkin shape.  A piece of clear acetate was glued to the back of the pumpkin face.  After orange sequins were placed inside the shaker all the pumpkin layers were glued together.
 The dogs were die cut out of brown textured card stock and stamped with black ink.  The die cut pumpkin was stamped on orange card stock and the witches hat was simply die cut from black card stock. The sentiments were shaped into ovals on the acrylic block before stamping on green card stock and free-hand cut into leaf shapes. Green twine and the leaves were glued onto the jack-o-lantern tags as a finishing touch.  These tags will be used on special home-baked goodie bags filled with pumpkin bars or muffins. Yummo.....time for fall treats!

Monday, October 10, 2016

Upcycled Halloween Fudge Tin

 At last year's after Christmas sales I discovered some metal cookie tins for 35 cents!  The cookies were dumped (horrible) and the tin saved as a perfect container for my homemade fudge.  Usually my fudge is given at Xmas, but I felt like passing out goodies early this year, so I decided to make Halloween fudge and present them in decorated tins.  Using Halloween washi tape (available at Ben Franklin Crafts), it was easy to whip up some attractive containers.  Washi tapes come in lots of different widths so you can definitely find some to fit your tin.  The tape is very forgiving and can be re-positioned over and over until you get it just right.,,no glue needed.  The hardest part of this project was cutting the top circle of paper because I didn't have a 5" circle die so I had to trace the tin and trim one from a sheet of MS flocked spider paper.  I added a label from my stash (to write the fudge flavor) and even decorated the bottom of the tin.  I am so pleased with this recycled tin that I am planning to make some decorated Xmas cookie tins next. Upcycle everyday crafts!
Here is another Halloween tin I created for my fudge. It was a little easier to make because I found my MS 4"-12" circle cutter and the directions were still with it! Sweet! Happy, happy, happy!


Thursday, October 6, 2016

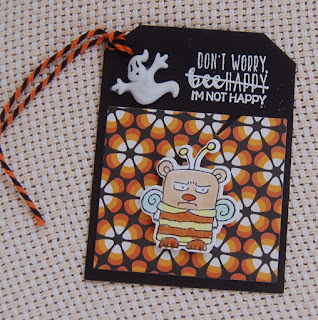
Grumpy Halloween Tags

Last year I was really too late to make good use of these Taylored Expressions Halloween stamp and die sets.  I find the images and sayings to be delightfully grumpy so I was glad that Halloween came around so fast.
Paired with the Paper Smooches Quote Tag die set, I knew that they would make cute tags to tie onto my home-baked Halloween goodie bags. (On some tags it's hard to see the 'V' cut outs that indicate that the character is speaking.)
For added interest Halloween ribbons/twine, stickers or shanks-cut-off buttons were added.
 Some of the words fit better if the tags were turned on their side.  The words were stamped with white ink and heat embossed with white opaque embossing powder.  If some of the words do not come out clearly, you can 'fix' them with an opaque white gel pen.
 The Taylored Expressions dies are great because they cut close to the image, but the stamps are made of red rubber which are not clear so you cannot see the through them to stamp accurately.  I discovered that the solution is to die cut the paper first, ink up the stamp, then place the die cut paper over the stamp and press by hand. The result of this method is that I didn't have a single misprint! I think this method may work with the clear stamps too, which often are hard to align even if you stamp first and die cut second.  I hope you've enjoyed this post.  Leave me a comment if you can spare the time. I love hearing from you....really!

Sunday, October 2, 2016

"Washi' Your Hand Sanitizers for Halloween

Now that many schools ban sweet treat giving, it is a challenge to come up with Halloween treats that are 'healthy'.  I thought that personal bottles of hand sanitizers decorated with Halloween themed washi tape would be the perfect solution.  (Just be sure that the kids know what to do with them and don't try to drink the liquid.)  It was super easy to wrap the printed washi tape around the hand sanitizers and then coat them with Glossy Accents to prevent the tape from fraying.  HM Ben Franklin Crafts has lots of Halloween washi tapes and buttons.  The plastic button shanks were easy to snip off and the buttons glued onto the sanitizers are the perfect finishing touch.  I think you will be able to quickly whip up dozens of these little 'healthy' treats for classmates, team mates or office co-workers.  Happy Halloween Crafting!