Wednesday, May 30, 2018

Magical Day Fairy Shaker Card


 I love shaker cards and I haven't made any in awhile so when I spied the line of fairy papers and fancy circular die by Kaiser Craft, I was inspired to make a fairy shaker card.  I used the die to cut a swirly circular piece from DCWV shimmer cardstock.  Then I cut another one from thin foam (available at HM BFC).  I used the die to make an impression on a piece of acetate so I could cut out the circle to glue behind the shimmer cardstock die cut to form the window.  Next I glued the foam die cut to the card front (printed Kaiser Craft paper on pink card blank) and added the Flower Soft and flower sequins into the depression.  After gluing the shimmer die cut over the foam, I added with foam dots the label (from the paper pack) and the stamped, colored, die cut fairy (from a Hero Arts set).  Paper flowers and pearly dots were added as finishing touches and to cover up  a boo-boo. LOL! I am pleased with the final look of this card even though I couldn't get a good photo of it due to the flashing on the shiny parts.  Note: The Flower Soft is a product sold ages ago at Ben Franklin Crafts. If you are a hoarder like me, you probably still have lots of it. The teeny flower sequins were ordered from Eva's online store, Simply Made in Hawaii. She sells lots of unique sequins and items that she creates. 
Thank you for visiting my blog site. I hope I've inspired you to make your own fairy shaker cards. Happy Magical Crafting!

Saturday, May 26, 2018

Summery Ocean Themed Card

I saw this 6x6 Kaiser Craft paper pack and I thought that I really need to make some summery cards for a change.  I like that Kaiser Craft products (sold at HM Ben Franklin Crafts) coordinate together so I was easily able to combine the wood pieces with the coral stamp and lovely printed/shimmery paper.  The paper that I chose was a seaweed print that had glossy parts.  I wanted to make it like an underwater scene so I stamped the coral design in white ink in on the bottom third of the front. After sprinkling on white embossing powder, I heated it with a hot air gun.  This gave the card a nice coral like texture.  The Best Wishes tag was one of many from the paper pad so I just did a little distressing and tied it to two colors of twine. The final add-ons were stained wood pieces and teeny tiny shells.  It turned out to be a simple card which is subtle enough for a male birthday card....always good to have those in my stash.


Tuesday, May 22, 2018

Japan Hobby Show Dried Flower Resin Crafts

 Recently, I attended the Japan Hobby Show and was drawn to a booth with a giant inventory of dried flowers. The flowers were being made into beautiful projects. The above ruler and plastic tray are two examples that I purchased to show you what can be made with resin and some creativity.
 Here's a keychain I made using the new LED resin I was given as a free sample.  I should have put less flowers in the oval and bought more  blank keychains....duh?  I did buy a lot of dried flowers and greenery though. ;)  The new LED light and resin should be available soon in our BFC stores....I hope.  I think you could activate the resin with your own LED light but this one has a timed light.  The new LED resin hardens very quickly.  I look forward to new resins products being developed in the future....more creative fun! 

Friday, May 18, 2018

Mother's Day Card with Cameo

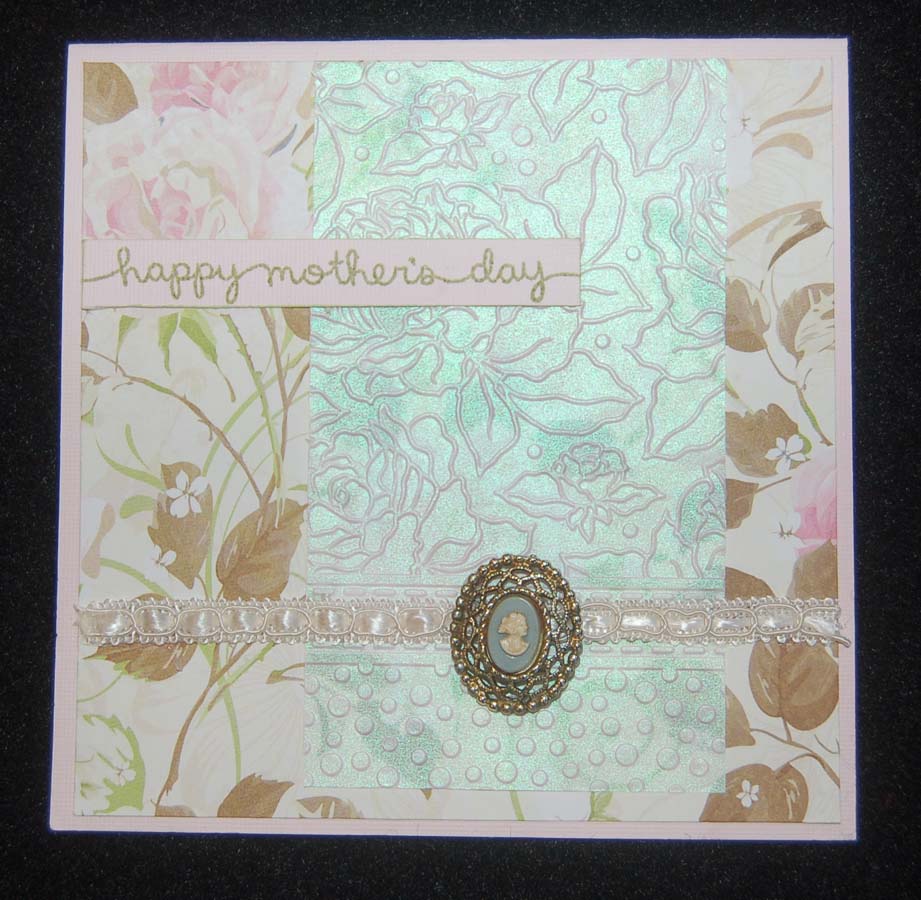
 Although I don't have a mother or mother-in-law to send this card to, I do have a daughter-in-law who is expecting so this will be for her.  The inspiration for the card started with an embossing folder that I acquired from a magazine.  Many foreign paper crafting magazines sold at Barnes and Noble have dies, stamps and embossing folders packaged with their publications.  I think this is an excellent bargain as the magazines also show examples of what to do with the paper crafting tools.  Anyway, I started by embossing a piece of pearlized vellum paper (from HM Ben Franklin Crafts).  I layered this over some rose printed Bo Bunny card stock which was adhered to a light pink 5-1/2" square card base.  Lawn Fawn script words were stamped on a strip of paper and added to the card along with a fancy ribbon and a faux cameo. 
 This close-up shows the cameo which is actually an earring with the back broken off.  I have a collection of real cameos, but I do like to search for bits and pieces in garage sale bags or online sites. For just a few dollars, it's surprising what you can get to decorate your craft work. Now what shall I do with the other earring?....a box top decoration? resin jewelry? ...fun just to imagine!

Monday, May 14, 2018

Resin Charm Kits

 I thought you's be interested to see the resin charms I've made using the kits sold at HM Ben Franklin Crafts.  First off, I love the resin kits because they have EVERYTHING you need to complete the project except for the resin and UV lamp (plus some toothpicks and parchment paper).  The Fruit Jar charm was made with the new resin designed to work well in silicon molds. Even though this kit did not have English directions, I was able to put the charm together fairly easily. (I have made a few kits previously so I do know the general steps.)  I ended up with a few 'extra' fruits so I just piled them onto the jar.  The goldfish charm did have English instructions so it was a snap to put this one together and it came out almost exactly like the one on the packaging...so proud!  I may use these charms for purses or perhaps I will change out the ball chains and add 24" necklace chains and give them as unique jewelry gifts. What do you think? I think, if you try them, you too will get hooked on making resin charms.  Give them a try for some crafting fun!

Thursday, May 10, 2018

Star-Gazing Sweethearts Card


 Continuing my quest to find and use dies and stamps that have not yet had a maiden voyage, I discovered this super cute Lawn Fawn set 'Upon A Star'hidden under some other supplies in my messy craft area.  All of the Lawn Fawn products used for this card were purchased at HM Ben Franklin Crafts.  I started the background for this card by spraying a piece of watercolor paper with Tim Holtz Distress sprays and sprinkling on some Ken Oliver Color Burst powders and sprayig again with water. The excess ink was blotted with a paper towel, hence the patterning along the edges of the paper. Once the paper was dry, I stamped the stars using silver ink and heat embossing with silver powder.  The fox and bunny were stamped in blue Memento ink, colored with Ciopic pens,die cut and adhered to the card with foam dots.  Because I cut the watercolored panel too small, I cut a silver paper to make a second border. I think I like this look more! Yay, for happy accidents!  On the inside of the card I stamped one of the sayings from the Lawn Fawn Lucky Stars stamp set that mades it perfect for an upcoming special occasion. (Shhhh! It's a secret!)

Sunday, May 6, 2018

Sew Sweet Birthday Card

 I have so many pieces of scrap printed paper piled on my craft desk, that I am always trying to find new ways to use them up.  Some of the pieces looked like fabric so I thought it would be fun to piece them together like a quilt. I simply glued triangles and rectangles onto a piece of card stock slightly smaller than my card base. Next I stamped and die cut sewing images from a Lawn Fawn set. To add more cuteness I stamped a face onto the pincushion, glued on some buttons and wrapped embroidery floss around the spool.  Finally, I stamped "It's Your Birthday "onto a piece of ribbon.  Test your ink before stamping as some inks will bleed on certain ribbons. This card was fun to make and will be perfect for my quilt-sewing friend. I am certainly going to make this card or similar ones again because I really enjoyed 'quilting' with my paper scraps.  Hope you liked this post enough to post a comment...I love hearing from you!

Wednesday, May 2, 2018

Yummy Cupcake Die Cut Card

The Sizzix die set (purchased from HM Ben Franklin Crafts) that I used to make this luscious card was in my box of craft supplies to use.....someday.  Well, someday is finally here and I am really glad that I tried the die out.  It was easy to use and resulted in a fun-shaped card for many gift giving occasions.  I decided to use the paper scraps from my desktop pile so the card was virtually free.  I stuck to the look on the Sizzix packaging but moved the twine bow banner and used Bo Bunny Pearlescent Paint to fill in the die cut holes.  I also rubbed a little paint on the frosting piece and sprinkled on some fine crystal glitter.  On the cherry I added Glossy Accents to give it a shiny surface.  The 'just for you' words were printed on the banner using one of the teeny stamps from the Lawn Fawn set. Oh yes, you can position the cupcake die on a folded piece of card stock so that when it is run through the die cutting machine the fold will remain intact or you can just cut two pieces out and glue the top portion.  This die set even has a piece to cut sprinkles!  Whether you are making a card for a child or adult, this die set is one you will use often....I know I plan to make another one soon!