Wednesday, January 31, 2018

Soy Good Calendar Card

 As soon as I saw the new 'So Punny' line of Doodlebug Designs 12x12 card stock papers at HM Ben Franklin Crafts, I knew I would be getting lots of them.  This soy sauce and sushi theme was particularly appealing to me because it pairs well with a Lawn Fawn stamp set I've had in my stash for quite a while. Since I wanted to use up more calendars, I decided to use my old standby Sizzix die for the card base...it's an oldie but goodie.
The words for this card came from the same Lawn Fawn sushi stamp set. I thought that making a paper chopstick holder would be perfect for the 'soy happy for you' sentiment. Used this way chopsticks would be a good party favor along with the calendar.  Shown below are some of the pretty Dandelion Valentine papers which are not super Valentinish so they can be used for many other occasions.  Hopefully, this post has excited you to check out and shop at BFC for some super cute Valentine items. See you there!

Saturday, January 27, 2018

Rescued Birthday Card

After watching the Joy of Crafting I tried to make a colorful scene using powder pigments and a stencil, but I had an epic failure.  In a fit of creative craziness, I sprayed the whole watercolor paper before I trashed it. The blur of vibrant colors caught me off guard and stopped me from tossing the sheet. I let the amazing watercolor dry and decided that it was salvageable. It became the front of my husband's birthday card.  I always struggle with his B-day card because it needs to be finished so soon after the holidays and I am always rushing.
My husband and I have an affinity for frogs because of an old movie (April Fool's) we saw in our pre-marriage years.  I decided to incorporate this Inkadikado frog image but didn't want to fussy cut it so I knew I needed to stamp it on the inside of the card.  To tie the front of the card to the inside, some twine seemed appropriate to join the bike to the sign. I am surprised that what started out as a failure turned out to be a special one-of-a-kind birthday card....and it was easy! P.S. the Copic markers I used to color the frog image leaked through the card so I attached a color card stock to the back and stamped it with one of the little Lawn Fawn 'made by me' stamps....another rescue!


Tuesday, January 23, 2018

Mini Valentine Cat Totes

I have lots of Valentine card stock left over from previous years so I decided that they would be put to good for these little totes.  Paired with the Mama Elephant cat face die, the Lawn Fawn tote bag is very simple to assemble. I love the embossed whiskers that come with the cat face.
These totes are perfect to hold chocolate kisses or some other Valentine treat. On the back you can attach a message or a CALENDAR!....still got more to use up!

Friday, January 19, 2018

Postage Stamp Resin Purse Charm

 For their thank you notes, my daughter-in-law cleverly turned their wedding photos into US postage stamps.  I thought the stamps were so unique that I decided to fashion them into keepsakes. I found the rectangle metal frame and purse charm chain at HM Ben Franklin Crafts in the L'Bell department. It was simple to trim the stamp and resin it into the frame with a UV lamp.  I added some faux pearls and glass leaves using jewelry pin heads.
I really love the way the charm holder looks on my purse.  I hope my daughter-in law will love hers too, and the fact that it has room to attach more resin charms.

Monday, January 15, 2018

Cat Calendar Valentine Cards

As usual, the new year is here and I still have lots of calendars to use in craft projects. For starters I decided to make Valentine calendars....lots of other holidays to go through in future months. LOL!
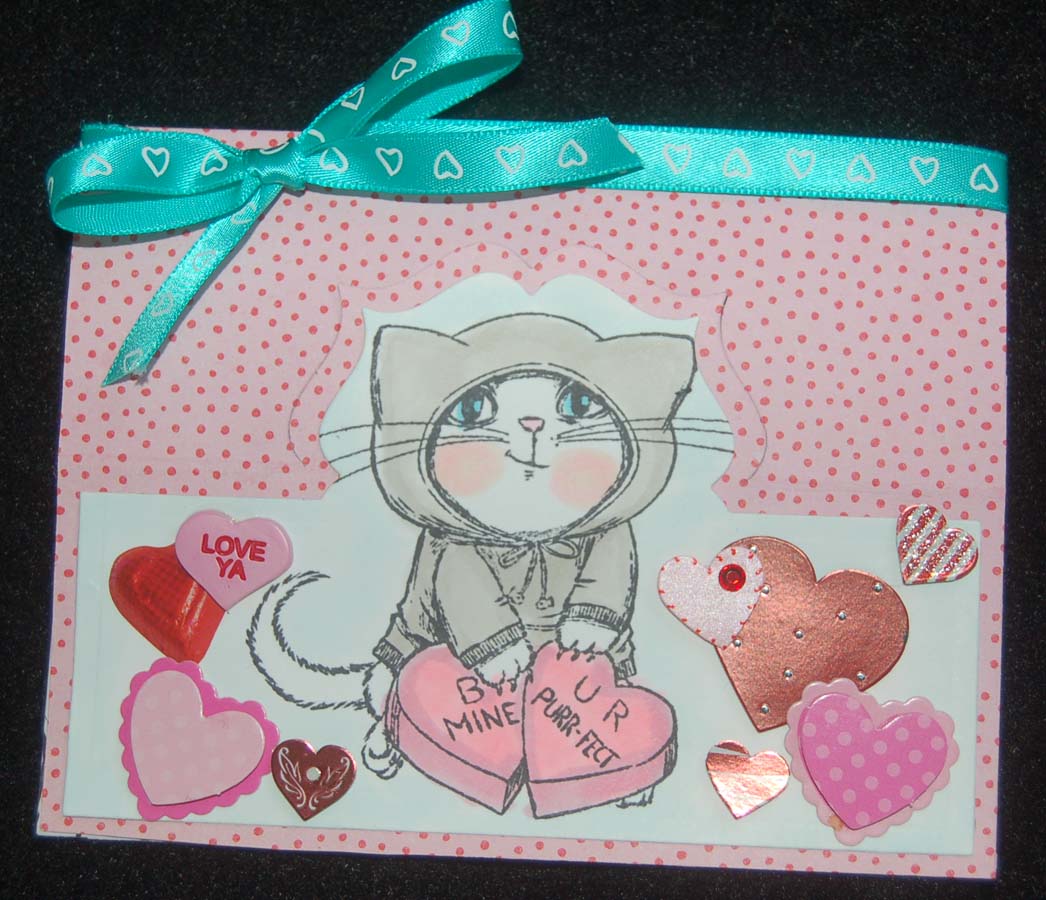
 I found this Penny Black cat image irresistible and amazingly it fit very well on the Sizzix card die cut piece made from white marker paper.
 I used Crate Paper Valentine 12x12 two sided printed card stock. I loved the simple designs which didn't overwhelm the cat image.
 Since I had an ample supply of stickers from previous Valentine's Days, I decided to generously apply them around the cat.
 I also had many rolls of American Crafts ribbons suitable for Valentine's Day, so I used them to decorate the outside of the cards.
This close up of a side view of  one card shows the simplicity of how the die cut card folds up to reveal a calendar for displaying.
 My favorite part of these cards is that the shape of the card matches the ears of the cat....how cute it that? Okay, that's it for now.... only a couple dozen calendars to use up before June....halfway in the year.....hahahaha!

Thursday, January 11, 2018

Gatefold Die Cut Wedding Card


An upcoming wedding prompted me to make this card.  I purchased the Sizzix die sets awhile ago knowing they would come in handy for many occasions.  I love the shape of the gatefold card and the delicate rose die cuts really add to the romantic look. I had intended to make an all white card, but I couldn't find just the right white paper for the base.  Instead, I found some pale blue sheets in my stash, but because they were too thin I doubled them up to add thickness.  The double sheets allowed me to glue the ribbon in between.  I found just the right ribbon and charm in the wedding section of HM Ben Franklin Crafts.  I ran the delicate rose die cuts through my Xyron adhesive machine  before applying them to the front of the card. (Dust with powder to eliminate stickiness.)
The card opens to reveal a Marianne Design die cut couple on a brushed silver heart (Sizzix die). The words were cut from silver foil paper (DCWV) using dies from a Sizzix set.  The small roses in the corners were made with dies  from another Sizzix set that coordinates with the Gatefold Card set.
I used a Paper Smooches die to cut the pocket that I attached to the back of the card. This pocket is to discretely hold the monetary gift. I added a Mrs. Grossman sticker to accent the pocket.


 To fancy up the front and back of the envelope I used Studio G wooden handled stamps (from HM BFC) and stamped in blue grey ink that was heat embossed with clear NUVO sparkle powder.
Because I used just dies (no coloring) on this card, it was quite easy.  I like the clean-cut professional look of the card and I plan to use the gatefold dies on future cards.  There are so many ways to incorporate colors and specialty papers to create entirely different cards.  Look for these gatefold card sets at BFC and let your imagination go wild!

Sunday, January 7, 2018

Xmas Scrap Paper Strip Thank You Cards

 Are you tired of everything Christmasy?  Do you have a pile of scraps next to your paper trimmer? Is writing thank you notes the last thing on your agenda? ..... yes, yes, and yes! Well, as the old adage says:  When the going gets tough; the tough get going...er, crafting!
As in the previous post, I took simple strips of scrap paper and glued them onto a rectangle slightly smaller than the card base. I stamped and heat embossed white powder to add the words 'Thank You' (Hero Arts) to a solid colored strip. Red and white twine was wrapped around the rectangle and a leftover cardboard Xmas embellishment was glued on before the whole rectangle was attached with double stick tape (Heiko).
The lower corners of the card base and paper strip rectangle were clipped with the corner cropper (We R Memory Keepers).
Don't forget about using up your leftover Xmas washi tape on your envelopes.....remember this is probably your last chance to use up Xmas supplies before they have to go bye-bye for another year. Now onward to writing those thank yous.....no more procrastination! 

Wednesday, January 3, 2018

Scrap Strip Thank You Card

 At a previous CHA craft show, I learned how to make this card using strips of paper scraps. It is a super fast card that uses all those paper scrap strips that end up next to your paper trimmer. (You know you have bags of them that you can't bare to discard...LOL!)  Originally, the card had a butterfly instead of a raccoon, but since this is being sent in autumn, the raccoon seemed more seasonal. I like the rounded corners and twine accent. For added interest, I applied printed washi tape strips to the envelope. HM Ben Franklin Crafts has a ton of wonderful washi tapes to choose from so go check them out. Since this card is so easy, I think I'll make lots more for my after Xmas thank yous.  (Yes, I have enough scraps!!!) Short post today....so much holiday clean up to do!