Wednesday, January 30, 2013

Valentine Accordian Pop-up Album


While I had the Sizzix Accordian die out, I decided to make a Valentine version of the mini album.  I started with a pink hued 12x12 piece of card stock. I used the die to cut four frames and then cut two of each Valentine-themed papers (eight pieces).  The printed papers are from a Colorbok pack.  Place the papers back to back before die cutting so they will match up with the frames. It is easy work to trim the papers so they fit the inside of the frames. Use a glue stick (Elmer's Extra Strength) to adhere the papers to the frame.  Tape the tabs together with Merikan double stick tape.  To dress up the front of the album, I added a cut-out of a stamped heart image (Hero Arts set).  Then I glued on some flowers pulled from a bouquet that I purchased from Lupicia (tea store in Ala Moana Center).  Next two (Little Yellow Bicycle) heart-shaped head pins were inserted into the blossoms.  Finally, a printed ribbon was tied around the album and a red rose (from Ben Franklin Crafts) was glued to the center of the bow. I think I will punch out heart-shaped photos, add some lace and bling-bling along with journaling to complete this album.  Thank you for taking the time to read this blog post.  I hope you enjoyed it and learned something too. Please visit this site again and leave a comment if you can. I love to know what you're thinking.


Saturday, January 26, 2013

Accordian Pop-Up Album


I bought the Sizzix die used for this pop-up album awhile ago but put it aside for holiday crafting.  While looking for a base for a photo card and perhaps family newsletter, I came upon the forgotten die.  It looked complicated so I hesitated, but it actually was a cinch to put together.  The hardest part was finding suitable cardstock.  Some of the Simplestories Sn@p 12x12 or 6x6 work well because they coordinate with each other and are not too busy so they will not distract from photos. After cutting, folding, taping and applying Sn@p stickers the simple album was done.  I haven't decided yet what photos to use but I think I will punch them into circles before gluing them onto the album.  I will probably add more sticker words and labels because the Sn@p set has so many in the packet that I'm sure I will find some to enhance/describe the photos. The really fun Sizzix die and Sn@p/Simplestories products were all purchased from Ben Franklin Crafts.  Go check them out...now!


Tuesday, January 22, 2013

CHA Show and Easy Valentine Card

This year the Craft and Hobby Association show was held in Anaheim.  The show was a little quieter than usual, but that made it much easier to maneuver through the booths.  I felt I could see more and talk to more vendors. There was even time to try several make and-take projects. The photos below show some of the crafts or products that I found especially beautiful/interesting.


 At one booth I made a very simple card which had strips of scrap papers glued onto a rounded corner vertically opening base.  (left photo)  While I thought the card was a really great one for using up all those small but too-good-to-discard strips of printed cardstock, my husband suggested that they looked like washi tape paper strips.  Aha!  What a good idea!  I used washi tape (purchased from BFC and Celebrations) to decorate a card made from a piece of Sn@p cardstock (corners altered with a corner clipping tool).  Washi tape works well for this card because it can be repositioned until you are satisfied with the look of the card.  I also used some of the new glitter tapes from Ben Franklin Crafts.  The smudged printed heart image was made with a Hero Arts stamp and the acrylic heart bling is from a pack of two sheets found in the wedding department of BFC.  What do you think of my Valentine version of the CHA show card?


Friday, January 18, 2013

Spinach Bead Necklace

No, these beads are not really made of spinach, but the Jesse James Bead Company named the strand of beads used in this necklace after Popeye's favorite vegetable. (Click on the photo to see a close up of the beads.)  Like the previous necklace I made, this one was super easy to assemble because all the hard work of selecting the shapes, sizes, colors, textures and materials was done for me.  All I did was add two sizes and colors of bi-cone crystals between the main  beads and attach the Sweet Beads brass colored chains with oval jump rings.  An additional piece of chain was added in the back so the lobster claw clasp could be used to adjust the necklace length. (Click on the photo so you can get a closer look at the beads.....they're really pretty.)  Using the Jesse James Bead strand  purchased at Ben Franklin Crafts is a smart choice for an easy jewelry project that results in something beautiful to give or wear yourself.  I hope you've been inspired to give it a try.  Thanks for visiting.

Monday, January 14, 2013

Almost Instant Nrvklace

It's been awhile since I posted a jewelry project, mostly because my jewelry supplies are in a big messy pile.  Honestly, it takes me so long to find the right beads that I sometimes give up before I start.  Recently, I discovered some Jesse James Beads in 7" strands which were color coordinated and varied in shapes, sizes, and materials (ceramic, stone, and crystal).  I decided on a delightful strand called 'vanilla' and with the addition of a few crystal bi-cones (in 4mm black and 5mm copper) I formed an 11" strand on copper colored beading wire. Loops were formed on both ends of the wire and fastened with crimp beads which were covered with copper crimp covers.  Each looped end of the strand was attached to two 3-1/2" lengths of chain (Sweet Beads Fundamentals) with jump rings and the clasp was connected to the ends of the chain.  The length of the chains were determined by subtracting the 11" from the total desired length of the necklace which in this case was 18".  I was very pleased with this necklace because it was quick to assemble, not as heavy as an all-bead necklace would be, and created at a low cost because an assortment of beads were obtained in one strand.  If you are an experience or novice beader, I think you will appreciate the look of the Jesse James Bead strands ($6.99 at Ben Franklin Crafts....what a bargain!)  Making jewelry is fun when you can whip up a piece in less than an hour and it costs you less than ones on the 75% off rack. Give it a try!

Thursday, January 10, 2013

Calendar Birthday Card - Version 2


Even though my sister's birthday is not until February, I decided to create a calendar card for her too, since I had all the supplies out already.( See last post.)  The instructions for this card are similar to the last one except I used 'My Little Shoebox' card stock.  The Asian girl figure is a sticker from a My Little Shoebox sheet. I dusted the back of the girl with cornstarch so it wouldn't stick to the card when it is flat. The cupcake brad is from K and Co.  Darice washi tape was used to hold down the blue circle and the Hero Arts stamped words were glued on.

Inside the card, a panel (cut from a My Little Shoebox 12x12) was taped on leaving the top edge open so a note or gift card could be inserted.  The stamped words came from an Inkadinkado stamp set.  To hold the front of the card in a folded position a sprig of cherry blossom (from the Ben Franklin Crafts floral dept.) was glued in place. As with the previous card the recipient has the option to use the calendar standing up on a desk or hang it up using the attached ribbon.  I hope you like this 'girly' version of my calendar card.  Thanks for visiting. Please leave a comment if you have the time. I love hearing from you.


Sunday, January 6, 2013

Calendar Birthday Card

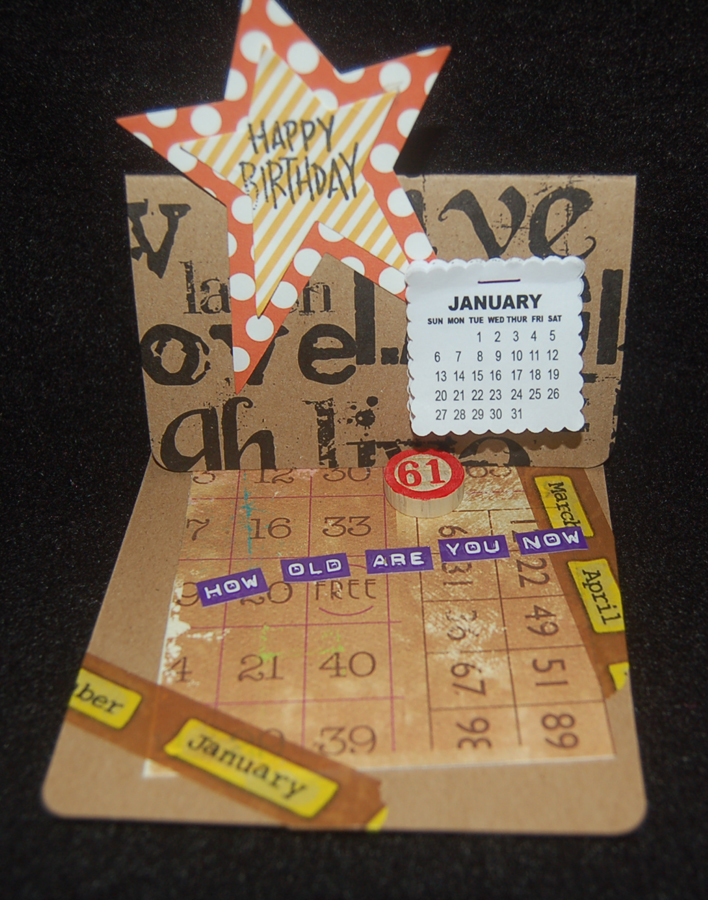
This card is for a special January birthday 'boy' so I thought it would be nice to include a small calendar that he could use.  Luckily, Ben Franklin Crafts had sheets of 2013 calendars for a REALLY good price (10 sheets with two calendars for a DOLLAR!) so it was an easy, inexpensive job to make the mini calendar using a Martha Stewart anywhere punch (square with scalloped edge). I started the card by cutting the base from a 12x12 Black and Kraft cardstock from Canvas Corp. using the Sizzix card base die (the one that can be used to insert various pop-up designs).  The front of the card was folded in half to form the stand-up part of the card.  On the front of the card the stars were cut from Sn@p! color vibe 6x6 sheets using a Sizzix thin die from a set, and stamped with Hero Arts words.  The quote in the upper right hand side of the card front was cut from a sheet of 12x12 cardstock from Graphic 45  Kraft Reflection Collection.  It says, "The great use of life is to spend it on something that will outlast it".  These words seem apropos for the birthday card recipient because he spends lots of time doing volunteer and foundation work.
The inside of the card was decorated with a piece of cardstock cut from a 12x12 sheet of Authentique "Richness" Paper, Darice Months Distressed Washi Tape, impressed sticker words (from my stash but can be made with a Dymo label maker) and a Tim Holtz game token.  Because the TIME panel and washi tape form a pocket, a secret letter or gift card can be inserted for an extra surprise.
Once the card is folded to stand up, the game token (which was chosen because of the birthday person's age) is used to hold it in place.  The reason I tied American Crafts twine around the fold of the card is because I wasn't sure if the recipient would want to hang the calendar or stand it up on his desk.  Pretend that the twine is yellow striped because that's what I thought I used until I looked at the photos....that's what happens when you work at dusk and don't turn on the lights (LOL)...anyhoo, no biggie 'cuz the AC package has 24 assorted color rolls in it so I'll change the twine color later.


As a final touch to personalize the birthday card, I stamped an Inkadinkado stamp on computer paper, cut it out and adhered it to the back of the card.  The card's recipient is a retailer so I think the stamp is perfect for him.  I guess some of you have figured out who the birthday'boy' is and know that the time spent of this card was well worth it.  I hope you'll make some calendar birthday cards for those special ones in your life.  Thank you for stopping here and please visit again for more ideas.  You can find all the supplies shown here at your nearest Ben Franklin Crafts store in Hawaii.


Wednesday, January 2, 2013

Fab Finds at Ben Franklin Crafts


The Tim Holtz line of products keeps expanding and I find myself drawn to them every time I pass the shelves in BFC.  Some of the items I purchased like the Bingo tiles and mini hangers seem perfect for decorating cards, and I can envision many of the TH metal keys and plaques in jewelry perhaps combined with the Vintage line. In the upper photo you can see a skinny stack of kraft core paper that I think will be perfect for border punches, dies, or embossers.  Next to the kraft core paper is a nifty pad of ephemera paper with a vintage look. (There are several different themed ephemera pads in the Tim Holtz line.)  Also purchased from Ben Franklin Crafts were  American Crafts paper products.  I liked this SnapShot line because of the bright colors, sticker sheets, zigzag/dot designs, and the fact that I think they will pair well with the Tim Holtz merchandise.  I hope 2013 will be filled with all you desire. Please visit this site again to see what I do with my latest purchases from Ben Franklin Crafts.