Thursday, March 30, 2017

Sakura Wedding Shower Card

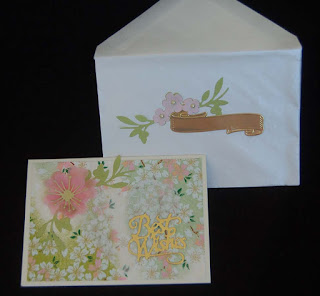
 I recently purchased some beautiful washi 12x12 sheets from HM Ben Franklin Crafts (the one shown is just one of many lovely prints) and planned to make some springtime cards.  However, I realized that I needed a wedding shower card so I decided to combine the two cards.  Here is the result. Since I didn't want to cover up the washi paper with layers of other papers, I embossed and die cut the vellum (with little gold and silver sprinkles) into a heart shape.  It adds a simple and appropriate touch for a shower card. The 'Best Wishes' were cut from gold foil paper (DCWV) using the X-cut die. Next I die cut the flower from pink vellum using the Spellbinder set and used DCWV shimmer gold paper (from the 6x6 pad) for the center of the flower.
This close-up of the embossed vellum sakura flowers shows the delicate beauty of the Darice embossing folder.
The label for the envelope (cut from gold foil) was made using a die from the 'Floral Berry Accents' set as were the leaves and flowers.
To fancy-up the envelope even more, I lined the envelope with a piece of extra printed washi. It was easy to trace the envelope onto the paper and then hand trim a little to get it to fit the envelope before using double stick tape to hold it in place.  This card would work equally well for an all occasion card, birthday, or even sympathy card with a change of sentiment.  I know that you could make a card like this, so go check out the gorgeous craft supplies sold at HM Ben Franklin Crafts.  You'll be glad you did! Happy Spring Shopping!

Sunday, March 26, 2017

Bunny Gift Bag


 When I saw the Paper Smooches bunny card die, I knew I had to have it....so cute and so many possibilities!  Although this die set is called, " Bunny Card", I decided I wanted to fashion a gift bag.  Starting with a 5"x 8" pre-made bag (from HM BFC), it was easy to adhere a white felt bunny with pink felt inner ears and a felt nose.  The lashes, whiskers, and upper mouth were cut from black construction paper and glued on.  For the grass I used the Impression Obsession die and cut only the tips of the grass so that the grass border would be wide enough to stamp the words on.  The words were from the Paper Smooches Critter Card Puns stamp set. I curved the words before stamping to make them more whimsical.
 As a final cute element, I glued on a pom pom for a tail in the back of the bag.  This bag was super simple to construct so it would be easy to make multiples for Easter party goodie bags.   I know this die set will be a favorite of mine for many Easters to come and I already have plans for a cute bunny card....so many ideas...so little time...sigh!

Wednesday, March 22, 2017

Wrap-Around Silver Plated Bracelets

 I saw a bracelet like these in an art gallery shop on the east coast and I thought, "I could make it", but I bought it anyway  so I could inspect it.  These bracelets are for gifts and to sell in MY LOCKER box in Hilo. (Ask an employee at HM Ben Franklin Crafts if you don't know about the MY LOCKER program where you can sell your handmade crafts.) It was pretty easy to assemble the bracelets using silver plated stringing wire, curved silver plated tubes and assorted stones, Czech glass beads, shells, pearls, and silver plated or pewter beads. Almost all of these parts were purchased at HM Ben Franklin Crafts.
Here is what the bracelet looks like unwound and unclasped.  Depending on the size of the wearer, the bracelet can be wound around the wrist and fastened or fastened then slipped over the hand. The photo below shows how I organize the metal parts.  By slipping the plastic bags (I put them in bags if they come in hard to open packages) over a metal shower curtain ring, I am able to easily see the part I need and retrieve it without searching through a pile of little bags.

I am very proud of my 'copy-cat' bracelets and I plan to make more.  They look great worn and help to use up the loose assortment of beads that I often end up with after finishing other jewelry projects. I think, if you are a crafter with basic jewelry making skills and tools, you will be able to make bracelets like these. Give it a try!  Happy Crafting!

Saturday, March 18, 2017

Fran, You Are a Winner!


                                                            Look at what Fran  won!


For those of you who are regular readers of this blog, you know that every once in awhile when the mood strikes me, I have an 'uncontest'.  I pull the comments from a certain time period (this time it was Jan. 1st - Feb. 29) and randomly select one of the comments.  If you left more than one comment during this time period, you get more chances.  The winner this time is Fran who writes the Little Paper Studio blog. Congrats! from HM Ben Franklin Craft Club. I hope you enjoy the prizes and will have fun using the HM Ben Franklin Crafts gift card. Thank you for being a reader of this blog!

Tuesday, March 14, 2017

Cat Kokeshi Dolls Thank You Card

 I recently read Marie Gamber's (Inky CreationsWith Marie) post and learned about making a 'bokeh' background and decided to give it a try.  Since I just received a very interesting kokeshi doll for a birthday gift, I opted to test out Marie's technique on a one layer card using an old Mari and Me kokeshi cats rubber stamp.  First on watercolor paper, I stamped and heat embossed the design using black Momento Ink and Nuvo Glitter Noir powder. Then I applied the Distress Inks (Dusty Concord, Dried Marigold, Broken China) directly onto the background.  I used a Q-tip cotton swab to color in closer to the dolls. With the same swab dipped in alcohol, I touched various places on the background to leave 'water spot' marks. The cats were colored in with Copic pens. I think that the watercolor paper absorbed the inks too quickly so next time I will try a slicker marker paper, but for a first try I am very pleased with the look of this card.  Don't be afraid to try new things....life is too short to always be afraid of making mistakes.

Friday, March 10, 2017

Resin Butterfly Charm Tags

 These tags were embellished with the butterfly resin charms that I showed in a previous blog post. By attaching them to a Little B die cut tag the ball chain can be also used to clip onto a gift bag.  I started by lining up the folded edge of a color coordinated card stock with the top of the die so that when run through a Big Shot machine the folded edge won't be cut.  This will allow the tag to serve as a card and a message can be written inside on the smooth surface.  I used a yellow and white sheet so that when the impressed design (made with Darice embossing folder) was sanded the yellow color showed up. To give the tags more interest I added a die cut (X-cut) butterfly or flower.  These dies purchased from HM Ben Franklin Crafts have pop-up parts that add some dimension.  The 'thanks'(Taylored Expressions) were cut from gold foil paper. The resin butterflies made with the L'Bell resin were filled with real dried flowers or iridescent foil. (see previous post for a close up. I hope this post has given you some new creative ideas. Please leave a comment if you have time..I enjoy your encouragement.

Monday, March 6, 2017

Resin Charm Cards

Here is what I did with two of the resin charms I showed you on my last post. I first embossed the white washi paper (with gold and silver speckles) using a Darice cherry blossom folder (purchased at HM Ben Franklin Crafts).  I used double stick tape (Heiko/Merikan) to attach the embossed strip to the printed washi paper. Using a 1/8" hole punch I made an opening through both sheets. The chain or cord was inserted through the hole and the chain/cord was taped and secured behind the washi papers. Double stick tape was used again to fasten everything to the card base made from Paper Accents 8-1/2 x 11 pink muslin card stock (from BFC).
 Finally, I added the stamped sentiments which were made using a Mari and Me thank you character stamp or Dandelion Design sweet Girl's Day stamp. The other two stamps in the photo below were used inside the cards. In following posts I will feature other resin items and projects. Please return again to see them. Happy belated Girl's Day!
P.S. Don't forget to tell the card recipient that the charm can be removed to use on a bag or keychain.

Thursday, March 2, 2017

Resin Charms from Fukubukuro Box

 Here are a few resin charms I made recently using the parts included in the Fukubukuro box (Resin Special Box sold at Market City BFC).  At only $29.88, it is a real bargain for crafters who enjoy working with the UV light resin. In the box there are many resin molds, colorants, embellishments, findings, etc.   Even though the box has instructions, they are in Japanese.  However, the diagrams are well done and easy to follow.  If you want to learn more, I would recommend that you take one of the make it-take it resin classes (about $5) offered at Market City and Mapunapuna BFC and/or try one of the smaller kit resin projects sold at the stores.  This Resin Special Box is packed in the 'Fukubukuro style' which means that not every box will have the same items, but they do have everything needed to make a dozen or more pieces and all you need to supply is your own UV resin and light.  I plan to use these charms as add-ons for Girl's Day, Thank You or Birthday cards. I will show you what I mean in my next few posts.  Thanks for visiting this blog site and come back soon!
Tip: To file down the rough edges on the charms I use a diamond nail file.