Thursday, October 29, 2015

Halloween Cat Costume Card


My husband was organizing our photo files and came across this adorable photo of our son at about  a year old.   Since I had just received the hilarious Art Impression stamp set, I knew that I had to make one more Halloween card and send it to the 'kitty' in the photo.
 I know that it would have been easier to use the  Sizzix banner die to cut the photo into the shape but I wanted to send the whole photo (I'm in it too) so I decided to use the die to cut an opening through all three layers of card stock. I cut the layers separately and then used Merikan double stick tape (from BFC) to adhere them together.  The mother cat in the costume was colored with Copic pens and the speech bubble was cut with a Paper Smooches die.  I covered the hand cut orange banner with Little B Halloween washi tape (from BFC) and added Doodlebug Halloween dot stickers (also from BFC).  Oh yes, the printed papers used were also Doodlebug products available at HM Ben Franklin Crafts.  Okay, this really is the last Halloween project for this year! Be scary but be safe!

Monday, October 26, 2015

Halloween Diorama Card

Just as I was putting away my Halloween supplies for this year, I discovered this Lawn Fawn stamp set that I bought after Halloween last year (on sale) and put aside for this year.  I decided I HAD to make another card so this stamp set wouldn't feel 'uninkable' LOL!  It's been a long time since I made a diorama card (I think that's what you call it) but it used to be a favorite style of mine because it looks fancy but it's super easy to construct.
 I started with a 12"x 3-3/4"piece of purple card stock. Measuring from the left, I scored at 4-1/2", 5-1/2", 10" and 11".  Before folding the diorama frame, I stamped the sentiment in white pigment ink, sprinkled it with white embossing powder and applied heat with a heat gun to melt the embossing powder.  Then I stamped the images on white marker paper (from BFC) and colored the house and tree with Copic pens before cutting them all out.  For the moon I punched out a 2"circle of yellow card stock and stamped the bats on it.  The diorama frame was formed by using double stick tape (Merikan from BFC) on the extra flap. The ghosts and house were attached with pop dots for added dimension. From the top view you can see how quickly this card can be assembled and that it can be folded flat for mailing.  This was so much fun to make; I think I'll make one for Thanksgiving..... ....maybe several to use as table place cards. Have a super and safe Halloween!

Saturday, October 24, 2015

Halloween Treat Bag Card

 Because the Halloween items at HM Ben Franklin Crafts are 30% off, I bought a few things for next year.  (I've already finished my Halloween crafts and bagged my treats.)  But then, I watched this week's Joy of Crafting and was inspired by Kelli's card using washi tape to form a shaker bag. *light bulb moment* I could make a shaker card using the treat bags I just bought!

Here is what I came up with....sorry for all the glare.  I cut the bag apart so if desired I could make two cards from each bag.  I stuck the bag front to a piece of vellum using foam mounting tape to give the sequins a little shaking room.Then I simply taped this shaker pocket down with Halloween washi tape...so many to choose from at BFC..easy peasy!

To let the vellum frostiness show, I cut a window in the front of the card before taping the shaker pocket down.  Although this is not a super fancy card (no embellishments here), it is quick and easy....just what I want in a Halloween craft project.  Hope that you'll visit HM Ben Franklin Craft stores to satisfy your Halloween crafting needs and don't forget items like the washi tapes and treat bags I used on this project are on 30% off right now....hurry and shop before they run out!


Wednesday, October 21, 2015

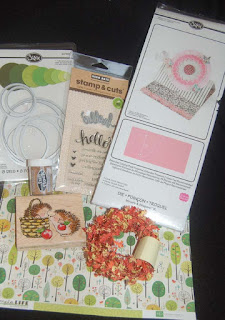
Hedgehog 'Hello' Calendar Card

Don't you just LOVE this Penny Black hedgehog image?  I purchased the stamp awhile ago from a clearance bin in a Boston craft store.  I knew that I would use it this fall for some of my calendar cards. When I spied the Echo Park printed card stock at the Market City Ben Franklin Crafts (I'm pretty sure it was on sale), I mentally paired it with this image...perfect!  I used my old stand by Sizzix die to cut the stand up card.  A circle die from a Sizzix set cut the stamped image before I colored it with Copic pens.
For a little texture, I added brown Fun Flock (Stampendous) to the hedgehog fur and mini leaves (from a BFC garland) near the calendar. (Still haven't ordered 2016 calendars yet...LOL!)  Oh, the die/stamp set from Hero Arts was used to cut the 'hello' and stamp the words under the calendar.  This set has lots of great sayings which would be appropriate for a calendar.
I only made a few of these calendar cards because I get bored easily and I don't want to send everyone the same item.  To me it's more fun to do a variety of designs.  These are for my friends/family who experience fall and have the joy of going apple picking.  One day I WILL pick real apples off a tree....my future dream trip!

Sunday, October 18, 2015

Halloween Treat Garland

 If you like to decorate your home for Halloween, I think you might like to make this quick and inexpensive pendant garland.  Depending on the stamp you decide to use (I chose a Halloween pumpkin by Hero Arts), find the Sizzix circle die that will fit the image.  I ran the die through my Big Shot but stopped half way. Then I cut straight down from the side of the orange half circle and free hand cut the pendant bottom.
 Once I made the first pendant, I used it as a template for the others.  I used Merikan tape to seal the bottom and sides of each pendant.  This made a pocket that can be filled with lollipops or other slim candies. I didn't fill mine yet.
I punched holes on the side of each pendant before tying on the Little Flowers yarn that I found at HM Ben Franklin Crafts.  Making this project is a great way to use up all the little scraps of Halloween decorative papers leftover from other projects. Also, if you fill the pockets with treats (pens are good too), the garland can be cut apart and the treat pendants can be given to the departing guests. Of course, you can make the pendants larger to hold more goodies.
Even if you are not having a Halloween party, you can make this garland and save it as a yearly decoration.  Just having something festive in the house makes me smile and look forward to the holiday season. Go ahead, craft your holiday happiness!

Thursday, October 15, 2015

Ghost Shaker Card

I really liked this spooky tree frame stamp that I purchased from TAJ Clubhouse in Ward Warehouse. I thought that it would make a great shaker card so I stamped it on some brown card stock and extra thick brown foam. I cut out the inside of the frame of both the card stock and foam. I glued (Beacon 3 in 1) an acetate sheet behind the card stock frame before gluing the foam frame behind it. This made the shaker frame and it was easy work  to snip the shanks off some Dress It Up Halloween buttons. The house with the moon was glued down to a purple top folding card blank and the ghosts with some sequins were placed under the window before the frame was glued down.
Here is the TAJ sentiment that I stamped inside the card.  I added two cute TAJ images and some Doodlebug washi tape (from HM Ben Franklin Crafts) inside and on the front for a punch of color.
 I truly love making and shaking shaker cards. This one was especially fun because I used the ghost buttons instead of just sequins.  (Remember: You will need a thick foam sheet to make the window or the ghosts will not move.)  Go and check out all the fun Halloween stuff at BFC....lots of buttons and washi tapes. Halloween crafting will definitely make you happy!

Tuesday, October 13, 2015

Celebrating Halloween at Celebrations

Do you want to make special treat bags for Halloween but you don't have lots of time to work on them?  Well then, you should make a stop at Celebrations (next door to BFC Mapunapuna) for some cute and different Halloween items. Besides really classy cello bags, there are an amazing array of ribbons and stickers.
 Here is a close up of my favorite woven rustic burlap-like ribbon and reversible gold and bronze ribbon.  Also you can see a super cute squirrel paper clip that I think adds an autumnal touch to the goodie bag.
 This is the bottom of the bag where you can see how I folded the cello bag and sealed the ends with a sticker to form the base that fits the square treat tray.
For a really quick Halloween treat bag you could just seal the bag with a long sticker that is also sold at Celebrations. I filled this bag with craft items because not all treats have to be edible...right?
 This is what the long sticker looks like on the reverse side.  The photo below shows another adorable long sticker which cat lovers will love.  The Halloween stamps that I used on the tags were from TAJ Clubhouse (Ward Warehouse)....so many terrific Halloween themed stamps...I had a hard time resisting temptation...LOL!  Hope you'll check out Celebrations to see their unique Halloween and other wrapping supplies from Japan. I know you'll be inspired!

Saturday, October 10, 2015

Sizzix Die Cut Birthday Card Version Two

 I couldn't resist making another birthday card (using the Sizzix die set shown in the last post) because I found lots of birthday double sided card stock sheets when I reorganized my stash. Again, I didn't feel like coloring or fussy cutting so I just used the dies and some felt stickers that were in my box of 'birthday' stuff. I discovered that after die cutting the words within the scalloped square that I could turn the piece into a shaker box by simply backing the piece with a die cut acetate film and then cutting two black foam frames (one foam piece was not thick enough to allow the sequins to 'shake'). The dies make forming a shaker box easy-peasy.  Oh, I added gold pearlescent paint (Bo Bunny) (with a little fine glitter sprinkled on) to the letters before attaching the acetate film. You can't really see the sequins, but they do add a lot of sparkle and a pleasant 'swishing' noise to the card. The bottom photo shows all the dies that are in the Sizzix die set.....so many possibilities...can't wait to begin on a baby card.  Be sure to put this set on your 'wish list'....it's a winner!


Tuesday, October 6, 2015

Sizzix Die Cut Birthday Card

 After spending some time organizing my 12x12 printed papers, I decided it was time to 'play' with a newly purchased (from HM Ben Franklin Crafts) Sizzix die set.  Boy, this is a terrific set...15 dies, seven of them words!!!  The basic scallop card is beautiful and the other die frames are interchangeable to make untold variations.
 The paper I used was printed on both sides so it made coordinating prints a 'no brainer'.  I 'found', in my stash of embellies, little dots to add some interest.  The flowers were surprisingly easy to match with the card....my hoarded stash just happened to have a printed flower that looked like it was made from the same paper as the card....imagine that!  I really enjoyed making this card because it involved no coloring or fussy cutting AND it turned out better than anticipated. It was a good craft day!


Sunday, October 4, 2015

Halloween Cookie Boxes

I happened to see a photo of some cupcake boxes I made a few years ago and realized that I haven't used that Big Pro die in a long time.  This Sizzix die uses one 12x12 double sided card stock sheet to make each box.  It was fun to use the new Doodlebug Halloween papers (sold at HM Ben Franklin Crafts) to mix and match the covers with the box bottoms.
 Rather than attaching a piece of acetate to the inside of the box lid, I decided to let the cellophane cookie bag protrude through the die cut opening.
This allowed the cookies to be protected by the box while giving me a chance to add a tag and embellishments.
HM Ben Franklin Crafts has a great assortment of Dress It Up Halloween buttons and Little B/Doodlebug washi tapes to decorate the cookie boxes.  The reverse side of the Halloween papers are sometimes plain so the washi tapes definitely can add a punch of color around the lip of the box cover.
The scalloped cut out portion of the box lids became the tags for the bagged cookie treats.
I used Mambi Halloween stickers (from BFC) to further decorate the tags.
Here are the delicious cookies that will go into the cookie boxes for friends and family.  The flourless chocolate cookie recipe is a Martha Stewart one and can be found on her website.  I hope all of you will have a sweet, dark and delicious Halloween!

Friday, October 2, 2015

Halloween Envelope

I meant to put this with the zombie brain card on the previous post but you know.......my old brain is going....maybe the zombies are nibbling on it....LOL!  Anyway, I wanted to show you how to use those less than pristine envelopes that are just too good to throw away.  I put my envelope 'seconds' in my Halloween supply box so I can mess it up with spooky stamped  images....a quick and money-saving trick.  I used red distress ink to make it extra gory. Beware that sometimes if your envelope 'blood' is too realistic the post office with rip it up....really, it happens.....can't they tell?  You might want to put this card in another envelope....*smile*!
I miss-stamped the 'zombie?' but I think this double image gives him some movement.  This zombie image and words are from a Pink Hippo stamp set. Another tip:  If your foam stamp (the big cat) is stored on something with texture it will pick up that texture and mar your future images. To undo this flaw, moisten the foam and heat it slightly with a heat gun.  I cleverly thought of this all by myself....pat, pat, pat on my back!  Happy Halloween!