Saturday, July 30, 2011

Beaded Necklace Change Up


The turquoise and wooden bead necklace in the foreground is a piece I purchased. I found it on the Macy's sale table and thought that the structure of the piece made it easily copied. Although I thought that the southwestern look was appealing, I wanted a more tropical necklace. It was easy to measure the department store piece and find similar materials at Ben Franklin Crafts. (See bottom photo.) Right now the store has many types of cordings, silver plated findings, and seed beads. Also available (while the supply lasts) are a jumbo packages of silver (or bronze) colored metal beads. Jewelry crafters will appreciate this bargain. The beads I used included prehenite, turquoise, shell, bone, metal, and various glass beads. When time permits I will try to write up a project sheet so you can create your own version of this simple three-strand beaded necklace. Thank you for being a visitor to this site. Please return often and leave a comment if you have the time. I enjoy hearing from you.




Wednesday, July 27, 2011

Belated Birthday Card

I had planned to make an elaborate !st Birthday card but as usual time moved on but I didn't. I knew I wandted to make a girly girl card and so I purchased one of the Sister Stamps (available now at Ben Franklin Crafts) because I thought it would give the card a local look. The day before I started this card, Cheryl (Life is Sweet - http://pinkydots.blogspot.com/) sent me a 'magic' card. (She will be doing a demo of this type of card at the Pearl City BFC paper party next month.) I've always been intrigued with the mechanics of 'magic color' cards, so I inspected Cheryl's card. It took me awhile, but I figured it out without (LOL) taking Cheryl's card apart. Since I was already late with the card, I kept it simple by just attaching the sliding envelope to a printed cardstock (Best Creation Inc.) card. Copic markers (sold at Ben Franklin Crafts) were used to color the image. The addition of a ribbon, rose, and Martha Stewart cardstock Birthday banner completed the card. For a first time and without instructions, I am fairly pleased with the results. Oh, one thing I would do to improve the card would be to use a stiffer acetate piece so it would be easier to slide the image in and out. Well, that's it for today. Happy Birthday Nykki !


Sunday, July 24, 2011

Too Much Basil?

What do you do when your garden produces more basil than you could possibly eat? I make pesto. It's easy and yummy. All you need is about a 1/3 cup of toasted pine nuts, 1 cup of basil leaves, approx. 1/2 cup of good quality olive oil, a couple of slices of parmesan cheese and salt/pepper to taste. I use a Magic Bullet blender but probably any small blender would work. First I grind up the cheese, then add the cooled nuts and basil with the oil (a little at the time) until a thick liquid results. You may have to add more olive oil. Voila! You have homemade pesto to dress up your sandwich or add to salad dressing. This pesto will last for weeks in the refrigerator and make a super hostess gift. When life gives you basil, make pesto! Go Green!


Thursday, July 21, 2011

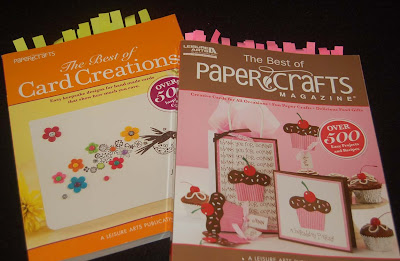
Craft books for Papercrafters

Without a Borders in Hilo, I'm always on the lookout for compendium edition craft books which compile the best of a year's worth of a craft magazine. I found two such treasures and wanted to share them with you. As you can see from all the Post-It tabs I placed in each book to mark the best pages. I refer to both of these books when I just can't think of what to do and need inspiration. The large book of Papercrafts magazine has the added bonus of some very good recipes to go with the paper crafted items. The Cowboy Caviar salsa is to die for and would be a great, simple, no-cook dish for a potluck. Keep reading and crafting this summer. Thanks for stopping by. I appreciate your visits and hope you'll come back again.


Monday, July 18, 2011

Gearing Up for a Steampunk Birthday Card

My son's birthday is coming up so I wanted to make him a special card since he is such a special boy (aw, that's a mom's opinion). He is a thinker and I can always see the gears turning in his head when he is working on a project. When I found these Viva Las Vegastamps, I knew they would make a perfect birthday card in combination with the Tim Holtz small gears die set I purchased from Ben Franklin Crafts. As usual I was in a rush to complete the card on time, so I was relieved to make a guy-card without the multitude of color and embellishments needed for girly cards. I cut the gears out of metallic vellum in three colors and wired them with Vintage wire (available at BFC). The vintage typewriter keys are stickers I found in my really old stash of sticker letters and were used because I wanted to note my son's age. (I had him when I was only 15 LOL! You believe me right!) You could use some other industrial-looking stickers/embellishments to get the same steampunk effect. I'm very pleased with the overall look of this birthday card and hope that it makes my son smile (maybe I should include some green stuff to make that smile bigger) LOL! With all the popularity of the steampunk look in jewelry, papercrafts, and other craft projects, I hope you'll give it a try. Crank up your crafts!

Friday, July 15, 2011

Sea glass necklace

Recently, I came across a collection of sea glass and together with this wire-wrapping book idea (see bottom photo) I was inspired to do more sea glass jewelry. (I had a blog post on a sea glass necklace about a year ago.) Please click on the picture to see the detail of the wire-wrapping in the photo. These necklaces differ from the older version because they use the new silver plated wire sold at Ben Franklin Crafts. I used 24 gauge for this project because it is thin enough to go through pearls and wraps easily. There are many different gauges and brands of silver plate wire at the store now. Also this silver plated wire is inexpensive as compared to sterling silver so you can really experiment with wire-wrapping. For my necklaces I only used one piece of sea glass so that they would be the focal point. The top piece has just a simple chain and the other one has a chain made with wire-wrapped beads and pearls. Well, I hope this has given you some ideas of how you can incorporate found objects into your jewelry pieces. Happy beach combing and crafting this summer!


Tuesday, July 12, 2011

Vintage Fruit Spoon and Low-Sugar Blueberry Jam

What's a fruit spoon? Well, in this case (sorry the photo doesn't show how beautiful the spoon really is), it is a utensil that has a bowl embossed with fruit shapes. I believe it was once used for jam or was from a set of spoons used for the Victorian fruit course. When I found it in an antique store for only $5, I grabbed it with a smile. It has a maker's mark (on the back of the handle) which indicates that it was made in Sheffield, England so I know it is a high quality heavy silver plate spoon.

Why low-sugar blueberry jam? Because Hawaii has one of the highest (if not the highest) ratio of diabetics per population in the nation, I've begun to recalibrate my recipes to cut back on sugar. I love summer fruits, especially blueberries. In season a big container of blueberries is quite reasonable. Anyway, you'll need about 3 cups of berries and 3/8 cup of Splenda Blend to make a jar of jam. Put the blueberries in a medium size saucepan with the Splenda Blend and some lemon zest (if desired) and cook it on medum heat for about 20 minutes until the jam drips from the spoon in a thick large drop. Pour the jam into a jar and let it cool before refrigerating.
This recipe can even be made with frozen berries. Because blueberries are high in antioxidants, this low-sugar version is healthy when eaten in moderation. Using a pretty vintage plate and eating the jam with high-fiber bread will make this a pleasant and healthy snack. Enjoy! Be healthy!


Saturday, July 9, 2011

Art Deco Tea Party Card with Photos

I am a big Art Deco fan (art style from the 1930's?) and so when I saw this elegant lady having tea rubber stamp at Viva Las Vegastamps(http://www.vlvstamps.com/), I just HAD to buy it. (If you're ever in Vegas and want to do something more fun than gambling/losing money, go to Viva Las Vegastamps and you will be blown away by the 17,000 rubber stamps in the inventory. If you can't get there, check out their website and you'll see a webcam view of the store and be able to order their stamps online.) Okay, back to my story. Not only was the stamp in one of my favorite art styles; it was a subject matter which was perfect for making a thank you note card for my sister. While visiting my sister in WA, I had the opportunity to have an elegant tea lunch with her and our husbands. (Our husbands did look out of place and I think the tea sandwiches were a bit too light for the men. LOL!) Anyway, because the Art Deco era did concentrate on simple geometric lines, I decided to make the card using mostly black and white. (Printed paper from DCWV La Creme pad.) This meant that there was basically no coloring.....a real time saver. Because I was planning to include some photos I decided to heat emboss the black areas of the stamp image using black detail embossing powder because the embossed areas would be glossy llike the photos. (You could use clear embossing powder over black ink which keeps the card from getting stray embossed bits.) Originally, I was going to put three photos on the front of the card but because the rubber stamp image was so large, I settled on putting the other two photos inside the card. On the back of the card I adhered a Tim Holtz die cut easel back so that my sister can stand the card up like a framed photo. The die can be purchased from Ben Franklin Crafts and is a Sizzix Bigz so it will fit the regular size die-cutting machine. The easel back for this card was cut from regular cardstock and should be able to hold up most cards except those overly embellished ones. This die can also cut through heavier matboard so a larger album 8x8 page can be turned into a display. Thank you for being a reader of my blog. I'm glad that you came and hope you will visit again soon!

Wednesday, July 6, 2011

Shower Gift Decorated with Die Cut Paper Roses

I've been dying to use my new rose dies; when we were invited to this wedding shower party, it was the perfect opportunity to give the dies a test run. I couldn't decide on the large size rose die or the one with two smaller ones so of course I got both of them (on Ben Franklin Crafts 40% off coupon day you can get one at a super price). Because the dies fit the large Pro machine, they are an investment but well worth the price. As you can see, the dies cut large flowers which are easily spiraled into roses to be used for a multitude of decorating projects. I used some leftover embossed white wrapping paper which give the roses some interesting texture. For the center of the flowers I glued in stamens from the Ben Franklin Crafts floral/wedding department, but you could leave the centers unadorned. The gold foiled leaves are from the Wilton cake decorating aisle and the tulle netting ribbon is also from the floral department. I only had enough of the wide satin ribbon to make a bow to match the Martha Stewart wrapping paper (hence the use of the tulle ribbon) but I think that it worked out alright and it made me happy to use up supplies which seemed destined for the odds n' ends pile. As you can see, it doesn't take much to dress up gift wrapping to make the presentation an exciting part of the giving. Show your crafty side and wrap it up pretty with help from Ben Franklin Crafts!

Sunday, July 3, 2011

July 4th Winners!

In celebration of the Fourth of July I've decided to announce the winners of my secret contest. It's been awhile since I gave away some prizes. To keep it simple, I decided to enter each person who commented on my blog site for the month of June. If you left 10 comments, you got 10 entries. Even if you only commented once in June, your name still went into the pool of possible winners. Okay, so the winners are: Shirley N. (Stamping for the Fun of It), Cheryl (Life is Sweet), and Claudette(Islander Girl Stampin'). Congratulations! Thank you for leaving such thoughtful comments. Your prize for being chosen as one of my July 4th winners is a $25 gift card to Ben Franklin Crafts. I will send out your prize as soon as I can. If I don't know your address, I will contact you by e-mail to obtain your mailing address. I hope everyone is having a spectacular holiday celebration!