Tuesday, March 28, 2023

Bunny Trapped in a Cake Box

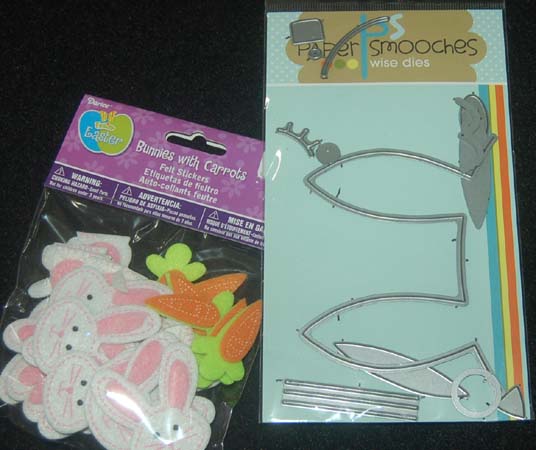
While rummaging through my stash of Easter stuff, I came across an old Paper Smooches (the company is no longer in business) bunny head dies.  I used them to cut out the bunny ears and face parts.  I free hand cut the head and paws. (Just take a white paper and cut off all the parts that are not bunny-like...hahaha!  If you're going to make lots of bunny boxes you might want to make a pattern.) I tried to make the bunny look worried and a bit goofy from being oxygen deprived.  I hand cut the pink paw pads.  The dies were used to make the ears and I glued them to back of the box closure flap.  It was then easy-peasy to glue the bunny face and paws to the inside of the box (behind the window). I used Beacon Fabri-Tac glue because it dries fast and clear.  I intended to put some blush on the cheeks of the bunny but I forgot and glued the face down...oops!  


I also found (in my stash) a cool  Jolee's  Easter sticker which I positioned on the front of the box. This really saved on decoration time.  


For the side of the box I glued on some Darice felt stickers that I purchased from HM Ben Franklin Crafts.  I plan to use this cake box to deliver some Easter treats...perhaps some cupcakes or cookies. The box is another one of the pre-made kraft boxes available at HM BFC for an inexpensive price. If you can't locate the Paper Smooches die set, I'm sure that you can fashion your own bunny parts...not rocket science. I think the crazed bunny is hilarious! He got his just desserts.... he shouldn't have been tasting the goodies in the box anyway. LOL! 


Friday, March 24, 2023

Chocolate Rabbit Easter Card


When I think back to my childhood memories of Easter, chocolate rabbits are a major part...(still are..LOL!). One chocolate rabbit story will never be forgotten. I'm not sure why but on a very long car ride to a far away beach house, I put my precious (just received) chocolate rabbit on the ledge of the back seat. Of course you can guess what happened...why didn't my parents predict the outcome?  Not only did the candy treat melt, the car ants ( I guess we had a colony) got to it too!  Well, I was only five and my eight year old sister did the same thing....two geniuses!  This card is a tribute to that never eaten chocolate rabbit.  I started by die cutting the rabbit from brown card stock and the bow from lavender card stock.  These were glued together and covered with Glossy Accents to make them look like a chocolate treat.  By putting the paper sweet into a small cellophane bag and tying it off with shimmery Heiko ribbon, I was able to make a 'forever' chocolate rabbit to adhere to the card.  The background paper was cut from a 12x12 Echo Park Easter cardstock. I am happy with this whimsical Easter card which brings back 'sweet/sad' memories.  I guess the melted chocolate rabbit  was a science lesson of sorts. Hahaha!


Tuesday, March 21, 2023

When I saw Annette Allen's blog post on her site (My Clever Creations), it reminded me that I bought that bunny stamp at the end of last year's Easter season and didn't have a chance to use the adorable stamp.  Amazingly, I found the stamp where I thought it should be...so I inked it up and this card is what I made  I started by cutting the floral print paper to fit the card that had it's corners rounded with a corner punch.  Next, I stamped, colored, and die cut (die comes with the stamp set) the image. It was then simple to stamp and gold heat emboss the script words. The card was assembled easily with Heiko tape and foam adhesive dots  I know that it looks like the bunny is camouflaged in the floral print of the Echo Park Easter 12x12 card stock, but perhaps he's resting from hiding Easter eggs and doesn't want to be discovered. *Wink*Wink*Wink* Well, onward to more Easter projects....time to hunt for rubber stamp eggs and bunny printed paper!


Friday, March 17, 2023

Saimin and Sushi Card

I was besotted with the Clearly Besotted stamp sets, Fast Food Plushies and Fast Food Scenes. They are so cute that it doesn't take much effort to create something adorably yummy.  I started with a piece of fibrous washi paper and dry embossed it with the Whimsy 'Thatched' embossing folder.  I used the Hero Arts Infinity dies to cut the card blank and washi paper (before embossing). If you align  the fold of the card stock just below the the top of the die you can easily cut a card blank to fit a Daiso envelope (small slimline size, 5 in a pack).  The images were stamped with permanent black ink and colored with Copic pens before fussy cutting them.  The words from the Whimsy stamp set (We Go Perfectly) were stamped and then cut out before gluing down.  The fussy cut images were glued or adhered with foam dots.  I am happy with the finished look of this card and especially like the look of the background which I think looks like a 'tatami' mat (woven grass Japanese floor covering).  I think the products I used for this card will have many uses for future projects....always something to consider when making craft purchases. Okay, time to eat...this card makes me hungry...LOL!


Monday, March 13, 2023

Tangerine Loaf Cake


 This year our tangerine tree was very prolific. It was getting boring eating tangerines everyday so I wanted to create a recipe that would use up as many fruit as possible.  I started with a citrus cake recipe and altered it a bit.  The result was a lovely textured, moist cake with a slight tangerine taste.  The odd looking fruit slices are dried blood orange pieces that a neighbor gave me.  They look unappetizing but taste great.  Next time I'll use regular dried orange slices or leave them off completely. I baked the loaf in a paper loaf pan that comes in a pack of three for $1.75 from Daiso.  The baked loaf cake comes out easily without having to oil the paper and you can just give the loaf as is. This recipe makes two delicious loaves. I will write up the altered recipe for you if you send me your email address.  (Warning: Tangerines have a lot of seeds so it will take a bit of time to seed and pulverize 2 cups of tangerine pulp.)


Thursday, March 9, 2023

Embossed Birthday Card

I liked the last embossed card so much, I decided to do another one.  This time I made it a birthday card for my stash.  I began by embossing the white card stock with the same folder I used last time (see previous post). Next, I rubbed the design with pink and silver Inka-Gold metallic paste (from HM BFC).  After stamping the words on vellum, I applied silver embossing powder and heat embossed it. By carefully fussy cutting the words, the vellum piece was glued (with 3 in 1 Beacon glue) onto the embossed card stock. The embossed piece was then attached to the pink card before the tiny heart was glued on.  I cut off the metal arms from an old heart brad.  I tried many embellishments, but in the end I decided to keep it simple so that the embossing would stand out.  I like that I have another birthday card to add to my stash. Every new year brings more birthdays so it's always good to be prepared with a bunch of pretty cards to mail out. Be Happy! Keep creating!


Sunday, March 5, 2023

Elegant Embossed Wedding Card

I was eager to test out the new Sizzix Tim Holtz embossing folder that I just purchased. After running plain white card stock (in the embossing folder) through my Big Shot, I decided to rub some Inka Gold metallic paste over the embossed design to bring out the details.  I used both gold and platinum colors. (If the paste dries out over time, you can refresh it with water.) When I was satisfied with the results, I die cut the Marianne couple image from silver vellum. I really love the slightly raised details of the couple's attire and features. (Sorry the photo was not able to capture the subtle details.)  Next, I stamped the words from the Hero Arts stamp set on a white card stock and heat embossed it with silver powder. After the swirling embossed rectangle was adhered to a pearlized white card, the die cut couple and heat embossed words were attached with Fabri-Tac Beacon glue. This card came together quickly and I was very happy with the end result. Hope you'll give 3D embossing folders a try. I think you'll be very happy with the results and amazed at how easy it is to give a plain piece of paper an interesting look.


Wednesday, March 1, 2023

Chocolate Dipped Mochi Nuggets with Sprinkles

One of my favorite snacks from Trader Joe's is Mochi Rice Nuggets.  They are plain but addictive. I decided I wanted to make a sweet treat for a friend so I decided to fancy up the nuggets with chocolate and sprinkles.  It was easy to melt the chocolate (available from HM Ben Franklin Crafts) according to the package directions.  Each nugget was then hand dipped and rolled in the sprinkles (also available at HM Ben Franklin Crafts).  This easy treat was then packaged in a pretty cello bag for gift giving. (Both Daiso and HM BFC have wonderful bag selections.)  If you want to purchase some Trader Joe's snack products check House Mart shipping.com.  They currently do not stock the Mochi Rice Nuggets, but they may if there are some requests (hint-hint).