Saturday, February 26, 2022

Grumpy Characters Rolladex-style Calendar

Way back in the fall I purchased some Taylored Expressions blank calendars and the coordinating stamp images.  I finally have some spare time to decorate them.  
I stamped the characters on marker paper and colored them with Copic markers before fussy cutting them. 
Next I used my Misti stamping tool to line up the words onto the calendar pages.  
Pop up foam dots were used to give the characters more dimension on the pages.
Finally, a tiny hole on the top of each page was punched with a small diameter hole puncher.  Lastly, the calendar pages were strung onto a metal curtain hook to form a revolving calendar that can be hung up or stood up on a desk.  I like how this calendar turned out but I think when I make more I will try to figure out how to do less fussy cutting...perhaps stamp on a piece of white paper, cut into a basic shape and just glue it down. Also some of the words did not show up well on the color printed background so I think for the next calendar I will stamp and cut out thought balloons.  I'll try to post the results of my next calendar creations.  HAPPY NEW YEAR !!!!!


Tuesday, February 22, 2022

Calendar Luggage Tags

A sweet blogger friend of mine sent me a lovely Dandelion Designs stamp set. I loved the images and immediately had to ink them up.  After coloring with Copic pens and fussy cutting the largest image, I decided to make my friend a luggage tag.  I did not attach the mini Vippies calendar to the second tag so you can see that there is a surprise under the calendar.  At the end of the year the recipient will be surprised to see the 'double happiness' gold seal (from my sticker stash) under the last calendar page.
I used floral origami paper for the front and back of the tag.
This photo gives you a better look at the foil sticker.  You could make your own seal with a character stamp and gold embossing powder.
For the back of both luggage tags I used a Penny Black stamp with words by Marcel Proust.  I thought it paired well with the floral stamp design. Hopefully, my talented blogger friend will be happy to use this calendar and later will take the luggage tag on a marvelous, well-deserved trip. Hugs!
P.S. I forgot to mention that the vinyl luggage tags are a Paper Accents product purchased years ago from HM Ben Franklin Crafts. They may still carry them but if not, you can probably order them online.
 

Friday, February 18, 2022

Valentine Calendar Bookmarks

Lawn Fawn had two really "stinkin' cute "skunk Valentine stamps and die sets. I just had to get them and decided that calendar bookmarks would be the perfect place to feature them. It was easy work to color the images with Copic pens and use the dies to cut them out.
I chose various Valentine printed card stock papers for the backgrounds. (Good way to use up paper scraps)  
It was fun mixing up the images and colored backgrounds with the stamped words.
Once the year is over, the bookmark recipient can remove the December calendar page and use the bookmark for years of reading pleasure. This last photo shows what the bookmarks will look like without the calendars.
I rummaged through my specialty yarn collection to find just the right tassel for each bookmark.
Here is what the backs of the bookmarks look like.  The one of the left has a Hero Arts message and the one on the right contains Paper Smooches stamped words. The empty vinyl bookmarks were purchase years ago but I think you should be able to find some for sale online. Many people don't use bookmarks because they don't read hard copies, but these bookmarks are great for cookbooks too! I'm sure you'll have fun making and giving these Valentines to your gal pals for Galentine's  Day!


Monday, February 14, 2022

Valentine's Day Mailbox

Back in the olden days (when I was an elementary school student) it was common for every classroom to have a Valentine's Day mailbox.  Students were supposed to insert their Valentine cards for fellow classmates into the mailbox slot.  On February 14th the teachers opened the mailboxes and distributed the cards to the students whose names were on the envelopes.
This was an exciting event because the cards were cute and often included a heart-shaped lollipop. Usually the sender of the Valentine card wrote his/her real name but occasionally the person wrote, 'secret admirer'.  Those were the best cards because they added to the mystery and excitement of the day.  Unfortunately, some students received no Valentine cards....heartbreak and probably the reason the classroom Valentine mailboxes were discontinued.
The base of my decorated Valentine box was a Big Island cookie box.  The salted cookies come in a blue and white box (like a cigar box) with a magnetic closure.  I decided to apply printed cardstock paper (Simple Stories from HM Ben Franklin Crafts) to the top, bottom and inside of the box.  The box top print design is of letters and envelopes so that seemed appropriate for a mailbox.  I cut out an old fashioned looking Valentine from an Authentique 12x12 cardstock and glued lace onto it before adhering it to the box top.  Red paper heart doilies, Petaloo flowers and K& Company die cuts were also glued down.

Floral print ribbon and a gauzy red one were glued around the sides of the box, over the striped paper before a bow was tied in front.

Of course, I had to decorate the inside of the box too. I always loved and still do love conversation heart candies so I gravitated to the Simple Stories 12x12 cardstock (available at HM BFC) with the candy heart design.  I used a Lawn Fawn 'Be My Valentine' die to cut the words from glitter paper (also from HM BFC) before attaching it to printed paper.  Foam sticker conversation heart candies (from my stash) added more cute fun.


I thought that the bottom of the box needed to be pretty too, so I added printed cardstock and a label from the K and Company die cut package.  I hope that this post has reminded you of a simpler time when not everything was politically correct but little things could bring big smiles.  I hope that I find a Valentine card (from my 'secret admirer') in my mailbox this year! *wink*wink*


Friday, February 11, 2022

Raccoons In Love Valentine Card

I acquired a new Lawn Fawn die that cuts out little hearts in a quilt-like pattern.  Normally, I would have just backed it with a solid colored card blank but I had a Simple Stories 12x12 printed card stock that I wanted to use because it had black and white stripes on one side.  I thought this lined print would match well with the Hero Arts raccoons images. Also the different colored mini hearts peeking through the openings give the card a quirky look.  The raccoons were colored with Copic pens and die cut with the matching Hero Arts dies.  
On the inside with black and white stripes, I added another raccoon and Spellbinder die cut heart before stamping the sentiment in red permanent ink.
This view shows the back of the card which is the design underneath the LF die cut card front.  I used my Misti stamp aligning tool to get the words exactly where I wanted them and was able to re-stamp to darken the words.  Besides my much used Fiskar paper trimmer, the Misti is a tool that I am always glad I have in my craft room. I know that this post is after Valentine's Day, but I just love all the hearts and sentiments so I'll keep posting until I'm done with the cuteness. LOL!
P.S. Be sure to save all the little heart confetti that you cut out with the LF die. The hearts make great fillers for shaker cards.
 

Monday, February 7, 2022

Crafty Characters Magnetic Calendars


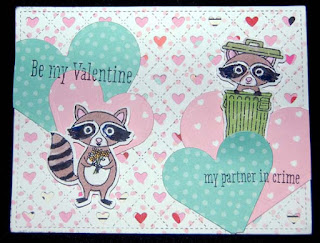
This time of the year it is hard for me not to put hearts on everything I craft.  These are not Valentine calendars but they could be.  I actually just wanted to use up my 2022 mini Vippies calendars and send out something to a crafty blogger who mailed some cool products to me.   The Taylored Expressions Crafty Grumplimgs are so cute in a grouchy sort of way and the saying are hilarious so I thought they were perfect to send to my crafty friends.
I started these calendars by enclosing the turquoise cardstock in the Pink &Main embossing folder (this was part of my goodie package from my blogger friend) and running it through my Big Shot machine with the special platform in it. This made the straight ridge markings which are helpful for aligning the characters and calendars, and also adds an interesting texture to the cardstock.  Once embossed, the paper was then run through the Lawn Fawn rectangle die.  To make the shorter (duck) version, I placed the die where I wanted to cut the piece and ran it through the Big Shot only up to that place.
The characters and words were stamped, colored with Copic pens, and fussy cut.  For the hearts, I used the Lawn Fawn heart border die and added some glitter. (Sorry, I didn't photograph the glitter sheets from which the hearts were cut. They were from HM Ben Franklin Crafts and they came in large packages of color coordinating colors.  I bought the pink shades but now I want to go back and get the blues and greens. LOL!
Rather than use the whole sheet magnet on the backs, I chose to add magnet strips. I now think I should have used the magnet sheets because they would have given more support to the cardstock. Adding a second back sheet of cardstock may have the same effect. Funny note: I did see glitter on my toilet seat and floating in the water.  Hopefully, the glitter came off my hands.....LOL!

P.S. Here is what the back of the larger calendar looks like after I applied another back to make it more sturdy. I chose a Doodlebug Designs printed 12x12 cardstock. I thought the cute faces on the craft supplies were adorable and really went well with the grumpling characters.  I added only two strips of magnets because I didn't want to cover up the pretty paper design.


Thursday, February 3, 2022

Valentine, You Are My Favorite

This is the counterpart to the last Valentine's Day card I posted.  It is for the twin cousins of my squirrel loving grandson. While they don't have any affinity for squirrels, I couldn't resist the two squirrels in a nut image. I've seen my grandsons hugging just like that. Also I like to jokingly tell each identical twin that they are my favorite. LOL!  Please refer back to my post from Jan. 26th to understand how I created the background.  The main image was stamped, colored with Copic pens and fussy cut.  A little vinyl heart sticker was added for interest.  All the words were stamps that were curved a bit on the acrylic block before stamping with permanent ink.  I hand cut the banner.  
Just for fun, I added another little squirrel inside the card.  I think I will look for just the right ribbon or yarn to weave through the openings on the spine of the card because I think the green leaf on the card front doesn't match the rest of the card.  If I find the right colors, I will add a P.S. photo. Okay, onward to making more Valentine crafts. YAY!
I found the perfect ribbon for this card!  It's gauzy with a little bit of purple and a greenish shimmery sheen.  I purchased the ribbon roll from Celebrations (store next to Mapunapuna HM Ben Franklin Crafts).  Now this card looks just right!