Tuesday, March 30, 2021

Rabbits With Easter Egg Balloons

Just after I got the Whimsy slimline cloud die, I was inspired to combine it with the stamp set of rabbits floating with balloons.  I had a funny thought that the balloons could be Easter eggs.  The card evolved  and I imagined that they could be tossing colored eggs to rabbits below.  I started by making the rainbow background with Hero Arts reactive ink pads (from HMBFC).  After making the color layers, they were spritzed with water to achieve a mottled look.  Initially, I wanted to use vellum paper with a cloud print, but that proved to be too see-through so I backed the cloud frame with another die cut made from white card stock.  Then both cloud die cuts were attached to the rainbow sheet and all of this was adhered to a blue card blank.  The rabbits were stamped with permanent ink and colored in with Copic pens before fussy cutting out the images.  The egg balloons were die cut (using a LF die, not shown) and glued over the original stamped balloons.  Smaller eggs were hand cut by simply clipping off any part that didn't look like an egg...LOL!  The rabbits and eggs were mounted on foam adhesive dots.  I was planning to put a sentiment where the small cloud (upper right) is.  However, I couldn't decide on an appropriate one so I simply put the cloud there and perhaps later I will attach a sentiment label.  Hope you enjoyed seeing this colorful, whimsical Easter card. Have a hoppy holiday!


Friday, March 26, 2021

Upcycling Paper Bags Into Easter Baskets

As a keeper of sturdy bags and boxes for upcycling, I couldn't throw away these great Hawaiian Airlines snack bags that were given during an international flight (taken way before the pandemic altered our traveling days).  I thought that the shape, color and woven handles would make great Easter baskets for my two honey bunnies.
I used the Lawn Fawn grassy hill dies to cut enough green card stock to go all around the bottom of each basket, adding extra hills as needed.  Next I stamped and colored the retired Sister Stamps bunnies.  They were fussy cut by hand and attached to the baskets with foam dot adhesives.  Because the bags had Hawaiian Airline logos on the top edge of each side of the bags, I made a 'happy easter' label for one side and used scrabble sticker letters on the other side.
For a little added color, I decided that Easter eggs would be perfect. However, I was too lazy to hand color each one and I didn't have the right size stickers.  I did locate a Studio G egg stamp set (from BFC) and combined with a long Colorbox rainbow ink pad I was able to create dozens of paper eggs that looked individually hand dyed.  
I discovered a long forgotten bottle of tiny Prima paper flowers and used them to further decorate the baskets.  The center of each flower was embellished with a tiny dot of Nuvo pearlized purple dimensional paint (available in an abundance of olors at HM Ben Franklin Crafts).  This was a satisfying upcycling project because I turned something others would throw away into Easter baskets special enough for two special boys.  Hooray for upcycling!!!!!


Monday, March 22, 2021

"Bunny, What's New? ?" Card

This is the third of my series of Easter-ish bunny cards.  Using a slimline Whimsy scenery card for the background, I simply added some My Favorite Things stamped, colored and Die-namics cut images.  Because the die cut images were popped up on foam adhesive dots, they stand out in an almost animated cartoonish way. The words were stamped in clear ink and heat embossed with white Nuvo powder (from HM BFC).  By stamping the words on card stock scraps which matched the scenery, they blend in nicely but are still readable.
As with the last two posts, the Whimsy scenery panel was adhered to a Making Memories card stock that has two slits through which the message panel is inserted.  This makes it easy to add additional panels for a longer letter.  This card would make a sweet Eater card, but can be used anytime of the year when you want to reach out to a good friend. Hugs!


Thursday, March 18, 2021

Bunny Hugs Card

Here is the second card in my series of Easter-ish cards.  Again I used a Whimsy slimline forest background card stock.  I kept this card simple with just a single Whimsy fussy cut image and words from the stamp set.  I originally stamped the words on the card stock but it was a little slick so the heat embossed words ended up not as crisp as I wanted them to be so I simply stamped them on a dark green paper scrap before adhering to the card.  Voila! Easy peasy and the card was done!

Although it is a bit hard to see, the card base has double slits through which a plain card stock  rectangle can be slipped and used to write a heartfelt message.  The decorated front of the card is attached to the card base so that the message card can be written on and reinserted easily.  If the card recipient is someone who would not save your handmade card, he/she can read and remove the message card and replace it with another message card.  This way your card can be recycled.  In fact, you might want to be thoughtful and include a blank message card for the recipient.  This would be crafty recycling.  Wouldn't it be amazing if your card made a trip around the world of friendships?


Sunday, March 14, 2021

Bunny Outdoor Tea Party Card

I'm still trying to make a dent in my old supply of Making Memories slim cards and envelopes.  They pair well with the Whimsy slimline scenery card stock (in a pack) so I decided to make some Easter-ish cards. (Click on photo to see an enlarged image.) Mama Elephant produces some really cute bunny stamps so I stamped the images on white marker card stock and colored them with Copic pens before using the matching dies to cut them out.  Prior to adhering the images, I stamped the saying and heat embossed it.  Using foam adhesive dots, the card was easily assembled.  Because of the scenery card stock, this card was a snap to create.  I don't really send out Easter cards, so I kept the card open for other uses...birthday, thank you, etc. messages can be stamped on the inside of the card.  I am pleased with the sweet, storybook look of this card and I plan to post other cards in this style.  Please visit this site again!  Thank You!


Wednesday, March 10, 2021

Twin Mice Thank You Cards

Okay, so I found another Penny Black Valentine stamp that I just couldn't put away before using it to make a thank you card.  Ah, but then I made three! Two of them have the same Pink and Main postage stamp die cut edges.  I basically did a similar procedure on these cards as I did on the previous post hedgehog ones.
For this card, I added a Heiko red, white and blue skinny ribbon (from HM Ben Franklin Crafts or Celebrations).  From my sticker stash I found three tiny acrylic hearts that added the perfect touch to this sweet card.
Since this card's format is a square, I decided that a gold edged thin satin ribbon (Heiko) would balance off the top and bottom of the card.  I think coloring the mice grey makes them more realistic and attractive on this version of the card.
Finally, this third tag/card was created because I had an extra fussy cut image and found an extra large post card stamp in my stash of odd stamps.  By stamping along the fold of the card stock, hand cutting the edges, and threading a Heiko ribbon through a hole punched in the post card tag/card, I was able to make a rather unique tag-card.  Oddly, I like this card the best of the three even though it was thrown together at the last minute.  I plan to attach this tag card to a gift to my twin grandsons and their parents.  The mice really remind me of the boys who often cuddle together to conspire against their parents. LOL!


Saturday, March 6, 2021

Postal Delivery Thanks

While putting away my Valentine stamps, I came across this cute Penny Black hedgehog postman and I felt inspired to make a card to add to my thank you card stash.  Since I was doing one, I decided I should make two while I had the supplies out
I thought the largest die in the Pink and Main set would make a great base because it looks like a postage stamp.  Ranger Distress inks  were used on the edges of the giant stamp and to stamp the heart with words and the postal date stamp. It was simple to stamp the hedgehog and color him in with Copic pens, fussy cut him out and adhere him with foam adhesive dots. The Hero Arts 'thanks' die was used to cut the word of gratitude.
My second card is a little different from the first one but was basically made the same way.  I think I like both of them equally.  I'm glad I found my set of Tim Holtz postal stamps as I think they really add to the look I was trying to achieve on these cards. I am happy that I got to use some more of my Valentine stamps before moving on to Spring and Easter cards....and I increased my thank you card stash!


Tuesday, March 2, 2021

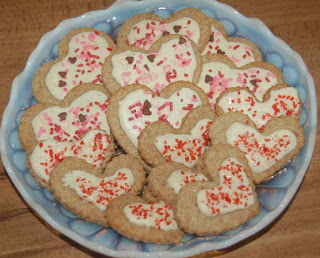
Valentine Decorated Sugar Cookies

I saw a Martha Stewart iced sugar cookie recipe online and felt  inspired to do some baking. While mine are not as fancy as hers, I think they are good enough to give to the grandkids.  They do taste wonderful so I'm sure that's all that will matter to the boys. I used whole wheat flour (healthier) which is why the cookies are a little darker than most sugar cookies.  Someday I hope to make cookies with swirls and maybe messages....next Valentine's Day??????