Tuesday, July 28, 2020

Critters on a Roller Coaster Card

After the dreary Spring days  with the threat of the virus, I decided I needed to make a cheerful Summer card.  When I think of summer fun my mind centers on the State Fair, so I eagerly opened my Lawn Fawn  'Coaster Critters' sets and plunged ahead.  Starting with the cloud dies, I made paper masks and used them to block off  blue Distress Oxide ink that I pounced on watercolor paper.  Next I sprayed the inked cloud paper with water and blotted more.  The stamped and colored coaster structure was adhered to the bottom of the cloud rectangle.  Then the curved Lawn Fawn die was cut just above the coaster. The cut out portion was then glued into the slot so the background would be consistent.  The critters and vehicles were stamped, colored with Copic pens and die cut.
 Then the little My Favorite Things disks were glued behind the vehicles and the disk was glue to a square of blue cloud paper which was slipped into the slot.  I love how the cars slide cheerfully up and down the curve of the coaster. For an interactive card, this one was fairly easy to create and definitely will bring a smile to the face of the recipient.  I may make another variation of this card since I have extra stamped and colored parts.  Please visit this site again to see what I create. Smiles!

Friday, July 24, 2020

Washi Paper Upcycled Tins

I can't bear to throw away good but empty tins that once held tea, cookies or other treats, so every once in awhile I decorate them for future gift giving.  I like to use washi paper on these tins because it comes in large sizes (available at Celebrations or HM Ben Franklin Crafts) and are pretty plus pliable.  After measuring (twice) and cutting (once), I used double stick Heiko tape to secure the paper onto the tins. Sizzix circle die set is really a time saver and ensures a neat finished look.
 Gold paper was glued onto the top of this tin but the rim of the tin cover was left as is because it matched the washi paper.  I folded the small cranes and added LED resin to only the underside of the cranes to give them more strength but retain the washi paper look.
This Lupicia tea tin was simply decorated to hide the logos.  The woven purple burlap-like ribbon is a Heiko product from Celebrations. I think it really compliments the crinkled paper.
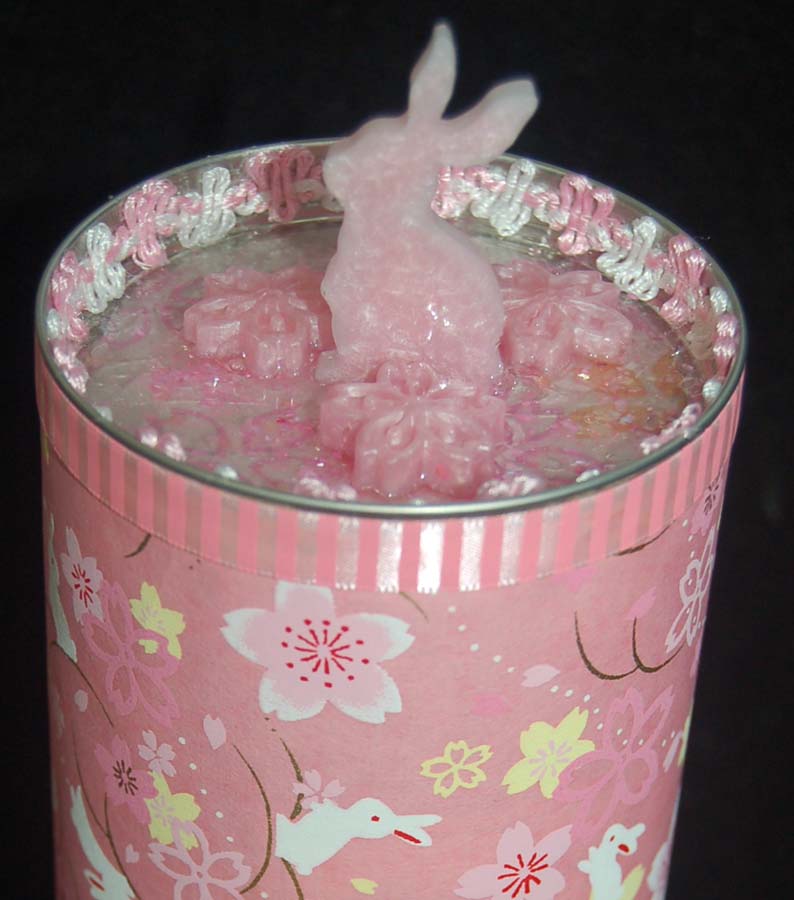
 Both the flowers and rabbit are resin pieces made with LED resin in silicon molds.  Because this tin has a lid that is hard to remove, I decided to attach a resin bunny knob.  Some ribbon and lace added to the sweet look of this reusable tin.  I plan to refill these tins with homemade cookies, handmade cards decorated with washi paper or maybe a package of loose tea.  Hopefully, the recipients will enjoy the contents and then use the tins as pencil/pen holders, paper clip storage, or fill them up and gift them to someone else. Now, that's recycling!

Monday, July 20, 2020

Twin Birthday Cards with Flip-Up Flaps


 My twin two-year-old grandsons love their books with lift-up flaps so I decided to make their birthday cards this year using my Lawn Fawn flap cutting die.  I wanted the cards to be colorful so I chose card stock from a Pebbles Birthday 12x12 pack.  Except for the 'It's Party Time' and 'Hope Your Birthday Is Rawr-some' sentiments and the big 2, the fronts are fairly plain even with added sequins.
 However, when the flaps are opened some happy creatures appear.  I hope my grandsons will be delighted with their birthday cards.  The animal images were stamped from Lawn Fawn, Avery Elle and Mama Elephant sets, colored with Copic pens, and cut with their matching dies.
 I mistakenly made the cards slightly larger than standard-sized envelopes. The only ones I had that barely fit the cards suffered from paper foxing stains.  Undaunted, I decided to try some new coloring techniques that  I saw on someone's blog.  Using Ranger Distress Crayons and a Plaid stencil, I colored in circles and misted them with water, hoping to create a distressed watercolor look.  I was somewhat successful and at least I did cover the foxing.  By adding a few sequins, I think I achieved a festive party look.  I hope my cutey grandsons smile when they see my cards.  They always make me smile when I see them so I'll do anything to see their adorable grins. Grandma love!


Thursday, July 16, 2020

Gemstone 'Laugh' and 'Success' Bracelets

These are two more bracelets that I made during the my stay-at-home Covid-19 vacation.  I really love the way they look and feel when worn.  The one on the left includes sterling charms, chain, and clasp. The gemstones are reticulated quartz which means they have tiny needle-like inclusions. The bracelet on the right has sterling charms and gold filled chain with clasp.  The gemstones on this bracelet are a little hard to identify.  I think the large stone is an agate and the smaller ones are moonstone or some kind of quartz with chatoyance.  I don't make jewelry as much as I do paper crafts because it is more time consuming and expensive, but the end product can give pleasure for generations. It's satisfying to think that these bracelets will probably last longer than me (and I probably will survive another 100 + years). LOL!

Sunday, July 12, 2020

Quiche for Dinner


I haven't made quiche in a very long time.  My crust making skills are sad so I avoid baking pies except at Thanksgiving. (Hubby has to have pumpkin pie.)  However, I happened to have just the right amount of leftover ham and asparagus for a quiche and I really love quiche.  The recipe is actually so easy that I don't really measure anything.  I start by making the crust dough, rolling it out between wax paper and fitting it into a glass  pie pan.  I let this refrigerate while I prep the other ingredients.  For this quiche, I used about 3/4 cup chopped cooked asparagus, 3/4 cup chopped cooked ham, 1-1/4 cup of shredded cheese, 3 eggs and 1 -1/2 cup milk plus salt and pepper to taste.  Blend the eggs and milk and set aside.  Put all the other ingredients in the pie crust and pour the egg mixture over everything.  Bake the quiche for about 45 - 55 min. at 350 degrees. The quiche is done when it is slightly brown on top and doesn't jiggle.  Let cool before cutting. Enjoy this easy dinner!
P.S. This time my crust was really good! Big smiles for me!

Crust:
1-1/4 cup flour
1/2 tsp sugar
1/2 tsp salt
1/2 cup cold butter (1 stick)
1/4 cup  or less ice cold water

Blend dry ingredients. Cut in butter with fork or pastry blender and add in ice cold water until mixture is moistened. Gather dough into a ball. Roll out dough between wax paper and transfer to pie pan (remove was paper). Crimp pie crust edge.

Wednesday, July 8, 2020

Birthday Cake Tower Card

 I purchased the Whimsy rectangle die (Slim Line Waves) to use on another card, but I happened to 'find' the Penny Black 'tall cake' stamp in my rolling bin of birthday themed supplies.  Voila! I absolutely had to put them together.  By cutting a second frame of foam sheet, I was able to make a shaker card.  Using foam for the inner layer has its challenges as the foam sheet seems to distort slightly when going through the die cutting machine so it might be a good idea to cut several frame layers from card stock and glue them together. The background with balloons and banners was cut from a 12x12 Pebbles sheet (Birthday stack) and inlaid into the frame.
As you can see from this close up, I inserted some pastel sequins and glitter into the cavities before sealing them with a clear acetate sheet and the dotted aqua frame. I didn't put too much in because then the printed design of the paper would be obscured...just enough and there is some sparkle plus sound.
The Pebbles printed card stock just happened to have a 'Happy Birthday' banner that fit in the top two windows of the die cut frame...how cool is that?  Did you notice the stamped sentiment, ' Did someone say cake?' I happened upon the clear stamp in an Avery Elle set that was squished in that bottomless rolling Birthday bin.  I guess I CAN go craft shopping in my own room....just like my husband always says..LOL!  Happy crafting and shopping at HM Ben Franklin Crafts!

Saturday, July 4, 2020

Doughnut Puns on Postage Stamp Frame Cards

 I do love play-on-word puns, so this Whimsy doughnut stamp set really caught my fancy. I also have a sweet spot for for postage stamps. (They are like mini works of art.) Since I just got the Pink & Main postage stamp die set, I thought that it might pair well with the doughnut stamp set.  For the card on the left, I placed the die slightly above the fold of the white card before cutting so that the front and back would be attached.  The card on right has just a die cut stamp shape attached to a blue folded card.
 I used the stamp die as a measure for the dotted and rainbow papers.  The blue label was cut with a Spellbinders die before stamping the sentiment and rubbing ink on the edges.
 I could not find speech bubble dies for the words on this card so I hand cut them and rubbed each one with ink pad dye before attaching them with foam dots.
 To make these doughnuts more realistic I added Glossy Accents and Bo Bunny Pearlescent Paint to the pink doughnut. I smudged a little glue onto the twisted doughnut before dusting it with glitter 'sugar'.
 I glued sprinkles (free from Whimsy) with Glossy Accents onto the round doughnut.  The glazed long doughnut was decorated like the other pink one.  These doughnut pun cards were fairly easy to create and I am happily adding them to my card stash.  Although the postage stamp frame added to the cheeriness of the card, I think next time I will use it to make a more stamp-like card, perhaps with a foreign country background and numerical pricing.  "Doughnut Stop Crafting!"