Friday, October 31, 2014

Vintage Style Card and Happy Halloween Winner

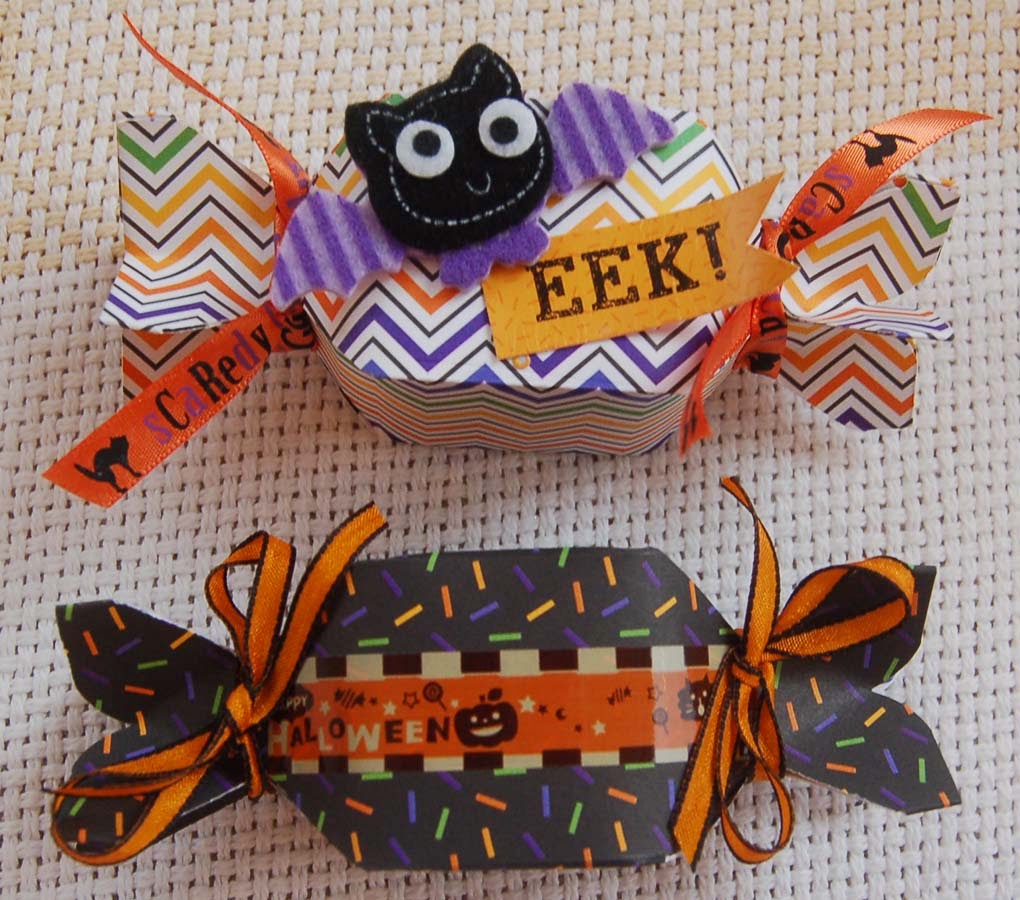
 Last year I made a bunch of vintage style Halloween cards so this year I decided not to do any....until I saw the Impression Obsession stamp and of course I had to get it.  This stamp is so gorgeous and it has a cat!  What I like the most about it is because it has all the shadows drawn in I didn't have to do any shading.  Yup, I just applied the Copic markers like I was doing a coloring book page.  Except for the black sparkle cardstock, all the papers and stickers were Authentique products(from my stash). To call attention to the cat in the pumpkin I decorated it with Martha Stewart black sparkle flocking(from a set). I think this really was the perfect embellishment (sorry, it doesn't show up well in the photo).
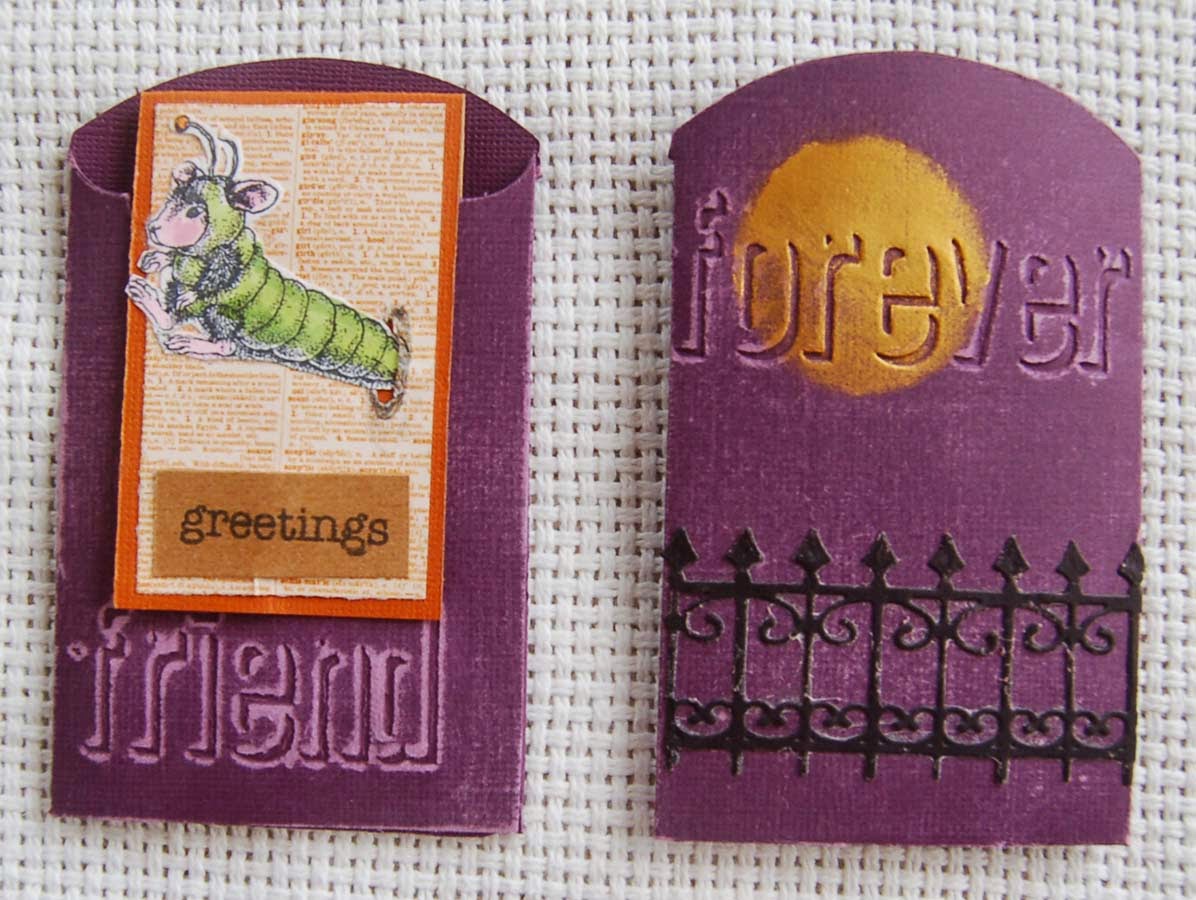
 I stamped the image in dark brown Momento ink but thought that the black ink looked better on the card.  Rather than discard the colored image I decided to turn it into a Project Life card (with a tab). The printed kraft paper is from a Tim Holtz 12x12 Halloween pad and the typed sentiment strip was the label cut off the 12x12 Authentique cardstock...yes I love to use up scraps!  Funny that the sentiment is the same one  found on a sheet of stickers and used inside the card.
On the Project Life card I tested out more of the Zig Wink of Stella. I really love the effect of the colors on the leaves (too subtle to see in a photo) and I definitely plan to use them on future autumn and Christmas projects.  The pens can be purchased singly, but the three pen sets are the best buys. Both the pens and MS flocking set were obtained at HM Ben Franklin Crafts.

Okay, time to announce the winner of my 'How many trick-o-treaters?' contest (see previous post).  Last year we had '0' trick-o-treaters knocking at our door.  I guess our house is too spooky looking...LOL!   Anyway, congratulations to Rylex who had the closest guess of 28! (Rylex, please send your mailing address to this email address: Lsakami@aol.com and I will mail you some crafty prizes.) Thank you to the readers who ventured to participate in my contest. Happy Halloween Everyone!

Tuesday, October 28, 2014

Autumn Hedgehog Card

Have you ever seen a live hedgehog?  They are really tiny.  I thought they were as big as guinea pigs but they are really the size of mice.  The ones we saw in a Japanese department store were so cute I wanted to buy one, but of course Hawaii doesn't allow them as pets.  The best I could do was buy a Lawn Fawn hedgehog die and stamp set.  To make the hedgehogs more realistic, I die cut them and then glued on some Fun Flock.  After the glued flock was dry, I stamped the hedgehog image over the flocked die cut shape. I discovered that some inks print over the flocking very lightly and other inks print a dark image, so you will have to do a test to see what look you prefer.  The die cut leaves used on this card were also Lawn Fawn products. Don't you love the veining?
The card was cut using a die from the Little B set that I purchased at HM Ben Franklin Crafts.  This set is great because the die precisely makes a neat fold in the card as it cuts it out.  Also the set has several card sizes and shapes to add to the front.  I was thrilled to find the green textured paper (12x12) and the Hero Arts sentiment stamp in the clearance sale bins at Ben Franklin Crafts.  They both perfectly fit the look I planned for my card!  I hope that you will search for autumn crafting goodies at your nearest BFC store too.  See you there!

Sunday, October 26, 2014

Halloween Bookworm Bookmark Treat Bag and Halloween Contest

 Here is the second version of a magnetic bookmark treat bag.  Like the last one, I used cardstock with kraft paper inner core so that the words could be embossed (with Sizzix folder) and sanded to highlight.  I had two jokes going on with this treat bag.  The mouse in the worm costume seemed perfect to portray a bookworm on a bookmark. Funny? The other humorous (well, I think it's funny) part is that because the back of the bag looked like a tombstone, I added a die cut (Spellbinders) wrought iron fence and the embossed word, 'forever'. The stenciled moon (Viva creme paint) was the finishing touch on the spooky back which contrasts with the cute front.
 The old House Mouse Halloween set also had mouse footprints so I couldn't resist stamping them on the back of the bookmark. As with the last bookmarks, the magnets were taped between the layers of paper. Okay, this is probably the last of my Halloween projects for this year.  I think I am ready for trick-o-treating.  Oh yes, Contest time!  If you can guess how many trick-o treaters came to our house last year I will send you some cool prizes. You have until midnight Oct. 30, 2014 to send in your guess by commenting on this post.  If you win, you will have to send your mailing address to my email address. The first one to guess the right number or the closest guess will win. Good Luck!

Friday, October 24, 2014

Halloween Cat Bookmark Treat Bag

The inspiration for these treat bags came from Emily Leiphart  (Art From the Heart) who posted her bookmark treat bags on her blog.  She used Paper Smoochie products and although I do have the PS bag and bookmark dies, I decided that I wanted to try making  magnetic bookmarks. (The PS bookmark die cuts pieces that just hook over the page.)  Also I discovered that HM Ben Franklin Crafts sells two different Sizzix treat bag dies. After die cutting on style of treat bags from a sturdy cardstock that had a kraft paper inner core, I used an embossing folder to impress the word, 'smile'. The bag was then assembled with Merikan double stick tape.
 
From my stash, I found just the right vintage-looking Tim Holtz Halloween cardstock.  The bookmarks are 2" wide and have small,very strong Sierra Pacific magnets (from BFC) taped between the layers of papers. To make the wonky (Studio G) cat look more scruffy, I glued on black Fun Flock.  A little sanding of the orange treat bag helped to highlight the letters.
 The magnetic bookmarks can also be used as refrigerator magnets that could hold several papers between the super strong magnets.  Even with the bookmark in the bag, there is still room for some candy.  If you don't want to give sweet treats, a gift card would fit nicely with the bookmark.  This mini bag can be adapted to many occasions.  Stay tuned for another version of this project.

Tuesday, October 21, 2014

Hello Kitty with Balloons Birthday Card

Okay, this is the last Hello Kitty die cut card I made this week.  I think it is my favorite of the three because of the background paper I found in the American Crafts Here and There 6x6 paper pack.  I made this top folded card with the Sizzix rectangle die set.  By placing the fold of the white card stock near the edge of the die, I was able to cut the card with one pass through the Big Shot. The second largest die in the set was used to cut the cloud paper.  For some odd reason the second die is the only one in the set with pointer corners, but this makes it look better on the card....LOL!  I assembled HK and used a Copic (cool shadow) to color the edges of her and the balloons.  I thought twine would look better than the die cut string parts to attach the balloons to HK. Finally, the birthday greeting was die cut and glued in place.  Because the letters were so tiny, I ended up just applying a thin clear glue (Martha Stewart) to the paper and sticking the letters down.  After drying I removed the stickiness with a dusting of cornstarch. (I have a jar of it and a powder puff on my desk.)
I hope this trio of Hello Kitty birthday cards made you smile.  It made me happy to craft with something old and something new.  Thank you for being my blogging friends.  I truly appreciate every comment and love to see all the crafts you create. Happy Crafting and Blogging!

Sunday, October 19, 2014

Hello Kitty Wish Big Card

 After revisiting my Hello Kitty dies for my last birthday card, I couldn't resist making another one using the Mama Elephant scallop rectangle die and stitched rectangle die.  This is a simple top- hinged card (score the back scallop rectangle on the top edge and Merikan tape it to the front scalloped rectangle to make a card that has scallops all around).  For those of you who have forgotten, HK whiskers can be colored in with  a small tip marker and paper can be glued behind the eye and nose holes to make assembly easier.  I used printed paper from 6x6 American Crafts paper pads (purchased at BFC) but the pieces needed are so small I'm sure that you can find what you need in your paper scrap bin.  A Paper Smoochies word bubble die and sentiment were used to add more cuteness to the card.
Well, that's it for today.  In the next post I will show you the third Hello Kitty card I made....nice to have extras for my card stash box.  Come back and visit again!  Happy Crafting!

Friday, October 17, 2014

Hello Kitty Beach Birthday Card

 I wanted to make a birthday card for a really sweet girl.  She has a sunny, summery personality and  loves Hello Kitty.  I was planning on moving all my old dies into my new (purchased at Ben Franklin Crafts) three-drawer wood topped rolling bin (a great work station for my Big Shot die cutting machine), so it was time to find my Hello Kitty dies.  I found them and remembered how sweet they are (Why have I neglected them?).  I also found three completed HK with sunglasses...woot! woot!..less work for me.  A die cut Spellbinders border seemed to be the perfect pairing with the HK figure and a beach blanket print paper from a Mambi 12x12 paper pad added a summer touch to the card (even though she is an October child).  For the birthday banner I used a clear stamp and die from Paper Smoochies.
Don't wait for clean up time to discover the craft treasures you already own. With a few new additions you can give a fresh twist (or curve) to 'old' supplies and even use up some  paper scraps.  I hope this card reminds you that Hello Kitty will live forever..... just like me.....LOL!

Tuesday, October 14, 2014

Halloween Cards for Project Life Album

I know it's hard to tell but these cards are in Project Life album sleeves (perhaps why the photos are a bit blurred).  I wanted #1 to finally get some of my photos in some sort of album and #2 use up some of the Halloween paper scraps and stickers I've amassed over the years.  With the Sizzix die sets that I purchased at Ben Franklin Crafts, I was quickly able to die cut many cards.  The raven card is actually a card (cut by putting the folded edge just under the cutting edge of the die) that can be sent as a greeting card to another Project Life album maker so she can put it into her album.  I love the raven cardstock by Kraft Corp which is sold at BFC along with the printed words of Edgar Allen Poe. Over the years of my children's childhoods I wish I had taken more photos but there were no cell phone cameras back then.  Alas, that time is 'never more'.  At least technology (and my husband) make it possible to scan camera photos to digitally reproduce them for my crafting use.
This is the backside of the top page.  Notice that I have a section for journaling on every page.  I tried to keep the pages fairly flat so the cards would fit in the pockets.
Like the raven, the cat was cut using a Tim Holtz die (one of my favorites for Halloween).  The moon was enhanced with Wink of Stella clear sparkle (too subtle for photo). The brush pens (which come in lovely colors) are now available at HM Ben Franklin Crafts. The cute row of mice was made with a Martha Stewart border punch.
I was very pleased with the ease that these Project Life pages came together and it seems that I may actually get my family photos organized and documented.  I certainly wish that I had taken more photos during everyday activities.  For those of you with young families remember that you will never say, "I wish I hadn't taken so many photos".   Photos you can always delete but time is fleeting and life is impossible to recreate.

Saturday, October 11, 2014

Halloween Candy Boxes Made with a Paper Punch

 When I first saw the We R memory keepers candy box board punch (at HM Ben Franklin Crafts), I passed on buying it because I have a Sizzix die that cuts a similar one.  However, recently I saw on someone's blog that the board punch can do many different lengths of boxes from 4 to 12 inches long. That variety of sizes made it an instant 'buy it' decision. The longest box in the top photo is 12"and the smallest is 5".
The board punch works extremely well and comes with very thorough, but easy instructions so even a mechanically challenged crafter like me can make a box on the first try.  I used 12x12 double sided Doodlebug Halloween cardstock which is available at BFC for the basic candy box. Both sides of the cardstock are pretty so I was happy that I was abe to punch out two boxes from every 12x12 sheet.
The fun thing about these boxes is decorating them.  Doodlebug makes a matching sheet of sticker labels and banners which can be used to embellish the boxes or in photo/project life albums. I used ribbons from my stash....yup, I have a section just for Halloween ribbons....hoarder alert!
The cute felt stickers (Darice) are inexpensive ones from Ben Franklin Crafts.  I also bought the slick printed Halloween tape (not washi) from BFC.  If you need to make some Halloween candy boxes quickly, I think you should try the We R memory keepers punch board.  I know that you will enjoy this product and use it for upcoming holiday crafting.  I'm already planning my Christmas and Valentine boxes.  Who wouldn't want a little sweet treat for those occasions?

Wednesday, October 8, 2014

Halloween 2014 Treat Bags

This year I saw the cutest die for flat bottomed, gusseted, handled bags made by Lawn Fawn.  I knew that I could use this die for many occasions besides Halloween so I bought it.  While I was making this purchase I discovered the LF Halloween stamps and dies which definitely would work well with the bags.  I had some leftover Halloween paper (too plain and not quite card stock thickness) that seemed perfect for treat bags.  It was simple work to die cut, color the images with Copic pens and pop-dot them to the bags.
After completing these bags, I thought that they would make a unique holder for my annual family newsletter (which has not been annual in the past few years).  This year I plan to get a jump on the holidays by mailing out my newsletter and photo magnet in these Halloween treat bags....won't that be a spooky surprise?

Saturday, October 4, 2014

Halloween Treat Jars

After turning the berry basket into a Halloween treat basket, I started looking for other dies that could be used to hold treats.  I discovered the Sizzix jar and spoon die which I thought would be cute and could hold just the right amount of candy and/or small gifts.
The monster 12x12 Carte Bella card stock  I purchased at HM Ben Franklin Crafts had appropriate graphics and was of a weight sturdy enough for this project.  To make the jar and spoon more realistic I added a pieces of silver vellum to the jar top and spoon bowl  A cute monster button (with the shank cut off) was a fun addition to the candy jar spoon.
 From this photo you can see that I used clear acetate to form the side of the jar.  I also die cut acetate to go over the jar front and back to make them shiny like a real jar.  The 'hairy' ribbon is just some leftover lei yarn and the skull pick (red dye painted over the wood part) came from a cupcake Halloween decoration set. I think the fiberfill makes a spooky 'smoke' to stuff between the treats in the jar.  The paper (MME, I think) for this jar was a bit too thin for the project so I used spray adhesive to glue it to some cardboard before die cutting the pieces.
I think you will have lots of crafting fun if you purchase this die.  It would make sweet baby shower table favors or a unique gift box for a birthday present.  I know that your creative mind is already making plans of how to use  this wonderful Sizzix die from BFC.  Wouldn't it be a perfect gift for one of your crafty friends?  Okay, time to do some holiday shopping and crafting!