Tuesday, June 28, 2016

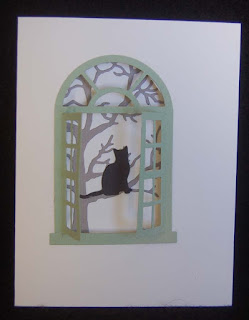
Cat Card I - Sympathy

 This card was made for a loving cat owner who recently had to euthanize his sweet cat.  I remember that his cat enjoyed looking out the kitchen window to watch the birds or squirrels on the nearby tree.
 I thought it would be poetic to use dies to make a card that looked like the cat is now on the tree looking wistfully at her kind owner in the house.  The Spellbinder and IO dies made the card a snap to make.
 For  the sentiment I used my new toy, 'Misti', to help align the Hero Arts stamped words then I heat embossed them with silver powder. The Misti will be in the HM Ben Franklin Craft stores very soon so you too can purchase and enjoy this unique stamping tool.  I hope this post has encouraged and inspired you to create cards anytime you want to express and send heartfelt messages.

Friday, June 24, 2016

Quick and Easy Die-Cut Wedding Card


 When I realized that I had only a week to come up with a wedding card for a relative, I made a quick search in my 'wedding stuff' box.  I found the Marianne Designs Creatable couple die and knew it would be the perfect start for a beautiful card.  Using watercolor paper (love the weight and texture), I die cut the couple and the scalloped edge frame.  With the stitched rectangle die from the same Mama Elephant die set, I cut a piece of pretty washi paper (purchased from HM Ben Franklin Crafts) and used it behind the couple.  Next it was super easy to die cut the Avery Elle 'congratulations' word from scrap watercolor paper, ink it, dust it with gold embossing powder and heat emboss it with a heat gun.  This card took hardly any time, so I made an extra one for my stash.  You never know when I'll have even less time to produce another 'instant' wedding card. LOL!


Monday, June 20, 2016

Celebrate Your Birthday Card and a May Winner!

 Like on the previous card, I used die cut vellum balloons and die cut the word 'celebrate' before embossing it.  I wanted a sparkling word but didn't have any glittery blue embossing powder, so I made my own!  I simply mixed clear embossing powder with Queen & Co. blue pixie dust glitter and sprinkled it on the inked die cut word before heat embossing it.
Although this card is similar to the one shown on my last post, it was made for a person born during the year of the monkey.  I like the way this card turned out, better than the last one because of the vertical alignment of the card and the penned in balloon strings (twine was too thick).  Please read the previous post to learn more about the construction of the card and the supplies used.

Okay, now for the winner of the May drawing (one random person's name is drawn from the comments left in last month's comments)....and the winner is .......wait, wait,...it's been so long since I named a winner, I think I'll pick TWO!  Okay....the winners are....Karen (Have A Scrap Happy Day) and Shirley N ( Stampin For the Fun of It). Congrats!  I'll be mailing out your prize packets as soon as possible.  If you are not familiar with my 'un-contest' contest, it's simple.  Every so often I pick a month and randomly choose a name from those who left a comment on my posts for that month.  If someone left 2 or more comments that month, that person's name will be entered as many times as he/she commented.  "What could I win?", you wonder.  Well, I usually send the winner(s) a bunch of cute/crafty goodies and sometimes a HM Ben Franklin Crafts gift card.  I think May's winners will be really pleased with the prizes they'll be receiving.....enjoy, and thanks for being faithful readers of my blog!

Thursday, June 16, 2016

Celebrate Your Father's Day Card

 
I was excited to try out some new stamps and dies which have been in my 'treat yourself' bin.  The Avery Elle balloon animal stamps and dies are soooooo cute!  I cut them out of colored vellum and stamped them with black Momento ink. To fill out the balloon bunch, I added some die cut Paper Smooches balloons too. 


 For the inside of the card I used stamps from an adorable My Favorite Things (Cheeky Monkey) set and stamped a Lawn Fawn script sentiment.  To lessen the boring white background I used a Ranger blending tool and some Distress Stain to rub on some blue color.  To make it more child-like (I am of course my husband's bothersome child who never grows up or moves out.) I scribbled on some  blue watercolor pencil marks and smudged them with water.
 I usually die cut words from gold card stock, but my stash is running low and I feel die cutting words wastes card stock.  I came up with a way to get the same effect with little cost.  I simply die cut the words and dab them with gold ink (do only one half at a time so you have something to hold) and then sprinkle it with gold embossing powder.  After heating the word with a heat gun you will have a gold sentiment to glue to your card.  Better than stamping and embossing which can be frustratingly messy, this method allows for the creation of really intricate embossed die cut sentiments.


 Here are the supplies used on this and my next posted card. Note the vellum adhesive sheets from Forever In Time.....they work really well to adhere the balloons without showing through the vellum.
Check back to this site to see a birthday version of this card and the name of a WINNER!
                                    

Sunday, June 12, 2016

Finding the Findings for Unique Necklaces

 I love acquiring interesting objects to craft into jewelry. The three pieces of ancient Roman glass used in this necklace were discovered at a recent trade show in Tucson. They were part of a loosely strung cotton string necklace. By simply wire wrapping three of the pieces with silver wire and attaching them to a crysophrase chain, a one of a kind necklace was created.  I added some antique looking chain and a clasp to further enhance the 'just found in an ancient ruin' look.
For this piece, I wanted to keep the look clean and simple like the quartz crystal. I found just the right chain that had angular flat sided links.  I wanted the crystal to stand out so I just hung it from a piece of silver wire and wrapped it onto the chain.  The clasp was likewise chosen for the simple clean line of the s.s. lobster claw. Probably all of the silver parts for these necklaces can be purchased at HM Ben Franklin Crafts.  You will need to keep an eagle-eye lookout for those 'special' parts that will be the statement for your jewelry. Making jewelry like this is a fun hobby.  I enjoy the hunt for the one-of-a-kind parts as much as I like making the pieces and wearing them. Hope you will give it a try!

Wednesday, June 8, 2016

New Products at BFC...woot! woot!

 Oh Boy!  This is my new favorite tool!  This outstanding punch not only punches out a medium sized tag, it also has a slot for punching out a perfectly centered hole and an eyelet setter.  All of this is in this one unique Fiskar punch.  (There are even a few eyelets enclosed in the package.) Within 10 minutes I was able to make the tags (shown in photo) from whatever scraps of card stock I had on my desk.  I can't wait to make some tags from my printed scraps.  If you have some eyelets with the right sized hole, you can even use them in this super tool. (See the flower and heart eyelets in photo.)  There were other Fiskar tag tools at HM Ben Franklin Crafts so you have lots of them to tempt you.
While at BFC, I purchased more coloring products...yes, more...they're addictive. There were great framed pictures to color, calendars, planners and postcards.  I've got a lot of coloring to keep me busy this summer.  I hope you'll check out all the crafty, fun stuff that are stocked at Ben Franklin Crafts.  I am already buying gifts for Christmas....so many things that will be terrific for friends/family on my shopping list.

Saturday, June 4, 2016

Flip Flops in the Waves Shaker Card

 If you are getting tired of my cards and tags using the Queen & Co. products, bear with me....only one more after this one.  I am still learning the advantages of using these cool toppings and double sided adhesive foam parts. I chose the 'Waves' shaker card set to make this card.  It is pretty easy to set up the foam on the included blank card and fill in the cavities.  I used the 'diamonds' and 'baby beads', combining like colors in each window.  Before using double stick adhesive tape to adhere the card front to the window part, I sprayed the front with Mister Huey's powder blue and opaque white ink to give the look of ocean water.  Finally, I used pop dots to adhere the 'rubbah slippas' (the local Hawaii name for flip flops) that were made with the Paper Smooches die shown below along with two other shaker card kits made by Queen & Co. I think that you will find these card sets a very satisfying  and frustration-free way make a beautiful shaker card.
Flip Flops in the Waves