Sunday, September 29, 2013

Bo Bunny Halloween Papers to Tags in Minutes

I vowed not to buy Halloween papers this year, but I'm weak.  I caved in and bought a selection of Bo Bunny 12x12 cardstock from Ben Franklin Crafts.  The sheet with the tag shapes immediately appealed to me.  It was simple work to cut them out and attach them to Doodlebug orange sparkle paper.  Cutting out the tag shapes doesn't have to be labor intensive or precise.  It's Halloween so wonky cutting is okay.
After finishing the tags I looked at the backs with the intent to write messages, but alas there was the Doodlebug information (that was on the bottom of the back of the orange sparkle sheet); I had included them inadvertently in the tag. To cover up the Doodlebug words/icon, I glued on some K and Co. die cut pieces (from my stash).  With the yarn scraps and hand-drawn stitching, I think the backs look like I intended the cover-up designs.  Be sure to look for and avoid printing on the back of the sparkle sheet if you don't want to expend extra effort and time on your tags.
I know, if you see these 'cute' spooky 12x12 Bo Bunny Halloween sheets at Ben Franklin Crafts, you won't be able to resist them too.  Now it will be simple for me to attach these tags to plain treat bags and no one will know how easy it was.  Everyone will think I'm a craft wizard.  Halloween is a fun time to craft, so grab some Halloween craft goodies and make yourself/others happy.

Congrats Alert!  Jayne (Handmade Cuties) was the winner of the Bo Bunny clear stamp set (and other goodies).  She was the winner for being the first to leave a comment on my blog post. Good job Jayne!

Wednesday, September 25, 2013

Quickie Halloween Treat Box

This has to be the quickest, easiest Halloween treat box. It involves simply cutting the Sizzix tall box with scallop flap from black cardstock.  Fold and tape the box together and tie a wide Halloween ribbon around the finished box. (Don't forget to put the treats in first ;)
 Adhere a Halloween image to the front of the box and voila you're done!  This treat box is a lifesaver if you have multiples to do and it's economical too because the ribbon from Ben Franklin Crafts comes in a giant (10yd.) roll  for the reasonable price of $5.99.  Remember if you don't have a die cutting machine you can always borrow the one at Ben Franklin Crafts.  If you buy your paper there, you can use the machine for free.  The BFC stores also have many dies for you can use for FREE!
Now, I bet you think I made a mistake showing this Bo Bunny stamp set when I used a Dandelion Design set to stamp the image I used on this treat box, but there's a reason I'm showing this set.  You see, this is an extra set I found in my Halloween stamp box. I used the other set but this one is unopened. (Yes, I have the hoarder gene.)  If you want this stamp set, just be the first to comment on this post.  (You don't even have to say you want it LOL!) I do need to have a way to contact you and you must be willing to send me your mailing address.  Well, thanks for visiting my blog.  I hope you will stop by again, soon.

Saturday, September 21, 2013

Recycling Project: Halloween Treat Bottle


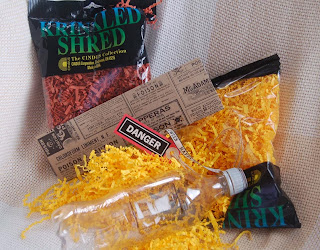
While admiring Marie Gamber's blog site, The Joy of Cards and Papercrafting (http://thejoyofcards.blogspot.com/), I saw a really cool way to turn a plastic drink bottle into a treat container.  My version does not look anything like the one I saw on Marie's site, but I am pleased that the result was a quick, low-cost, and unique treat container.

 I sketched on the bottle with a permanent marker the place where I planned to cut the opening.  (See photo.) It was easy work to cut the window (leave one side attached) in the clean plastic drink bottle using a craft knife.  Then you can fill the bottle with shredded paper (from Ben Franklin Crafts) and candy (or other treats).  Next, to cover the window, I cut a label from some Tim Holtz Halloween paper and adhered it to the bottle with Merikan double stick tape.  Luckily, I found a sticker in my stash that just fit the top of the bottle, but you could easily punch out a circle from a scrap of Halloween card stock.  For the caution tag, a Martha Stewart sticker was attached to a piece of red card stock and cut into a tag shape.  A beige reinforcement ring (made using punches), ribbon and twine completed the look of a spooky Halloween treat bottle.
I hope you'll give this recycling project a try.  It is a good, quick and inexpensive way to make treat holders for other occasions too. By the way, for those of you who are wondering who won the witch clear stamp...it was Shirley N., Stampin For The Fun Of It, (http://stampinforthefunofit.blogspot.com/).  No one actually said they wanted the stamp and other goodies; so I decided that since Shirley was the first to comment, she was the winner.  Either no one really reads blog posts completely or everyone was too polite to say they wanted to win the prize.  Anyway, congrats Shirley.....your prize is on the way to you. Stay tuned for more surprise giveaways.

Tuesday, September 17, 2013

Witch in the Moonlight Treat Box


Since I rarely seem to have a need for Halloween cards, I have decided to concentrate on treat containers. Anyway, as far as I am concerned, Halloween is all about the sweets.  LOL!  The base for this first treat box was made using a Sizzix die called, bag with handles.  Perhaps the most challenging part of this project was die cutting the wrought iron fence because the Spellbinders die is so intricate it takes awhile to extricate the fine parts.
To save time and add color I stamped the Halloween silhouettes on a strip of purple card stock and added it to the other three sides of the box. The witch was simply stamped on a yellow moon and taped onto the box before adding the fence. Several ribbons were tied onto the handles and a Martha Stewart sticker (from my stash) was added to the back of the box.

The bonus for making this treat box was that in the Studio G package containing the witch stamp, there was a second set of witch stamps. If there is anyone out there in blogland who would like to have this second set of stamps please leave a comment saying, "I want it!" If you are the first one to comment indicating that you want the stamp set, I will send it (and maybe *wink-wink* some other goodies) to you.  I will need to have a way to contact you (blog site, email address) and you will need to send me your mailing address after I contact you.
Thank you for visiting this blog site and reading all the way to the end.  I hope you have learned something and enjoyed your time here. Please stop by again and leave a comment if you have the time.

Friday, September 13, 2013

Vintage Style Halloween Tags

After Halloween 2012,  I purchased the Tim Holtz cat and crow die, knowing that I would use it the following year.  It is finally time to put the die to use.  I love the graphic look of the scary animal shapes so I decided that making black silhouettes was a given.  This year I was lucky to find ( in a clearance bin at Ben Franklin Crafts) a 12x12 Tim Holtz seasonal pack which had a very vintage look.  The Halloween  papers were a perfect match with the animal silhouettes.  The animals were just a bit larger than the Tim Holtz die cut tag shape so I easily cut a larger tag from gray card stock by trimming around the die cut tag. The tag die also cuts the reinforcement circles which make the tags look more finished.

I think the twine ties in the first photo make the tags look shabby chic country.  For a more upscale vintage look, I put fancy ribbons (see previous post) on the tags.  I liked this look too but thought the animal silhouettes looked too flat so in the last set I glittered the crow and flocked the cat before gluing them to the tags.  With the acrylic gemstone eyes, I think this third look (click on image to enlarge) is the one I was hoping for as it has vintage Victorian style, which I love.
Most of the supplies for these tags were purchased from Ben Franklin Crafts.  You will be able to find an abundance of Tim Holtz products there, including the Distress Stain.  This is my new favorite ink line because the dauber ink container allows me to distress the edges of my paper easily.  Distress Stain comes in a whole range of deliciously vintage colors to enable you to distress your projects and achieve the exact aged look you desire.
Next I will be working on treat bags/boxes onto which I can fasten these tags.  Later I will bake up some treats to go in the containers. Oh, maybe I'll be lazy and just fill them with store bought candy....heheehee!

Monday, September 9, 2013

Mailing Box Birthday Card

I am so impressed by the pop-up box cards made recently by Eunice and shown on her blog site, A Star for Chiemi. I knew that when the moment and occasion was right; I would have to try to make one, too.  Here is my attempt at a pop-up box card for someone who collects Kaiju toys (colorful monster-like toys from Japan). Since the toys usually are purchased online and mailed in boxes, I thought that a mailing carton with monster toys and bubble wrap popping out would make the perfect birthday greeting for this collector.

I started the construction by cutting two 4-1/2" x 12" pieces of card stock, one in white and one in kraft brown.  Next I scored the pieces into four panels to form the sides and across the top of each panel at 1-1/2"  for the flaps so that the sides of the box would measure 3"x 3".  I cut the flaps apart and then used various rubber stamps on the outside of the unfolded white box.  Using double stick Merikan tape, I adhered the unfolded boxes together and then formed the double thick box.  By taping two layers of card stock together, the box becomes stronger and the kraft brown card stock as the interior makes the mailing box more realistic. The seam was connected with regular tape (for strength) and then covered with red, white, and blue striped washi tape (from Ben Franklin Crafts) for a postal look.

The monsters were stamped using Darcie's and Hero Arts cling sets. For the color I used Hero Arts Neon ink pads.  For two of the creatures, the ink was rubbed onto bubble wrap and the bubble wrap was used as a stamp for background color before the image was stamped over the bubble wrap print.  Uninked bubble wrap was taped inside the box along with the monsters and birthday greeting. Be sure to pop the bubbles before inserting them into the box so that there will be less bulk. (Rolling a bottle over the bubble wrap is an easy way to quickly pop the bubbles.)  The above photo is a view of the flattened pop-up box card ready for mailing (probably needs a large pouch envelope).

Shown below are some of the stamps that you might find useful if you decide to make a mailing box card like this one. I believe that I purchased most of them at Ben Franklin Crafts.  Please go to Eunice's blog site to see her marvelous pop-up creations. I'm sure after seeing them, you will be eager to make one of your own.  Blogland is the best place to get inspired and meet the nicest, craftiest people. Thanks for visiting with me!


Thursday, September 5, 2013

Shopping Fun at BFC

Okay, I know I don't NEED any more ribbons in my collection, but who could resist these Autumn and Halloween beauties?  These textured and shiny ribbons sold at Ben Franklin Crafts are great for home decorating and crafting. I plan to take the wire out of the wide ones and use them as border strips on cards as well as bows for dried floral arrangements.  The thin ones are of course perfect for Halloween card making and treat bag ties.
I tried walking past the burlap ribbons but of course I couldn't. I can just see them stamped with inspiring words in black or brown ink. The iridescent thin ribbons are from Celebrations (next door to the Mapunapuna BFC) and are beautifully vintage looking. The voile-like texture reminds me of butterfly or fairy wings.
I was determined not to look at the Halloween items in BFC because I no longer have young ones who desire spooky treats.  However, my eyes spied a Wilton test tube rack with candy sprinkles in vials and my hand reached out and put it into my shopping basket.  If I was buying sprinkles, then I had to make candies, cookies, or cupcakes so I needed paper treat cups right?
 Finally, the impulsive shopper in me decided it would be fun to make a Ball jar soap dispenser.  It looked so easy to do......and it was!  See..... I made it with just a twist of the cap and a clip of the slightly too long tube. (Just use a scissors to clip off about an inch from the bottom of the tube.)  This vintage-looking dispenser will make a terrific office or hostess gift accompanied by a jug of liquid soap.
 Well, that concludes my shopping trip at my favorite store, Ben Franklin Crafts, where I never fail to find some crafty goodies. Hope you have an opportunity to shop there soon.  I'm sure if you do, you'll  have fun and find something irresistible!

Sunday, September 1, 2013

Brownie Cookie Experiment

Recently, I enjoyed a no-flour chocolate cookie at Beyond Bread in Tucson.  I came home determined to create my own healthy no-cane sugar version.  I was able to replace the cane sugar in one of my favorite cookie recipes with coconut sugar which is a low glycemic sweetener. I did not use wheat flour but just a bit of coconut flour which has a lovely fragrance and no gluten. I was very happy with the resulting taste of my Brownie Cookie so I made up a small gift bag for a friend who did me a favor.
Because I had just purchased a new chocolate themed word stamp from Viva Las Vegas Stamps, I couldn't resist making my friend a card to go with the cookies.  The baker stamp I used is a Stampingbella one I got from Ben Franklin Crafts. The figure was holding a plate of cupcakes so I masked it out and drew in chocolate chip cookies. The bag and matching tape is from Ben Franklin Crafts/Celebrations. I made the envelope (using the Envelope Punch Board) and decorated it with the leftover scrap from the card and more tape.
Here is the recipe for my healthy brownie cookies:

4 oz. bittersweet chocolate
1 T butter
1-1/2 T coconut flour
1/8 tsp. baking powder
1/8 tsp salt
1 egg
1/3 c. coconut sugar
1/2 tsp. vanilla
4 oz. bittersweet chocolate (chopped into chip size)
4 oz. rough chopped walnuts or pecans

In a small bowl, melt 4 oz. of chocolate and the butter using the microwave at 10 sec intervals, stirring until it is combined and smooth.  In another bowl beat together the egg, sugar and vanilla. Add in the melted chocolate mixture.  Sift in the flour, salt, and baking powder.  Add in the chopped chocolate and nuts.  On a parchment lined cookie sheet form 8 cookie patties and bake them for 10 minutes at 350 degrees. ( Turn the tray halfway during the baking time.) Let the soft cookies cool on the sheet before removing them. Enjoy!