Sunday, March 31, 2019

Asian Waterfall Thank You Tag

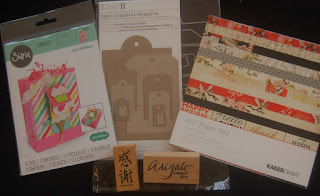
 I enjoyed making the waterfall ice cream tag (see previous post) so I decided to use the same Sizzix die set to make an Asian style waterfall tag. Instead of using the ice cream dies in the set, I used three stickers from my overflowing box of Japanese stickers.
I used the same Little B tag die to cut two tags, one black and one printed.  I trimmed the edges of the printed tag so that when glued together the black tag, it would make a border. Because it is white in the back, it also provides a good surface for a message.
The arigato  (thank you) and Japanese character stamps are both Mari and Me products (old wooden style).  Embroidery floss was used to make the red tassel and tag hanging loop.
 As a last embellishment, I folded two origami cranes from gold paper and glued them to the tag. I think they added a touch of gold and interest.
 Oh yes the stamped words and characters were stamped in a slow drying dark blue ink and dusted with Nuvo black sparkle heat embossing powder.  (I couldn't find my black stamp pad so I substituted since the ink wouldn't show under the powder.) Tip: Always use slow drying ink for embossing so that the powder will stick.
 I was pleased with the outcome of this tag especially since it will be good for use on a bag containing omiyage (thank you gifts brought home from a trip). If you have lots of Japanese stickers/seals and printed Japanese card stock (KaiserCraft pad is the perfect size for the dies.) you should really give this project a try.  It's so easy to craft an elegant Asian waterfall tag!

Wednesday, March 27, 2019

Ice Cream Waterfall Tag

 The Sizzix waterfall die set excited me because I usually make waterfall cards by measuring and folding but this set seemed to be a quick trick.  However, the set did not contain instructions so I had to look it up on the Sizzix website.  The instructions and video for a card were easy enough for me to follow and make this ice cream waterfall tag.
I changed quite a few things.  I wanted to make a colorful, yummy thank you tag so I used a Little B tag die to cut a Doodlebug Designs card stock with a frozen treats pattern. The Hero Arts 'thanks' die was used to cut out the word from blue card stock.
 The 'pull here' Lawn Fawn stamp was applied to a small punched out circle and glued to the striped twine.  A Newton's Nook stamp was used to print the words, 'You make life sweet' on the die cut pull out tab.

 After die cutting scoops of ice cream from ice cream -like card stock, I added some heart/dot  sprinkles and 'chocolate chip' Bo Bunny pearlescent paint.
 I found some square green brads in my old stash of decorative brads so they were used to adhere the waterfall base piece to the tag.  I thought the tag needed a border so I added thin striped washi tape. I also used washi tape (Doodlebug Designs) that matched the card stock to cover the brad arms in the back of the tag.
 I think this tag will look great on a special thank you goodie bag.  Adding a fancy tag like this really shows the recipient how grateful you are and you can write a message on the back too.  However, if you prefer, don't write on the tag (use a post-it ) so that it can be recycled to another gift bag.....then your handcrafted tag won't be one-and-done then into the trash. OH NO!

Saturday, March 23, 2019

Easter Bunny Gift Bag


 This is a bag I designed to hold some Easter themed books for my grandsons. I'm a big champion for reading to children even before they can talk or walk.  The Japanese bunny washi paper is a 12x12 piece from HM Ben Franklin Crafts and inspired the large die cut felt bunny . I cut the pink felt ears with the Paper Smooches die and then I glued it to white felt and cut around it. Googly eyes from HM BFC were glued on as well as a small pink heart nose. For the tail I used a bit of batting.
 The 'Easter Greetings' (Impression Obsession)was cut from yellow card stock and to make it match the slightly frosted sheen on the paper, I patted a gold ink pad over the words. This a simple and inexpensive way to avoid wasting the foiled or pearlized card stock.  Purple lace was glued around the washi paper and puffed green cloth hearts (from my stash of stuff) were added.  Oh yes, this bag was also started to use the cute plain white bags with the striped handles that I purchased (3 for $1.50) from our company's Daiso store.....so many goodies there! Happy crafting and bargain shopping!       
                                       

Tuesday, March 19, 2019

Wedding Thank You Card

The wedding of my youngest son took place last weekend.  It was a beautiful affair designed by the bride and aided by her mother.  For all the work she did and hospitality she shared, I wanted to send 
my son's mother-in-law a handmade thank you card. The wedding colors were dark green, gold, and white so I chose them for the card. The symbol throughout the wedding was a butterfly because that is our family 'mon' (Japanese crest). When I 'discovered' the butterfly and floral die/embossing folder in my stash, I knew they were perfect to use on this card. (I believe I got this set from a craft magazine.) 

                                                  
  I made two versions of this card just to play with the layout. The printed floral paper from a Kaiser Craft pad (available at HM BFC) is slightly different on each card. I wanted the light green parchment paper to stand out more on the top card so I rubbed the embossed portion with gold metallic rub-on paint (from Ben Franklin Crafts).  The 'thank you' was die cut from gold foil paper and adhered easily because it was run through a Xyron sticker maker. The butterfly dies were used to cut the gold base parchment and perforated frosted parchment top.  The tiny white flowers are vintage ones I found in an antique shop...always be on the look out for pretty bargains.  I think both card versions turned out very well and are suitable for special thank yous. The second card will be added to my thank you card stash which gets depleted so quickly.  Everyone is so generous and kind to me!

Friday, March 15, 2019

Puffer Fish Birthday Card

 When I saw the Avery Elle puffer fish stamp and die sets in the red tag clearance bin at the Hilo Ben Franklin Crafts, it was a no-brainer that it would be coming home with me.  The KaiserCraft Deep Sea decorative paper (from HM Ben Franklin Crafts) was used for the sea urchin-like background, but I miss measured the dimensions so I had to make another version of it with bubbles in the background to see if it would look better.
 I think I like the placement of the pieces better on the larger size card, but I like the sea urchin background better. My favorite part of the stamp set is the sentiment which fits nicely on a Lawn Fawn die cut banner. I used a Lawn Fawn circular die to cut the candle print paper which came from a Dandelion Designs 12x12 paper pad (Hip Hip Hooray?)
 The Avery Elle stamp and die sets also had a fierce but funny shark which I colored with Copic pens and inserted into the card with the birthday greeting.  I enjoyed making these cards because they were easy (very little coloring or cutting). They will be kept in my birthday card stash and be good for most of my oldie but goldie friends. LOL!

Monday, March 11, 2019

Pineapple Thank You Card

 Because pineapples are such a popular icon now, I considered purchasing the Sizzix die for awhile before I decided I couldn't resist it.  I thought I could use the die to make charming thank you cards to send to my mainland friends. The bumpy texture on the fruit was made with a Sizzix embossing plate that I discovered in the red tag clearance bin at HM Ben Franklin Crafts in Hilo. (I got lots of bargain items including dies, stamps, inks and even Ken Oliver pigment powders!)
 The pineapple print paper (Dandelion Designs) oval was cut with the die from the same Sizzix set.  After stamping the 'Mahalo" on yellow card stock paper, it was fussy cut and glued onto the oval.
 Unfortunately, I didn't think of where I would write my message as the texture on the fruit made it difficult to write on.  I decided to use an oval die from my Spellbinders set to cut two yellow ovals and join them at their tops to form a card to write my thank yous.  When I make this card again, I will stamp in light brown ink a texture to mimic the rough pineapple skin.  This will allow for a large smooth writing surface.  In any case, I did like the final look of the pineapple card and I think it might make a good stand up card for a table at a baby luau or local wedding.  I can imagine the menu and/or seating list printed on a paper and attached to the card. Remember that pineapples are the symbol of hospitality in different cultures so this die is a useful one for many occasions. Enjoy the sweetness of a crafty life!

Thursday, March 7, 2019

Out of this World Card


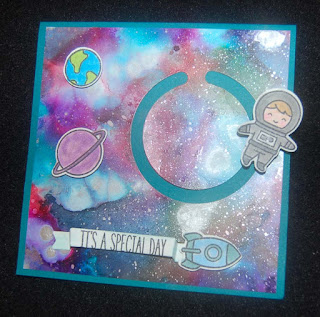
This card was started because of the desire to experiment with the Yupo paper and Ranger Alcohol Inks that I saw on the Joy of Crafting.  The beauty of the inks on the non-tree paper is breathtakingly 'out of this world', so of course a space themed card seemed appropriate.

First, I sprayed the paper with Isopropyl alcohol and then dripped some ink on it. After the Ranger inks dried, I flicked on some silver Liquitex ink.  I die cut the circular track and stamped the Lawn Fawn images on marker paper. After coloring the images, they were die cut with the LF dies.
The My Favorite Things tab was adhered to the astronaut and to a card stock piece inserted behind the circular track.  Actually, a small round sticky foam piece could be used instead of the MFT plastic tab. This set up allows the astronaut to go around the track and spin around.
The sentiment was stamped on a Lawn Fawn die cut banner. The planets, rocket and banner were adhered to the card with sticky foam dots.
If there was one thing I would change about this card, it would be to make a second inked Yupo paper to put behind the circular track so that it would not be as noticeable a the solid blue of the card blank.  I'm definitely going to use the Yupo paper and alcohol inks again because of the luscious colors that can be achieved. I see beautiful ocean scenes in my future cards. You should give this technique a try. I know you won't regret experimenting with the explosion of colors that will delight your eyes.

Sunday, March 3, 2019

Beautiful Day Bicycle Riding Slider Card

It's not a beautiful day in Hilo...it's pouring!  To combat the dreariness of the day, I decided to make a happy springtime card.  I've had the Lawn Fawn 'bicycle built for two' stamp and die sets for awhile (maybe from last spring...heeheehee) so it's about time I used them to make a card.
Rather than having a static scene, I decided to use an Ellen Hudson slider die to cut a channel in the grass. By attaching a My Favorite Things replenishments piece between two thin sticky foam pieces and dusting the back of the foam piece with cornstarch, I was able to attach the bicycling pair to the slider piece. The weather changed the lighting in this room so this photo is a bit 'overcast'.
The clouds were made by cutting out masks using the Lawn Fawn cloud dies. The masks were then placed on the damp watercolor paper card base before applying the blue distress ink with a scrunched up paper towel. Oh yes, the grass was cut with a Lawn Fawn die.  The sentiment came from the same LF set and this set also has the parts to make a lovely wedding card. My favorite part of the the card is that the dies cut out every thing including the spokes of the bicycle!  After finishing this card, I feel more springy and the rain has stopped....yay!  Crafting makes you happy and chases the gray clouds away.